# Welcome to HeyMint Launchpad!

Welcome to the documentation for HeyMint Launchpad - the free tool to launch an NFT collection in minutes, no coding required!

We cover everything you need to launch your own NFT collection:

* Art generation
* Smart contract builder & management
* Mint website

We want to keep our tool as accessible as possible to achieve our goal of "**Making NFTs go mainstream**", and so the majority of our features are completely free to use (with the exception of some advanced features).

Our smart contracts are written by the same devs who wrote the contracts for World of Women's $30 million Galaxy collection mint, Universal Music Group's first NFT collection KINGSHIP, Zeneca\_33's ZenAcademy tokens and more, and have never been exploited in any way - so you can trust that you're in good hands.

Hope you'll enjoy the experience of building your NFT collection on our Launchpad!

<figure><img src="/files/33AeRgjp2BMvaqE4EcWA" alt=""><figcaption></figcaption></figure>


# Setting up your collection

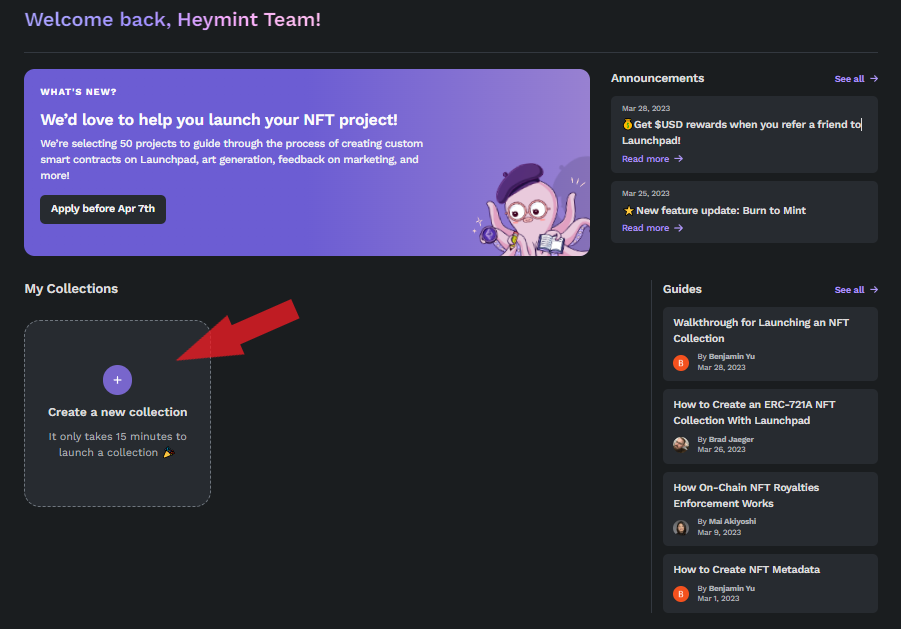
## Create a new collection

<figure><img src="/files/yR5vHy83QpAYMWukyuDc" alt=""><figcaption></figcaption></figure>

## Watch the walkthrough

Before you get started, we'd highly recommend that you watch our [walkthrough video](https://www.loom.com/share/f2ea32dedb7d4e81b55821dfd33f760a), which will show you all the steps you need to take to launch a collection.

## Select an NFT token standard

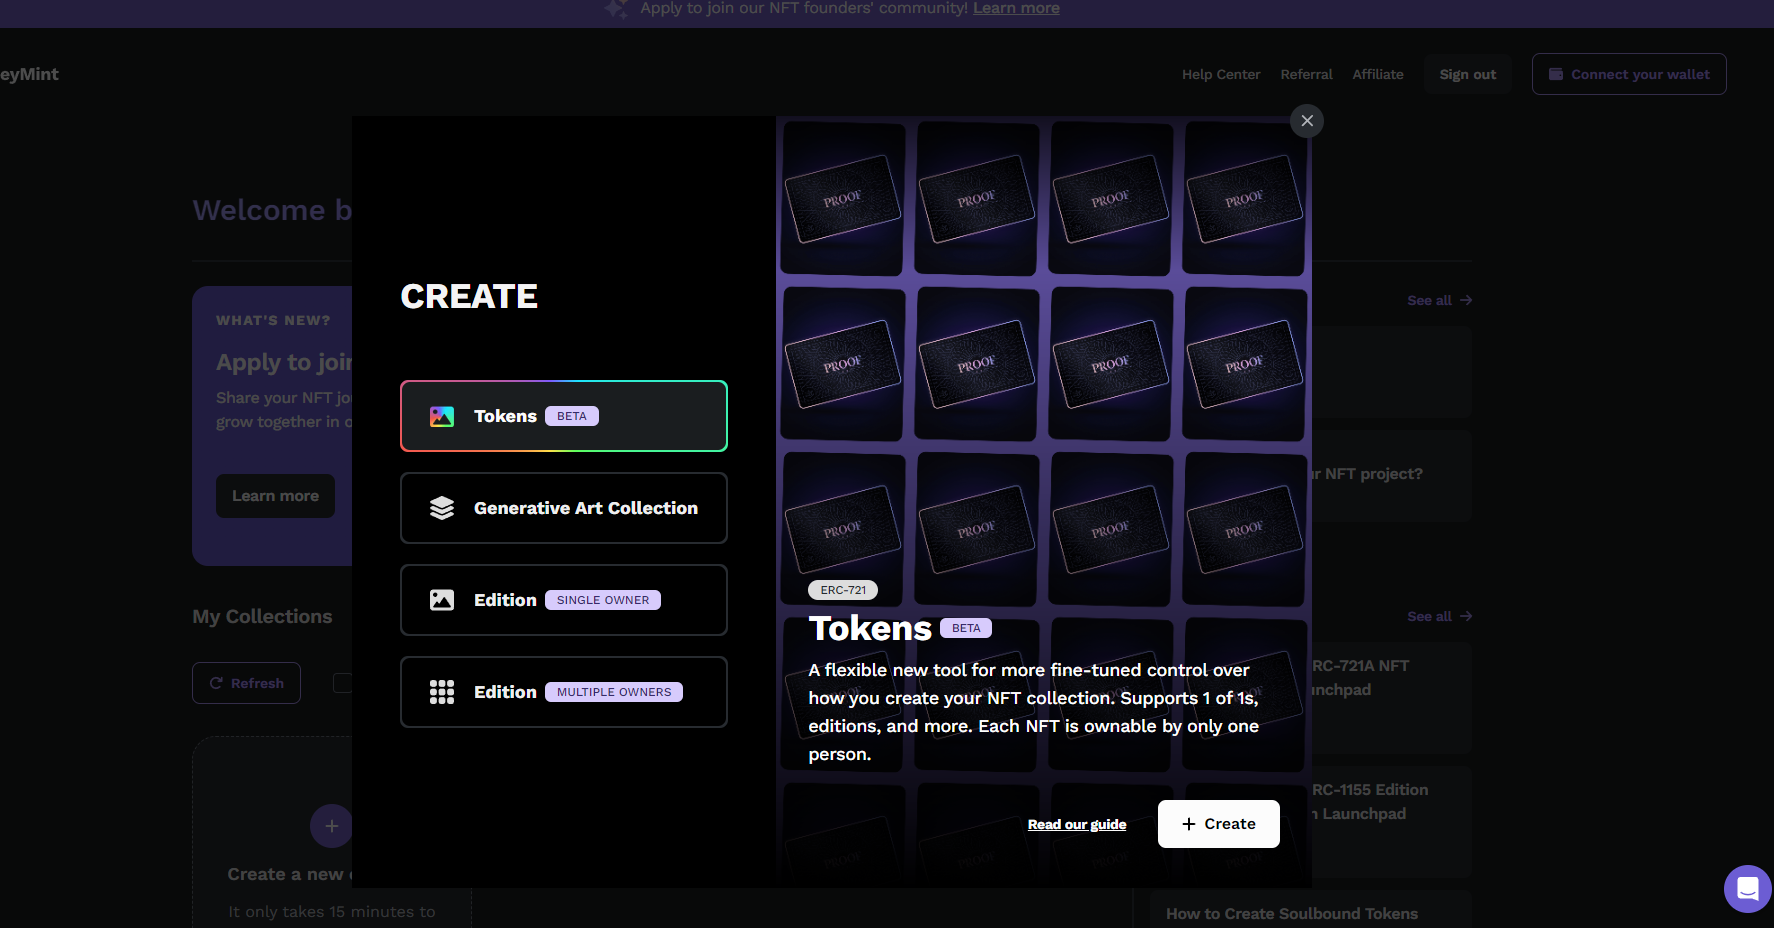
Begin by deciding the type of NFT collection you want to establish. There are four distinct flows to choose from. Each flow represents a different approach or standard in the NFT space. To understand more about these options and determine which one aligns best with your collection's goals, proceed to the next page where each flow is explained in detail.&#x20;

<figure><img src="/files/zykAO5xk5SdcyFTdZUqd" alt=""><figcaption></figcaption></figure>


# ERC-721(A) vs ERC-1155

When to use ERC-721A or ERC-1155

In almost all cases, NFTs adhere to one of two token standards: ERC-721 or ERC-1155.&#x20;

Many people wonder which standard to choose, so we'll explain the differences below to help make the decision easier for you.

In short - if all your NFTs are unique and there will only be one copy of each NFT, the ERC-721 standard is best. If there can be multiple copies of each NFT (e.g. a membership pass or limited or open editions of artwork), ERC-1155 is designed for that.

## ERC-721

ERC-721 is the most common standard people use and most of the major PFP NFTs you see (Crypto Punks, BAYC, World of Women etc.) follow the ERC-721 standard. With ERC-721, every single NFT in a collection is unique, and there are no two copies of the same NFT.

### What is ERC-721A?

ERC-721A is an improved implementation of the ERC-721 standard that dramatically saves gas for minting multiple NFTs in the same transaction. On our platform, we use ERC-721A by default for all ERC-721 collections, as it yields substantial cost savings for both creators reserving NFTs for themselves and for collectors minting multiple NFTs. You can learn more about the standard [here](https://www.erc721a.org/).&#x20;

## ERC-1155

While there is only ONE copy of each token in an ERC-721 contract, there can be multiple copies of the exact same NFT in an ERC-1155 contract. The ERC-1155 standard is commonly used for membership tokens (e.g. [`ZenAcademy tokens`](https://opensea.io/collection/zenacademy)), limited edition and open edition NFTs, and so forth.&#x20;

In an ERC-1155 collection, you can have multiple tokens and each token can have its own separate presale/public sale, token price, token image etc. You can have as many tokens as you want in an ERC-1155 (However, our admin interface in our platform doesn't yet support adding new tokens after contract deployment, though this is technically possible at a contract level for advanced users already).

## Launchpad Collection Flows

1. &#x20;[Tokens (Beta)](/creators/create-a-erc-721a-collection-using-generated-art/tokens-beta) - ERC-721A
2. [Generative Art Collection](/creators/art-and-metadata) - ERC-721A
3. [Edition (Single Owner)](/creators/create-a-erc-721a-collection-using-generated-art/edition-single-owner) - ERC-721A
4. Edition (Multiple Owners) - ERC-1155


# FAQ

We compiled all the frequently asked questions - please check when you have some troubles.

## Overall

<details>

<summary>Does Launchpad support Solana?</summary>

Unfortunately, we don't. We support Ethereum, Polygon, BNB Smartchain, Base, Arbitrum, Rari, Blast and Optimism.&#x20;

</details>

## Features

<details>

<summary>How to reserve NFTs for team/marketing purposes?</summary>

You can use gift/airdrop functionality to send tokens to team members addresses. Gift/airdrop works for bulk send, so you could even make a list of addresses/quantity in the CSV, import the CSV and bulk send tokens.

If you want to send custom 1/1 tokens to your team, you can insert 1/1 tokens in art generation process at the beginning of the collection and airdrop them before you start the sale (for example, if you want to gift 10 1/1 tokens, inserting them at the beginning of the collection allows you to make token #1-#10 1/1 tokens. As tokens will sequentially get minted, you can airdrop these first so that token #1-#10 will be airdropped to the address you specify.&#x20;

</details>

<details>

<summary>Is it possible to set up multiple mint phases?</summary>

Yes, you can do multiple mint phases such as different price, different allowlist etc.. For example, you want to do:

* Sale 1: Price: 0.03 ETH, allowlist 1&#x20;
* Sale 2: Price 0.02 ETH, allowlist 2

You can start the sale with 0.03 ETH for allowlist 1, close the sale, change the price to be 0.02 ETH, remove the allowlist 1 and add allowlist 2 and restart the sale. You can change the sale status, price, allowlist after contract deployment from contract management page, so you won't need a contract re-deployment. You will need a blockchain transaction to change sale status and price, but you don't need it to change allowlist.&#x20;

</details>

<details>

<summary>Can we add/edit metadata after deployment?</summary>

Yes, you can change metadata as many time as you want even after deployment. However, if you are using our art generator, re-generating art will invalidate the contract. So if you want to re-generate the art after deployment, we recommend you to create a new project to generate art, upload to IPFS and set the IPFS link to token base URI of your contract (you can do so from "Reveal" section.

</details>

<details>

<summary>Where can I see the wallet addresses who minted my NFTS?</summary>

Our platform doesn't offer a straightforward way to see the addresses that are minted. You could use [our snapshot tool](https://heymint.xyz/creator/snapshots) (Closed beta) from HeyMint tool and take a snapshot of your collection to get the list of addresses.

</details>

<details>

<summary>Where can I see the the number of minted NFTs and remaining supply?</summary>

You can see the the number of minted NFTs and remaining supply from contract management page in "**Sale**" tab.

&#x20;<img src="/files/RBwj4v4uwqx2rkJtEsEc" alt="" data-size="original">

</details>

<details>

<summary>Are mints will be according to the order of my uploads/file name?</summary>

Yes, for example, the metadata file named as 1 will be token #1.&#x20;

</details>

<details>

<summary>Can more than 2 people work on the same project through HeyMint?</summary>

Yes, We need you to start creating the project first and reach out to us; send us the email of the person who you want to add and your project ID so we can add it on our side.

</details>

<details>

<summary>Is it possible to have an Open Edition mint? I'd love to release something that's an unlimited supply.</summary>

Yes, using erc1155 in our launchpad, you can create your own open edition NFTs! You can read more about this [here](<https://docs.launchpad.heymint.xyz/create-a-erc-1155-collection/set-up-smart-contract#token-details >).

</details>

<details>

<summary>Is there any way to provide exceptions for my art Layers? I have a few images that don't work well with art in another few specific other layers.</summary>

In "Art & Metadata" section > Step 5 "Rules", you can set which traits can appear with other traits and which can't. Read more about custom rules from [here](https://heymint.xyz/blog/how-to-use-layer-rules-on-an-nft-art-generator-to-design-your-nft-collection-2).&#x20;

</details>

<details>

<summary>How do I make sure that the NFTs are minted on the Polygon blockchain instead of Ethereum?</summary>

When you deploy your contract, you should be able to change the network from the drop down menu and select Polygon network. It will then trigger your wallet to change networks from Ethereum to Polygon.

</details>

## Smart contract

### Contract deployment

<details>

<summary>I deployed my contract, but I can't find the deployed contract</summary>

When this happens, it's usually because you changed your configurations after deployment. Whenever you change your configurations, it will invalidate the contract and prompt you to deploy the contract again. If you end up in that situation in mainnet and don't want to redeploy the contract again, you can contact us at <hey@heymint.xyz> and provide us etherscan url for your deployment and project ID.&#x20;

</details>

<details>

<summary>Do I need to verify my contract on Etherscan?</summary>

No, you don't need to verify your contract on Etherscan as Launchpad already has a functionality that allows you to verify your contract.&#x20;

</details>

<details>

<summary>Do I need to redeploy smart contract to change allowlist after deployment?</summary>

Nope! You can add/remove members to your allowlist without redeploying your smart contract. You also won't need to make any transaction to change the allowlist and as soon as you add/remove members from allowlist, the change will be reflected immediately.

</details>

<details>

<summary>Will my testnet contract affect my mainnet contract when I mint or airdrop in testnet?</summary>

No, your testnet contract won't affect your mainnet contract when you mint or airdrop in testnet. Once you deploy a contract on mainnet, it's a completely new smart contract and any airdrops or mints done in testnet won't reflect in your mainnet contract.

</details>

### Contract specs

<details>

<summary>Is the creator royalties enforced on OpenSea?</summary>

Yes, Creator royalties are enforced on OpenSea if your smart contract subscribes to the [Operator Filter Registry](https://github.com/ProjectOpenSea/operator-filter-registry) contract that they provides. Our Smart Contracts are subscribed to this by default.

</details>

<details>

<summary>Can we freeze metadata?</summary>

Yes you can. We don't have that option on our Launchpad frontend, but you can do so by calling the `freezeMetadata` function on etherscan for your contract. In order to call the function, you will need to verify your contract, which you can do so from Launchpad.&#x20;

</details>

<details>

<summary>Can I run public sale and presale at the same time?</summary>

Yes you can! If you run them at the same time, for the people who are allowlisted will see presale price and those who aren't will see the public price. Please note that if you run both sales at the same time, the smart contract will respect the max supply for both sales (therefore presale max supply is not respected) and people in the allowlist can mint up to max supply. If you would like to keep the supply only for presale supply for allowlisted people, we recommend you to run sales at different times.&#x20;

</details>

<details>

<summary>Can I add more tokens to ERC-1155 contract after deployment?</summary>

Unfortunately, we don't support that functionality yet. Once you deploy your smart contract, you can't add or remove tokens from the contract.

</details>

<details>

<summary>Can I upload all metadata in a single JSON file?</summary>

Because each token needs its own metadata, you can't put all the metadata in a single JSON file and upload it. For example, if you have 10 tokens, you will need 10 different metadata files. This is because each token is one-of-a-kind and has its own distinctive attributes.&#x20;

</details>

<details>

<summary>Can I upload MP4 files, and are there any size limits?</summary>

Yes, you can upload MP4 files; however, OpenSea imposes a 100 MB maximum file size restriction. Before uploading a video file to the Launchpad, you should ensure that it does not exceed this size restriction. If your MP4 file is too large, you may need to compress or optimize it so that it fits inside the allowed size range. We suggest using a video editing program or an internet compressing tool to do this.

Please note that when OpenSea displays assets that are categorized as animation (mp3/mp4), the animation asset will only appear on the collection details page and not on the collection summary page, which can only display photos. So, when users want to utilize animation files such as mp3 or mp4, they must upload both an image and an animation file.

</details>

<details>

<summary>How can I burn the remaining supply from my collection?</summary>

If the tokens haven't already been minted, you can reduce the max supply by calling the **reduceMaxSupply** function on your contract on Etherscan on the Contract **#writeContract** tab and passing in the number of total tokens minted and your supply will be locked at that number permanently.

If the tokens are already minted, unfortunately the only way you can burn them is by manually transferring them to the burn address, 0x000000000000000000000000000000000000dead

</details>

<details>

<summary>We launched the project for free but why is it written an additional fee?</summary>

The additional fee that the collectors are seeing and charged with is the HeyMint fee for each token for Ethereum mints. We announced this new the pricing model on the product / Twitter and has been introduced since last Feb 21st - [here](https://docs.launchpad.heymint.xyz/introduction/how-the-heymint-fee-works).

</details>

### Marketplace

<details>

<summary>My NFT doesn't show up on Testnet Opensea</summary>

First of all, many times it's an issue with OpenSea, try checking [testnet Rarible](https://testnet.rarible.com/) to see if your token shows up.&#x20;

If you are still seeing an issue, most of the cases it's caused by incorrect metadata settings. Please make sure your metadata settings are correct:

1. Make sure your token base uri is pointing a folder that contain metadata files (JSON format), not the folder of your asset files
2. Make sure your metadata files don't have .json file extensions as our contract doesn't support .json files. The filename should just be numbers (1,2,3 etc. - you can see the example from [here](https://bafybeigrqbssjbkd3xz4gpnulfgldstri7rv5zcycpgchlyy3ruycalkbu.ipfs.nftstorage.link/))&#x20;
3. Make sure your metadata has image\_url and image\_url points to the right location that you store your image (example [here](https://bafybeigrqbssjbkd3xz4gpnulfgldstri7rv5zcycpgchlyy3ruycalkbu.ipfs.nftstorage.link/4676)). Please note that even if you set animation\_url (mp3, mp4 files etc.), you will still need to set an image\_url

If you are not sure, please check out [How to create metadata blog post](https://heymint.xyz/blog/how-to-create-nft-metadata) which explains what metadata is and how to set up correctly.&#x20;

</details>

<details>

<summary>Is there a way to see my NFTs on Opensea as a collection?</summary>

Once the contract is deployed, as soon as you mint a single NFT, it'll show up on OpenSea.

</details>

<details>

<summary>Is ERC_1155 tradeable on blur?</summary>

Yes, It is.

</details>

<details>

<summary>What is an OpenSea slug?</summary>

Your OpenSea slug can be found by looking at the end of your collection's URL on OpenSea:

![](/files/h7wrDNUt0bnfenl85imW)

In this example, the slug is "**catc**".

</details>

## Art

<details>

<summary>Where are my NFTs stored?</summary>

If you use our art generator, all the assets and metadata are stored in our IPFS account. You can also choose to upload your assets under your IPFS account. Check out [Upload art & metadata guide](/creators/art-and-metadata/advanced-upload-art-and-metadata) to learn how to do so.

</details>

<details>

<summary>Can I upload all metadata in a single JSON file?</summary>

No, each token has to have it's own metadata, so if you have 100 tokens, you will need 100 metadata files

</details>

<details>

<summary>Can I use .GIFS on your art generator?</summary>

If you want to use our art generator, unfortunately it currently does not support .gifs. But if you import the metadata, then it's possible to use .gifs for your collection

</details>

<details>

<summary>Why can't I upload metadata files with .json extension as token URI?</summary>

Our token URIs are designed to not expect a .json file extension at the end of the metadata file. To upload your files smoothly onto our platform, you just need to remove the .json from the metadata filename (For example: instead of 1.json please rename it to 1).&#x20;

If you're experiencing difficulty and are willing to share your metadata files or an IPFS link to them, please feel free to send us a message at <hey@heymint.xyz>. We can assist in removing the .json extension in the filenames.

<img src="/files/M6isfyVtHP24tRr739BE" alt="" data-size="original">

</details>

## Mint website

<details>

<summary>Why is my mint closed?</summary>

In most of the cases, the mint is closed because you haven't start any of your sale. You can start public sale/presale from contract management (See how to do so from [Start/stop public sale/presale](/creators/manage-smart-contract/after-deployment/start-stop-public-sale-presale) guide).

If you start the sale and still see the mint closed message, you might be setting start time for your contract and start time hasn't come yet. If you want to start, you can remove start time settings to start the sale immediately.

</details>

<details>

<summary>I embedded my button to my website but the button isn't displayed</summary>

This happens when you are using Wix. If you are using Wix, wrap your embed code around with \<body> tag to make it work. Check out [the guide for the embed mint button](/creators/manage-smart-contract/after-deployment/set-up-mint-website/use-mint-button-embed) to see the example.&#x20;

</details>

<details>

<summary>Some people can't see the mint button</summary>

Mint buttons could have issues the browsers the users are using, recommend them to use different browser or clear the browser cache.

</details>

<details>

<summary>Why can't I log in to my HeyMint account?</summary>

If you're experiencing issues, it's possible that our platform is currently experiencing issues. However, rest assured that we're working diligently to restore normal operation as soon as possible.&#x20;

In the meantime, you can monitor the status of our platform by visiting <https://uptime.heymint.xyz/>. This page will provide you with real-time updates on the status of our platform and notify you of any issues that may be preventing you from logging in. Please do not hesitate to contact our support team for assistance if you are still having trouble logging in.

</details>

## Error Messages

<details>

<summary>There was an error parsing the metadata CV: Essential information (title, image_filename) not found</summary>

This error message can appear if the asset's filename is not correctly formatted. Please ensure that you enter the filename of the asset without the file extension.&#x20;

For example, if the name of the asset file for token 1 is 1.jpg, input "1" in the relevant field.&#x20;

This should be the name of the image exactly as it appears in the IPFS folder of all the image assets you uploaded and linked to on Launchpad.

![](/files/jOMQiWrOWxNByirr5CYf)

</details>

<details>

<summary>If I do not have a website for my project yet to embed your button, can people mint directly from your contract?</summary>

If you don't have your mint website, you can set up a mint page on HeyMint. You can read more about it [here](<https://docs.launchpad.heymint.xyz/creators/manage-smart-contract/after-deployment/set-up-mint-website/use-heymint-mint-page >).

</details>

<details>

<summary>Users are seeing Max NFTs Minted even if the supply isn't maxed out yet.</summary>

Ask the users who are having issues to check if their **wallets are on the right network.**

</details>

<details>

<summary>What to do when the deployment wallet was hacked?<br></summary>

Read this page: [Hacked Wallet](https://app.gitbook.com/o/PuWjBdHmUGS105jxI6Tq/s/gUBEZKVtA2DMYGTVBbl6/~/changes/64/introduction/faq/what-to-do-when-the-deployment-wallet-was-hacked).

</details>


# What to do when the deployment wallet was hacked?

Discovering that your deployment wallet has been hacked can be distressing. However, taking immediate action is crucial to minimize damage.

This guide offers a step-by-step approach to handle a compromised deployment wallet. By following these recommendations, you can mitigate the incident's impact, protect your funds, and regain control over your contract. Acting swiftly is essential to safeguard your assets and preserve your project's integrity.<br>

#### FIRST: **Transfer the ownership to another address**

Here are the simplified steps to transfer ownership and set a new owner address using Etherscan:

1. Log in to your Heymint Launchpad account.
2. Connect your deployer wallet and navigate to your project.
3. Proceed to **Contract Management** and go to the "**Overview**" tab.
4. Ensure that the contract is verified.
5. Click on your contract address, which will take you to your contract's scanner.

![](/files/maem7ia0ydaCZvpLoYWJ)

6. In the scanner, locate the "**Contract**" tab and click on "**Write as Proxy**."

![](https://lh4.googleusercontent.com/Laht_Wkkk7NvZMQzlzkK0FQg9-1pY006zKAJV-oz_9RfFmJYIZWm5ZEai65UCh5N9n9gzWHBlxuETwoUyJ0vzBqT72LSHo7JWCzI_DH8_5InInYbYthBgXO04erlXr8M1teEUKhwyx0ScC0LZRQ-irc)

7. Follow the provided instructions to connect your Deployer wallet to the page.

![](https://lh3.googleusercontent.com/KIaZwRTS9VlcbWMQc3eOyEmiVgs1N_h9Lry7q77D9oin1cc67RbnOks0sfmL7pul2b9mY69UZa3VdT9Xwq_i1ve0-m6wQ133dY2-ShZmdqH4jyU3eMoJwj4XjsdQhSOyzleZ8FtL8dlWnNusQrt3d8Q)

8. Once your wallet is connected, find the "transferOwnership" function, which is used to transfer ownership of a contract.

![](https://lh5.googleusercontent.com/zkF_yz0V1idipGYKkYFwcA9wfz9FtIbU3FZ0Jv4BPO8qX15FOy0a-OVKr1-OL9u4FS1txLd6_w7X0gbYSOKfPXKW-t88meaqvghQHmMd8exMbGpmmLBcWvbWU2ijPCGraGh1uZrbLeZZzqCF6prbe1E)

9. Enter the new owner's address in the provided field, ensuring that it is correct.
10. Click on the "**Write**" button and review the details, including gas fees.
11. **Confirm** the transaction and wait for it to be processed on the Ethereum network.
12. Once the transaction is successfully mined, the contract's ownership will be transferred to the specified new owner address.

{% hint style="warning" %}
Please note that the steps and interface may vary slightly depending on the version of Etherscan or any updates they have implemented. Always carefully review the instructions and information provided by Etherscan when performing actions on their platform.
{% endhint %}

#### SECOND: Change payout and royalties address:

If you have used the same hacked wallet address for both your payout and royalties, it is crucial to change them to ensure the security of your funds. Here's what you need to do:

1\. Log in to your Heymint dashboard.

2\. Connect your new wallet to the dashboard.

3\. Navigate to the "**Contract Management**" section.

4\. Click on the "**Payout**" tab.\
![](https://lh3.googleusercontent.com/CEkYSo1Tjwe7jSMMRKWnjHIZ5wfkrEOGrqIPNivaELnJrJKnOtF30u3XzwZqMBgyR-oEyDJuAt87o6QTzqDKKMu-oZa5pMb122zHjs2RZnnyO3AKldbxRG0VGN9yODodKQQ89OES13x-4FuMzSjWEu4)

5\. Locate the "**Primary Sale**" address field and remove the old wallet address from the text box.

![](https://lh5.googleusercontent.com/wjdN9l50evNBRCgMf-s2i0XpLX1IaLcE6fugL7bUpQQWjNxFl-YaurMT8bgGlhijamcEYUWeLRMsqPT2BMei6ipN9PSnUBRzh3oun12r0Jj_Su4hVd9Gr1BByHv2AiBnS1wxz2Gs6j9E4IEwx5wh0Zo)

6\. Paste your new payout address into the text box.

7\. Click on the "**Save Payout Settings**" button to save the changes.

8\. A confirmation prompt from Metamask will appear. Follow the prompts and confirm the transaction to make the changes in the contract.

![](https://lh6.googleusercontent.com/dZ5mwaANPZFeFISNXDRHuxCz3f3h-EjEP0NSAh3SIEEvAseBwDwvzJTEvuYEBvi8MIK6W8d5nsoo5v0ItaRM1pgzp6O1ntMZPqOexhPjYepXlkGDEJl0E8emn7L28cFvzwnzM37sLgaq4LYZXGqKHCw)

### To update the royalties address:

1\. Just scroll below the “**Payout**” tab

2\. Click on the **pen icon** or edit button next to the royalties address.

![](https://lh5.googleusercontent.com/M17SA588ghQIbCyYoaZCNeseaM3Le4Xg_5NBpgQ4E_nemVpYM7A_t9kNRwzriqLWl1PFaAFvs2NgIdgW2f5zdLP7-40F2sB4w7Ve9hVhzCReOOuXelQzGjTci1uMQQTY40znJ-BxbxlVO4HJFQpock4)

3\. Paste your new royalties address into the provided field.

4\. Click on the "**Save**" button to update the royalties address.

5\. Another confirmation prompt from Metamask will appear. Confirm the transaction to finalize the changes.

{% hint style="info" %}
By following these steps, you can change your payout address and royalties address on Heymint and ensure the security of your funds. Remember to verify the accuracy of the new wallet addresses before confirming any changes, and always follow the prompts from Metamask for transaction confirmations.
{% endhint %}

### THIRD:  Change soulboundAdminAddress

If the soulbound feature is enabled and the admin address is set to the hacked address, it is crucial to change the admin address to ensure the security of your contract. Here's what you need to do:

\
1\. Navigate to the "**Contract Management**" section.

2\. Click on the "**Advanced**" tab.

![](https://lh6.googleusercontent.com/0hfD-GCJ1_7E4SldR8jSA0NAKBd4_7GYjvZrOKK-AYjc8-sRMcpBwVjHi0DuZC32np0mvi6ZH6HRdaPWd7ZEsAQF94Dyzoyp-WT7CN4ApPzxsJPBYtS9nxu54FSFSOgUINQVYKFExAm3C5bebNmyM2I)\
3\. Look for the "**Soulbinding**" feature within the advanced settings.

![](/files/z61LBKbuMdIVQNX4kC6C)

4\. Locate the **pen icon** or edit button next to the admin address for Soulbinding.

5\. Click on the pen icon to edit the admin address.

6\. Replace the hacked address with your new wallet address in the provided field.

7\. Click on the "**Save**" button to update the admin address.

8\. A confirmation prompt from Metamask will appear. Follow the prompts and confirm the transaction to save the changes.

{% hint style="info" %}
By following these steps, you can change the admin address for the Soulbinding feature on Heymint and ensure the security of your contract. Always verify the accuracy of the new wallet address before confirming any changes and follow the prompts from Metamask for transaction confirmations.
{% endhint %}

<br>


# Deploy Proxy Contract

Deploy Proxy Contract method enables cost-effective and efficient smart contract deployment, allowing for more functionality and control while reducing gas costs.

*TL;DR: Deploy Proxy Contract method is a new way to deploy smart contracts that eliminates redundant logic, decreases transaction fees by up to 85% (*&#x67;as fees can range from $20 to $50 depending on the transactio&#x6E;*), and enables the inclusion of advanced features on all contracts. Creators maintain complete control over their contracts and can avoid implementing redundant logic by delegating or referencing previously deployed contracts. This method reduces gas costs and utilizes a modified Diamond Proxy Pattern, offering a more efficient, secure, and cost-effective way of deploying contracts.*

The Deploy Proxy Contract method for deploying smart contracts offers a superior alternative to the traditional method of copying the same logic for each creator's contract. With this approach, a single contract can be deployed and referenced, significantly reducing the size of the contract and decreasing the transaction fee for deployment by up to 85%.

This innovative approach enables creators to include all features on all contracts, which is typically impossible as a single contract is limited to 24kb in size. Creators can now enable advanced blue chip features such as staking, loaning, burn to mint, free claim, soulbinding, and more, at any time.

<figure><img src="/files/mY1WLhhOW8Zf4gf0DUEc" alt=""><figcaption><p>Creators can now enable advanced blue chip features </p></figcaption></figure>

Creators maintain complete control of their smart contracts, with no possibility of interference from our side. By deploying their own child contracts, creators can avoid implementing redundant logic functions and instead delegate or reference previously deployed contracts. This not only saves time and effort, but also reduces gas costs and enables the inclusion of more functionality than was previously possible with traditional contract deployment methods.

The logic contracts that are delegated to by the child contract are immutable and fully open source, just like non-proxy contracts. All state-specific to the creator's contract is only triggerable by them, as they are the sole owner of the child contract that stores all the information about their specific NFT. Creators have complete control over starting/stopping sales, minting tokens, and withdrawing funds.

Overall, the Deploy Proxy Contract method is an innovative solution that dramatically reduces gas costs and enables more functionality in smart contracts. It utilizes a modified Diamond Proxy Pattern (<https://eips.ethereum.org/EIPS/eip-2535>), and offers creators a more efficient, secure and cost-effective way of deploying their contracts.


# Manage Access

Add/remove admins to your project

If you need to manage the admins for your collection, you can easily add or remove them in the "Manage Access" section in Contract Management. Whether it's before or after deployment, you have the flexibility to add or remove admins as needed. Here's how you can do it:

**Adding Admins:**

1. Click on "Manage Access" in Contract Management.

<figure><img src="/files/bEtnm53zdj59tG5L0Iaw" alt=""><figcaption><p>Manage Access</p></figcaption></figure>

2. Enter the Email address

{% hint style="danger" %}
You can only add users who have previously signed up to HeyMint Launchpad. If they have not already signed up, please have them [login to create an account first.](https://launchpad.heymint.xyz/)
{% endhint %}

<figure><img src="/files/QfTRr2bSziObDzGoPS7i" alt=""><figcaption></figcaption></figure>

3. Click on "Add user" button

Once an admin is added, you can easily keep track of their details in the "Current Users" section. This section provides a convenient overview of the admins' names, email addresses, and the date they were added to your project. Once admins log in to their Launchpad account, they will have access to the collections they have been added to. They can find these collections listed under the "My Collections" section. *If they don't see the project in their project list, please have them press the "Refresh" button at the top of their project list*.

<figure><img src="/files/ZFIg1FGjpMtveIPmHFG0" alt=""><figcaption></figcaption></figure>

**Removing Admins:**

1. Click on "Manage Access" in Contract Management.
2. Find the admin you wish to remove&#x20;
3. Click on the red trash can button on the right to remove their admin privileges.


# How the HeyMint Fee works

We introduced a new pricing model on Feb 21st, 2023.&#x20;

**Please note that HeyMint fee will be applied for all of the pricing plans.**&#x20;

## Creators

For creators, almost all the basic features that you will need to launch a simple NFT collection (art generation, smart contract generation & deployment, and mint website) are free. For example, using public sale, presale & allowlist, withdraw, and other commonly used features are free.\
\
Only one feature that costs is airdrop. We are charging 0.0001 ETH/\~$0.333 per token for airdrop/gift tokens (so if you want to airdrop 10 tokens, it will cost \~$3.333).&#x20;

Here's the airdrop fee breakdown across all chains we support:

| Blockchain      | HeyMint Airdrop Fee | Testnet                     |
| --------------- | ------------------- | --------------------------- |
| Ethereum        | 0.0001 ETH          | Sepolia: 0.0001 ETH         |
| Polygon         | 0.1 POL             | Amoy: 0.1 POL               |
| Optimism        | 0.000016 ETH        | OP Sepolia: 000016 ETH      |
| Arbitrum        | 0.000016 ETH        | Arb Sepolia: 0.000016 ETH   |
| BNB Smart Chain | 0.00012 BNB         | BNB SC Testnet: 0.00012 BNB |
| Base            | 0.000016 ETH        | Base Sepolia: 0.000016 ETH  |
| Blast           | 0.000016 ETH        | Blast Sepolia: 0.000016 ETH |
| RARI            | 0.000016 ETH        | RARI Testnet: 0.000016 ETH  |

**For advanced features, dedicated support, and priority service, see our** [**Pricing**](broken://pages/Oofur62NSD8j5vawCbwf) **doc for more details.**

## Collectors

We are charging a fraction for fee for each token on mint:

* Ethereum mainnet: 0.0016 ETH/\~$3 per token
* Polygon mainnet: 1 POL/\~$0.45 per token

Here's the fee breakdown across all chains we support:

| Blockchain      | HeyMint Fee | Testnet                    |
| --------------- | ----------- | -------------------------- |
| Ethereum        | 0.001 ETH   | Sepolia: 0.0016 ETH        |
| Polygon         | 1 POL       | Amoy: 1 POL                |
| Optimism        | 0.00016 ETH | OP Sepolia: 00016 ETH      |
| Arbitrum        | 0.00016 ETH | Arb Sepolia: 0.00016 ETH   |
| BNB Smart Chain | 0.0012 BNB  | BNB SC Testnet: 0.0012 BNB |
| Base            | 0.00016 ETH | Base Sepolia: 0.00016 ETH  |
| Blast           | 0.00016 ETH | Blast Sepolia: 0.00016 ETH |
| RARI            | 0.00016 ETH | RARI Testnet: 0.00016 ETH  |

{% hint style="warning" %}
Please be aware that our platform fee is denominated in cryptocurrency, and its equivalent in USD or fiat may vary due to the volatile nature of cryptocurrency prices.
{% endhint %}

If the project owner is a [Launchpad Lifetime Access Pass](https://opensea.io/collection/heymint-launchpad-lifetime-access-pass) owner, [Curious Addys](https://opensea.io/collection/catc) holder (either holding a Curious Addys NFT & a [Curious Addys SBT token](https://opensea.io/collection/heymint-launchpad-catc-access-pass) or just holding a Curious Addys NFT longer than 6 months) or [Zen Academy SBT](https://opensea.io/collection/heymint-launchpad-za-access-pass) holder, the fee will be waived.

## How our funds will be used

The funds we receive will be used to continue building and supporting tools to support the NFT ecosystem for both creators and collectors. We currently have two products, [HeyMint Allowlist Manager](https://heymint.xyz/) (free for both creators and collectors) and HeyMint Launchpad, and will continue adding more features and tools that solve strong pain points for people launching, managing, and joining NFT collections.

If you have any feature requests, please submit a request [here](https://requests.heymint.xyz/) - we prioritize building features based on user demand!


# Basic Plan

This plan is ideal for creators who want to explore NFT creation with their own artwork.

### Cost

Free

### Features <a href="#plus-plan-199" id="plus-plan-199"></a>

* **Self-serve setup**: You have control over setting up your NFT project.
* **Standard support**: Basic support channels are available for assistance.
* **Customizable hosted mint page**: A basic mint page is provided that you can customize with your project details.
* **Optional metadata download**: For an additional $100, you can download your NFT metadata.


# Plus Plan

This plan offers everything in the Basic plan, plus additional features for creators who want more control and advanced functionality. Once you get this plan, you can use this plan for all of your future projects. &#x20;

### Cost

$199 per user

### Features <a href="#plus-plan-199" id="plus-plan-199"></a>

* **Advanced resources to boost your NFT creations**: Access to additional tools and features to enhance your NFT project. See below for more info.
  * **Embeddable mint button**: Integrate the mint button directly into your website. If you want to host mint on your landing page, you can design the button, insert a code snippet to your landing page and have your mint on your website. Please note that burn-to-mint, free claim, and credit card cannot be used with the mint button.&#x20;
  * **Remove HeyMint branding**: Create a branded minting experience without our company logo.
  * **Advanced smart contract features**: Use features like burn-to-mint, free claims, soulbound tokens, credit card mint, affiliate mint and more.&#x20;
  * **Metadata download included**: This plan includes art & metadata download which typically costs $100.


# Premium Plan

This plan is ideal for creators who want a hands-off approach to launching their NFT collection. You create the art; we do the rest. Focus on your creative vision while our team handles the technical aspects.

### Cost

$499 per project

### Features <a href="#premium-plan-499" id="premium-plan-499"></a>

* **Everything from the** [**Basic**](/pricing/basic-plan)**/**[**Plus**](/pricing/plus-plan) **plan included**: Benefit from all the features of the Basic/Plus plan.
* **End-to-end setup by our experts**: Our team will manage the technical process and deliver the contract for you.
* **Priority support**: Receive priority access to our support team for any questions or issues (9 am - 5 pm PST).
* **Hosted mint page on our trusted platform or guided integration with your website**: Choose between a secure mint page hosted by us or easy integration with your existing website.
* **Metadata download included**: Download your art & NFT metadata for free.
* **Quick delivery**: A ready-made solution in just 3-5 business days **after receiving all the specifications.**

### **Process**

1. Once we receive the payment, our team will reach out to you to request more information about your project details.
2. Upon receiving all the project details, we will build the contract and mint page within 3-5 business days (depending on the complexity of the project).
3. After completing the setup, we will share with you the project link, OpenSea collection on testnet, and test mint page for your review.
4. Once you give us the go-ahead, we will deploy the contract on the mainnet, build the mint page or button, and transfer ownership to you.

### Important note

* This plan does NOT include any customization on the contract or frontend.
* We require at least 2-4 business days to deliver the testnet. To ensure everything is set up as you wish, we kindly ask customers to reach out at least 7 business days before the mint date.
* Our support is available from 9 am to 5 pm PST on weekdays. We will be closed on US federal holidays.
* [HeyMint fee for collectors](/pricing/how-the-heymint-fee-works) will be applied.


# Enterprise plan

This plan caters to established businesses and complex NFT projects who want to build a completely custom experience for their mint.&#x20;

### Cost <a href="#enterprise-plan-2000" id="enterprise-plan-2000"></a>

$2000\~ per project

### Features

* **Customized solution for advanced projects**: Tailored approach to meet your specific needs and requirements.
* **Everything from the Premium plan included**: Benefit from all the features of the Premium plan plus more.
* **Dedicated customer success manager support**: A dedicated point of contact for priority assistance and guidance throughout your creation journey.
* **Personal dedicated smart contract**: No proxy contract. Smart contract designed specifically for your project's needs.
* **Tailor-made minting integration & white-label page available**: Create a fully branded minting experience for your collectors, easily integrated with your website.
* **Priority delivery**: Fast-track your project launch with expedited service.

Have questions? We're here to help. Contact us today to discuss your NFT project: <hey@heymint.xyz>


# Set up smart contract

Configure smart contract for your NFT

The first step for setting up your NFT collection is to configure your smart contract.&#x20;

## Collection details

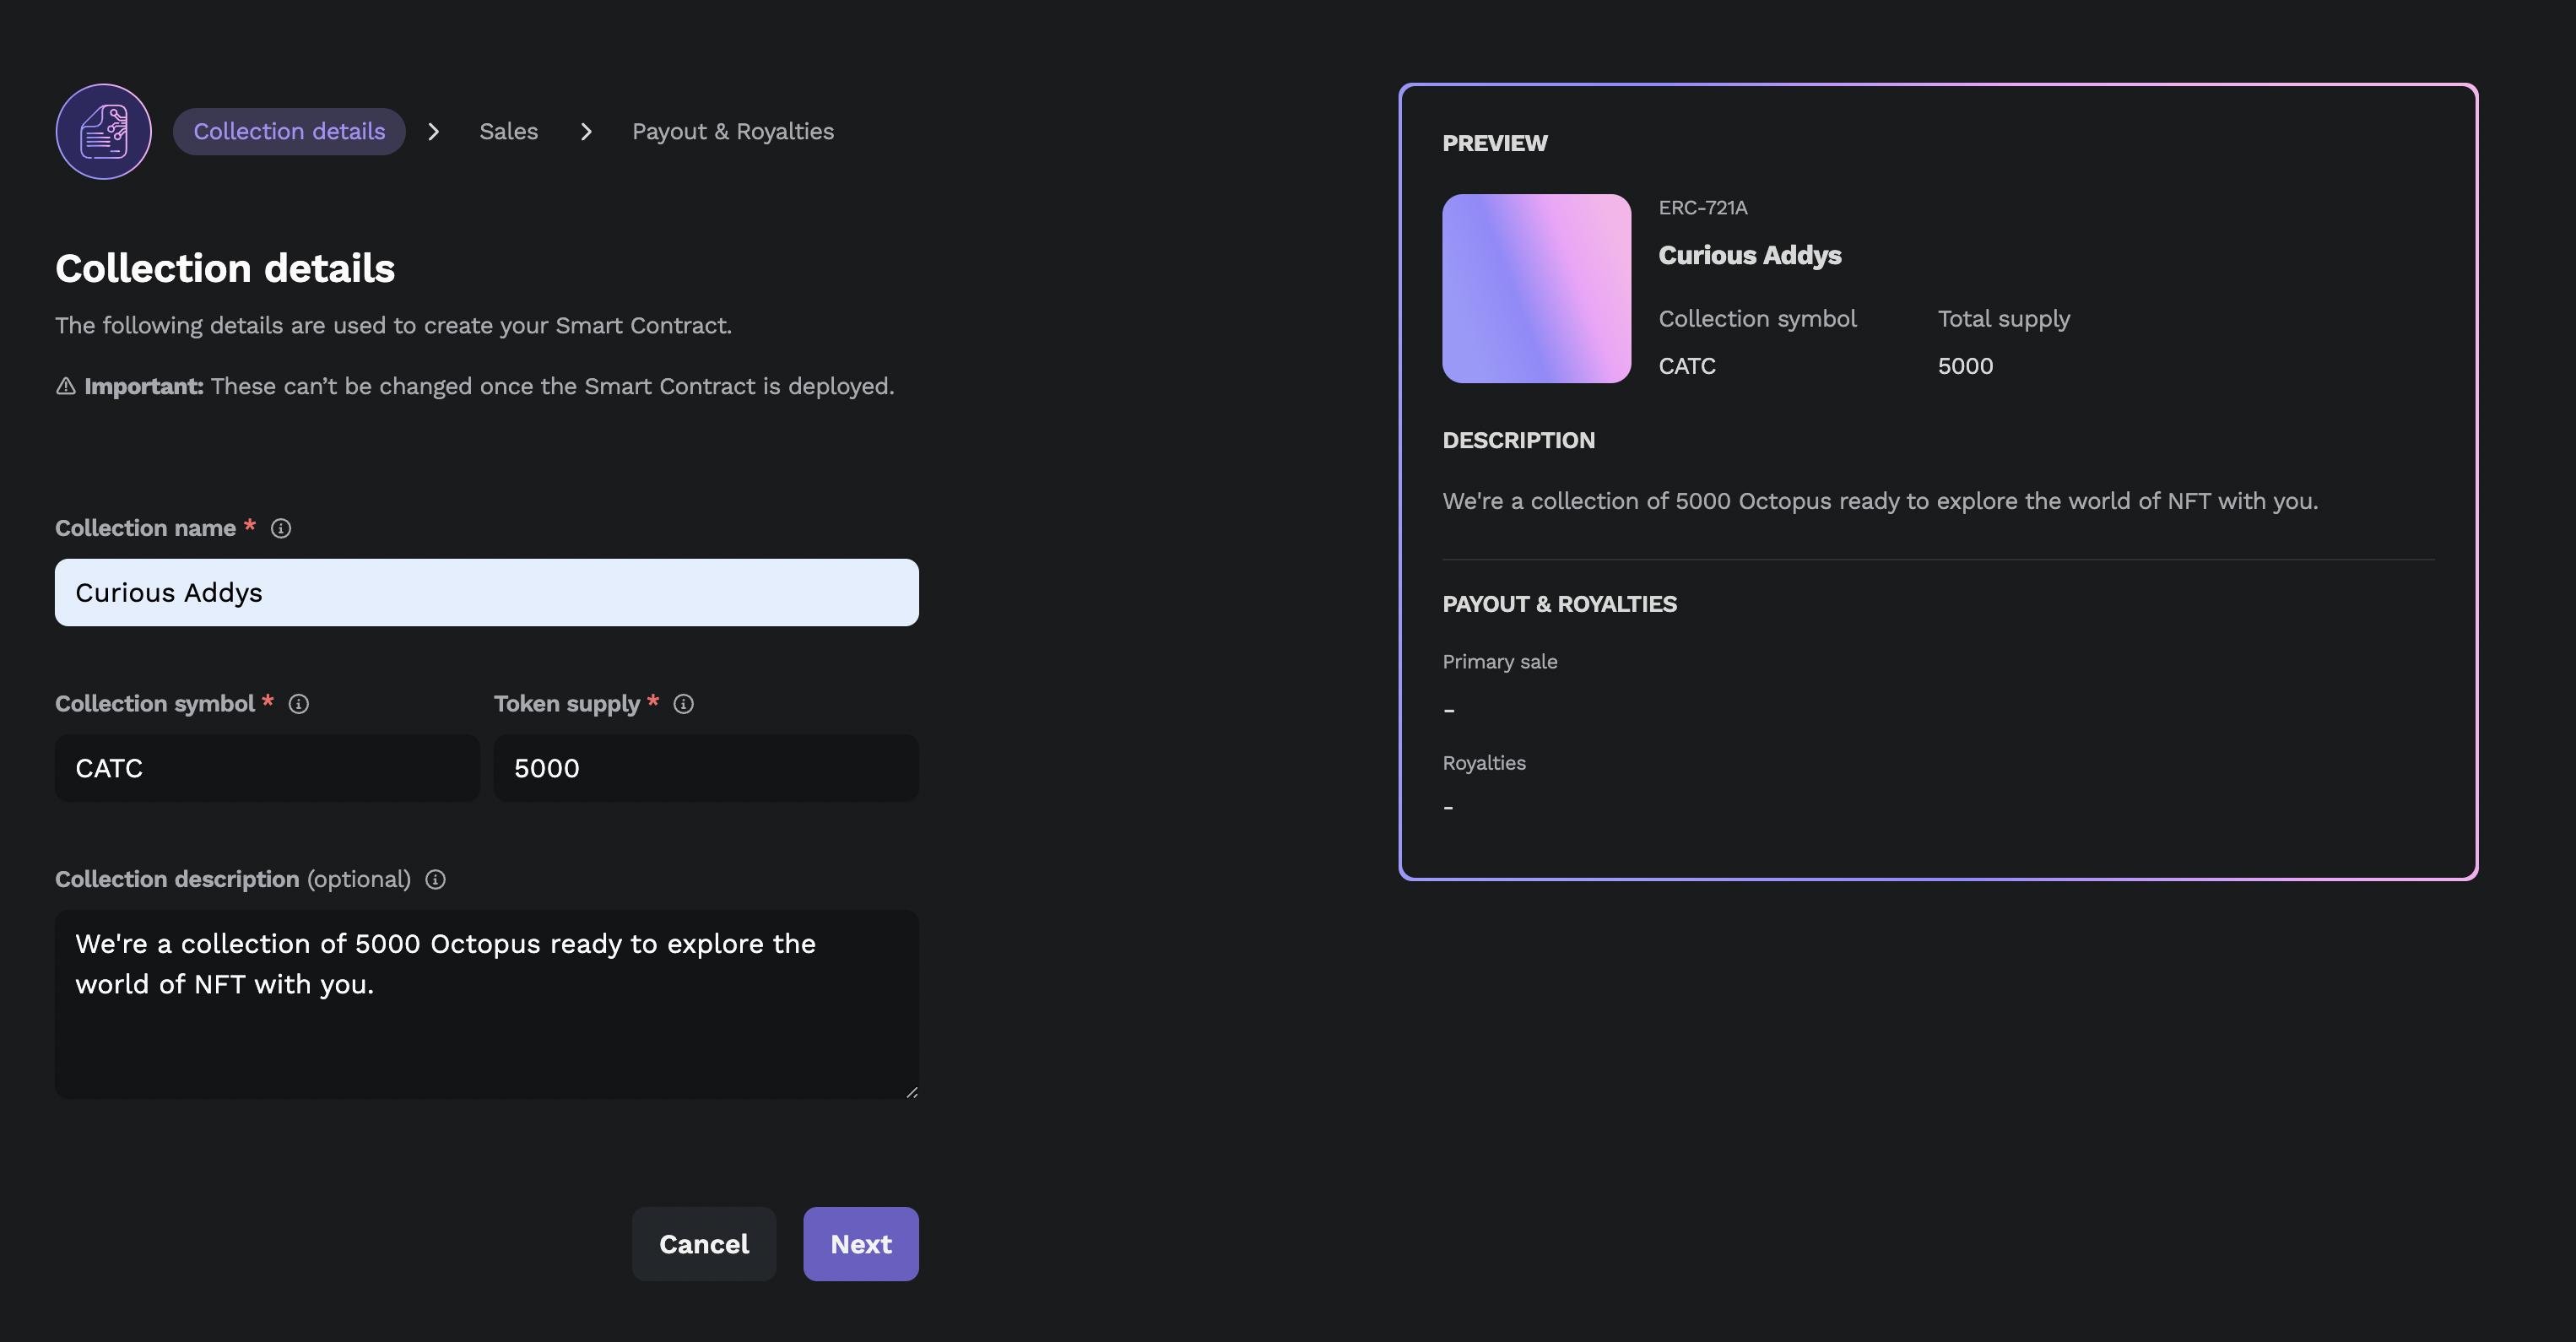
First, fill out some basic information about your collection:

* **Collection name:** This will be the official name of your NFT collection that will appear by default on NFT marketplaces like OpenSea, and on Etherscan. This can never be changed after smart contract deployment.
* **Collection Symbol**: This is a short symbol, typically all caps and 3-5 characters in length, that serves as an abbreviation for the name of your NFT collection. This will show up on token trackers such as Etherscan and can never be changed after smart contract deployment. Example: BAYC (for Bored Ape Yacht Club)
* **Token Supply**: This is the total number of NFTs available for mint, inclusive of presale, public sale, and any gifted/reserved NFTs.
* **Collection description**: This is a short description that will be in your token metadata and displayed in the description section for each token on OpenSea.

{% hint style="warning" %}
Please note that collection name, collection symbol, and token supply cannot be changed after you deploy your smart contract. Please make sure all the information is correct before you deploy your contract.
{% endhint %}

<figure><img src="/files/iT8UE2Md5ctzcOVGoNwq" alt=""><figcaption><p>Collection details set up</p></figcaption></figure>

## Sale details

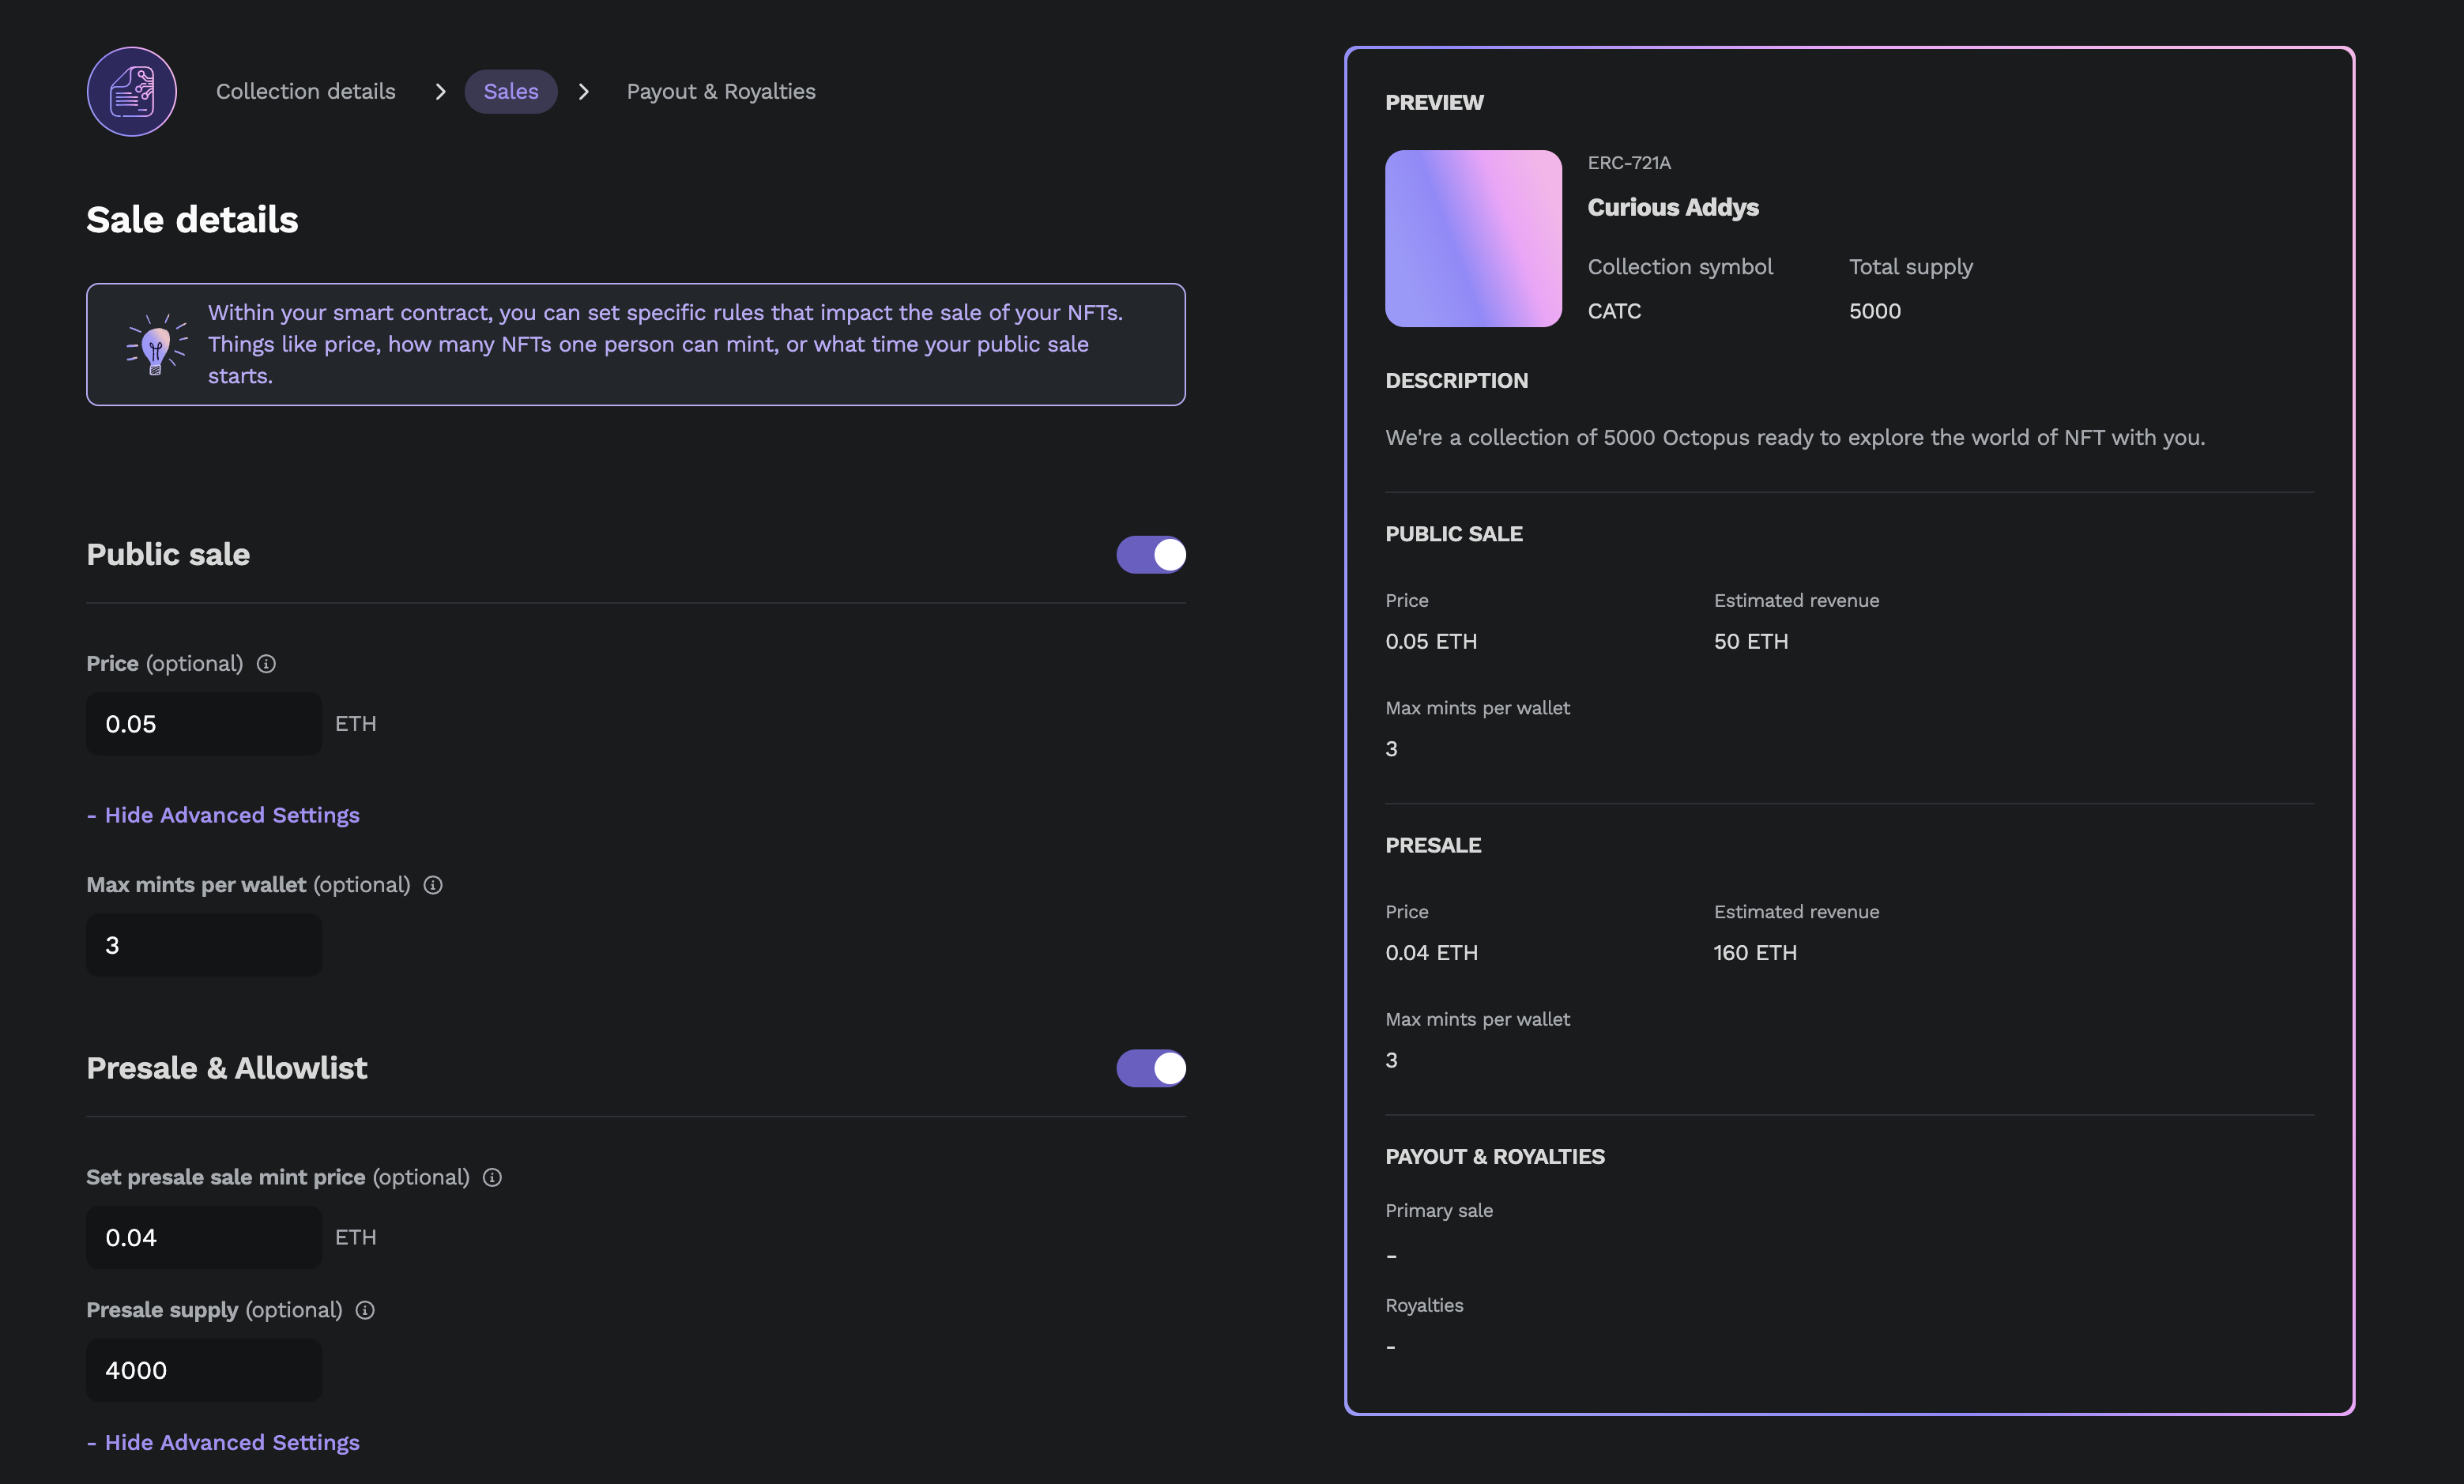
Next, fill out your public sale/presale information. You can toggle on/off both sales to enable/disable them in your contract.

### Public sale

**Basic**

* **Public sale price:** This is the price collectors will pay to mint each NFT in the public sale. This number can be changed at any time after smart contract deployment. Please leave this blank for a free mint. Once you set the price, you can see the estimated revenue you'll earn if your mint sells out.

**Advanced**

* **Max mints per wallet:** This is maximum number of NFTs that can ever be minted by a single address across multiple transactions for your public sale. This number can be changed after deployment. You can leave this blank to keep this unlimited.

### Presale

{% hint style="info" %}
You will need to enable the presale option to add the presale feature.&#x20;
{% endhint %}

**Basic**

* **Presale price:** This is the price collectors on your allowlist will pay to mint each NFT in your presale. This number can be changed at any time after smart contract deployment.
* **Presale supply:** If you would like to limit presale mints, please enter the number of total NFTs available for minting during presale. Once mints reach this limit, the presale will automatically turn off and all remaining NFTs can only be minted in the public sale. **This number cannot be changed after deployment.**&#x20;

**Advanced**

* **Max mints per wallet:** This is maximum number of NFTs that can ever be minted by a single address across multiple transactions for your presale. This number can be changed after deployment. You can leave this blank to keep this unlimited.

<figure><img src="/files/MTCOhIMmGF7I0UKgwrRb" alt=""><figcaption><p>Sale details set up</p></figcaption></figure>

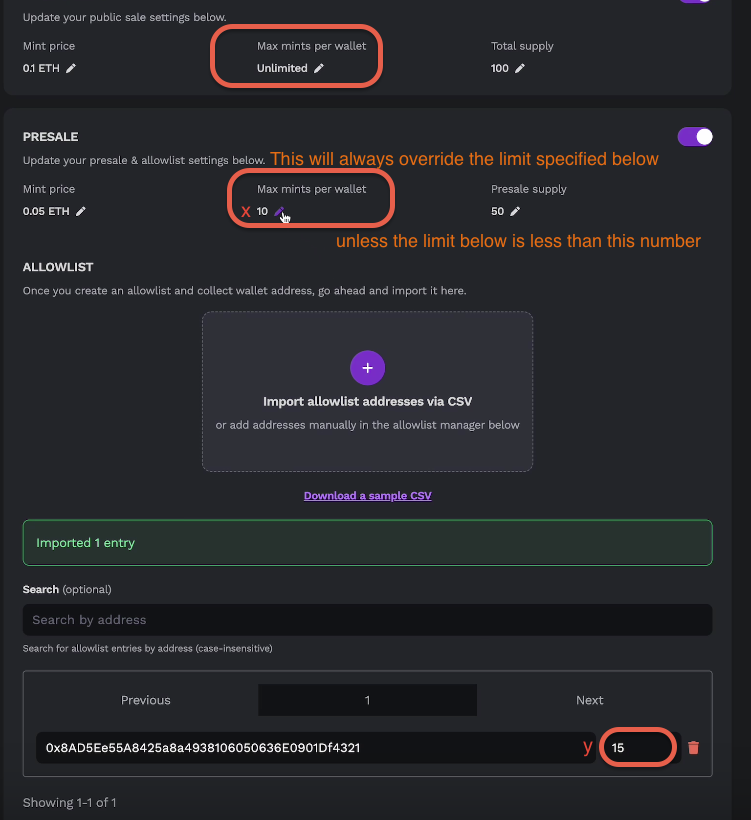
* **Overrides:** It's important to know that if your max mints per wallet are set to "unlimited" in the public sale, "x" in the presale, and "y" for a specific wallet address, the presale max mint of "x" will always override the quantity you set for the specified address, even if "y" is greater than "x." But if you set a limit on the specified address that is less than "x," that specific address can only mint up to the limit "y" you set. For an example, please look at the picture below.

<figure><img src="/files/8utR4NluJIVwjErXbsCS" alt=""><figcaption><p>Max Limit Overrides</p></figcaption></figure>

* Since you set the presale maximum mint per wallet to 10, even if you set the maximum mint for the specific address to 15, that wallet will only be able to mint 10.

  However, if you set the quantity to a number lower than 10, like 3, that specific wallet can only mint up to 3.

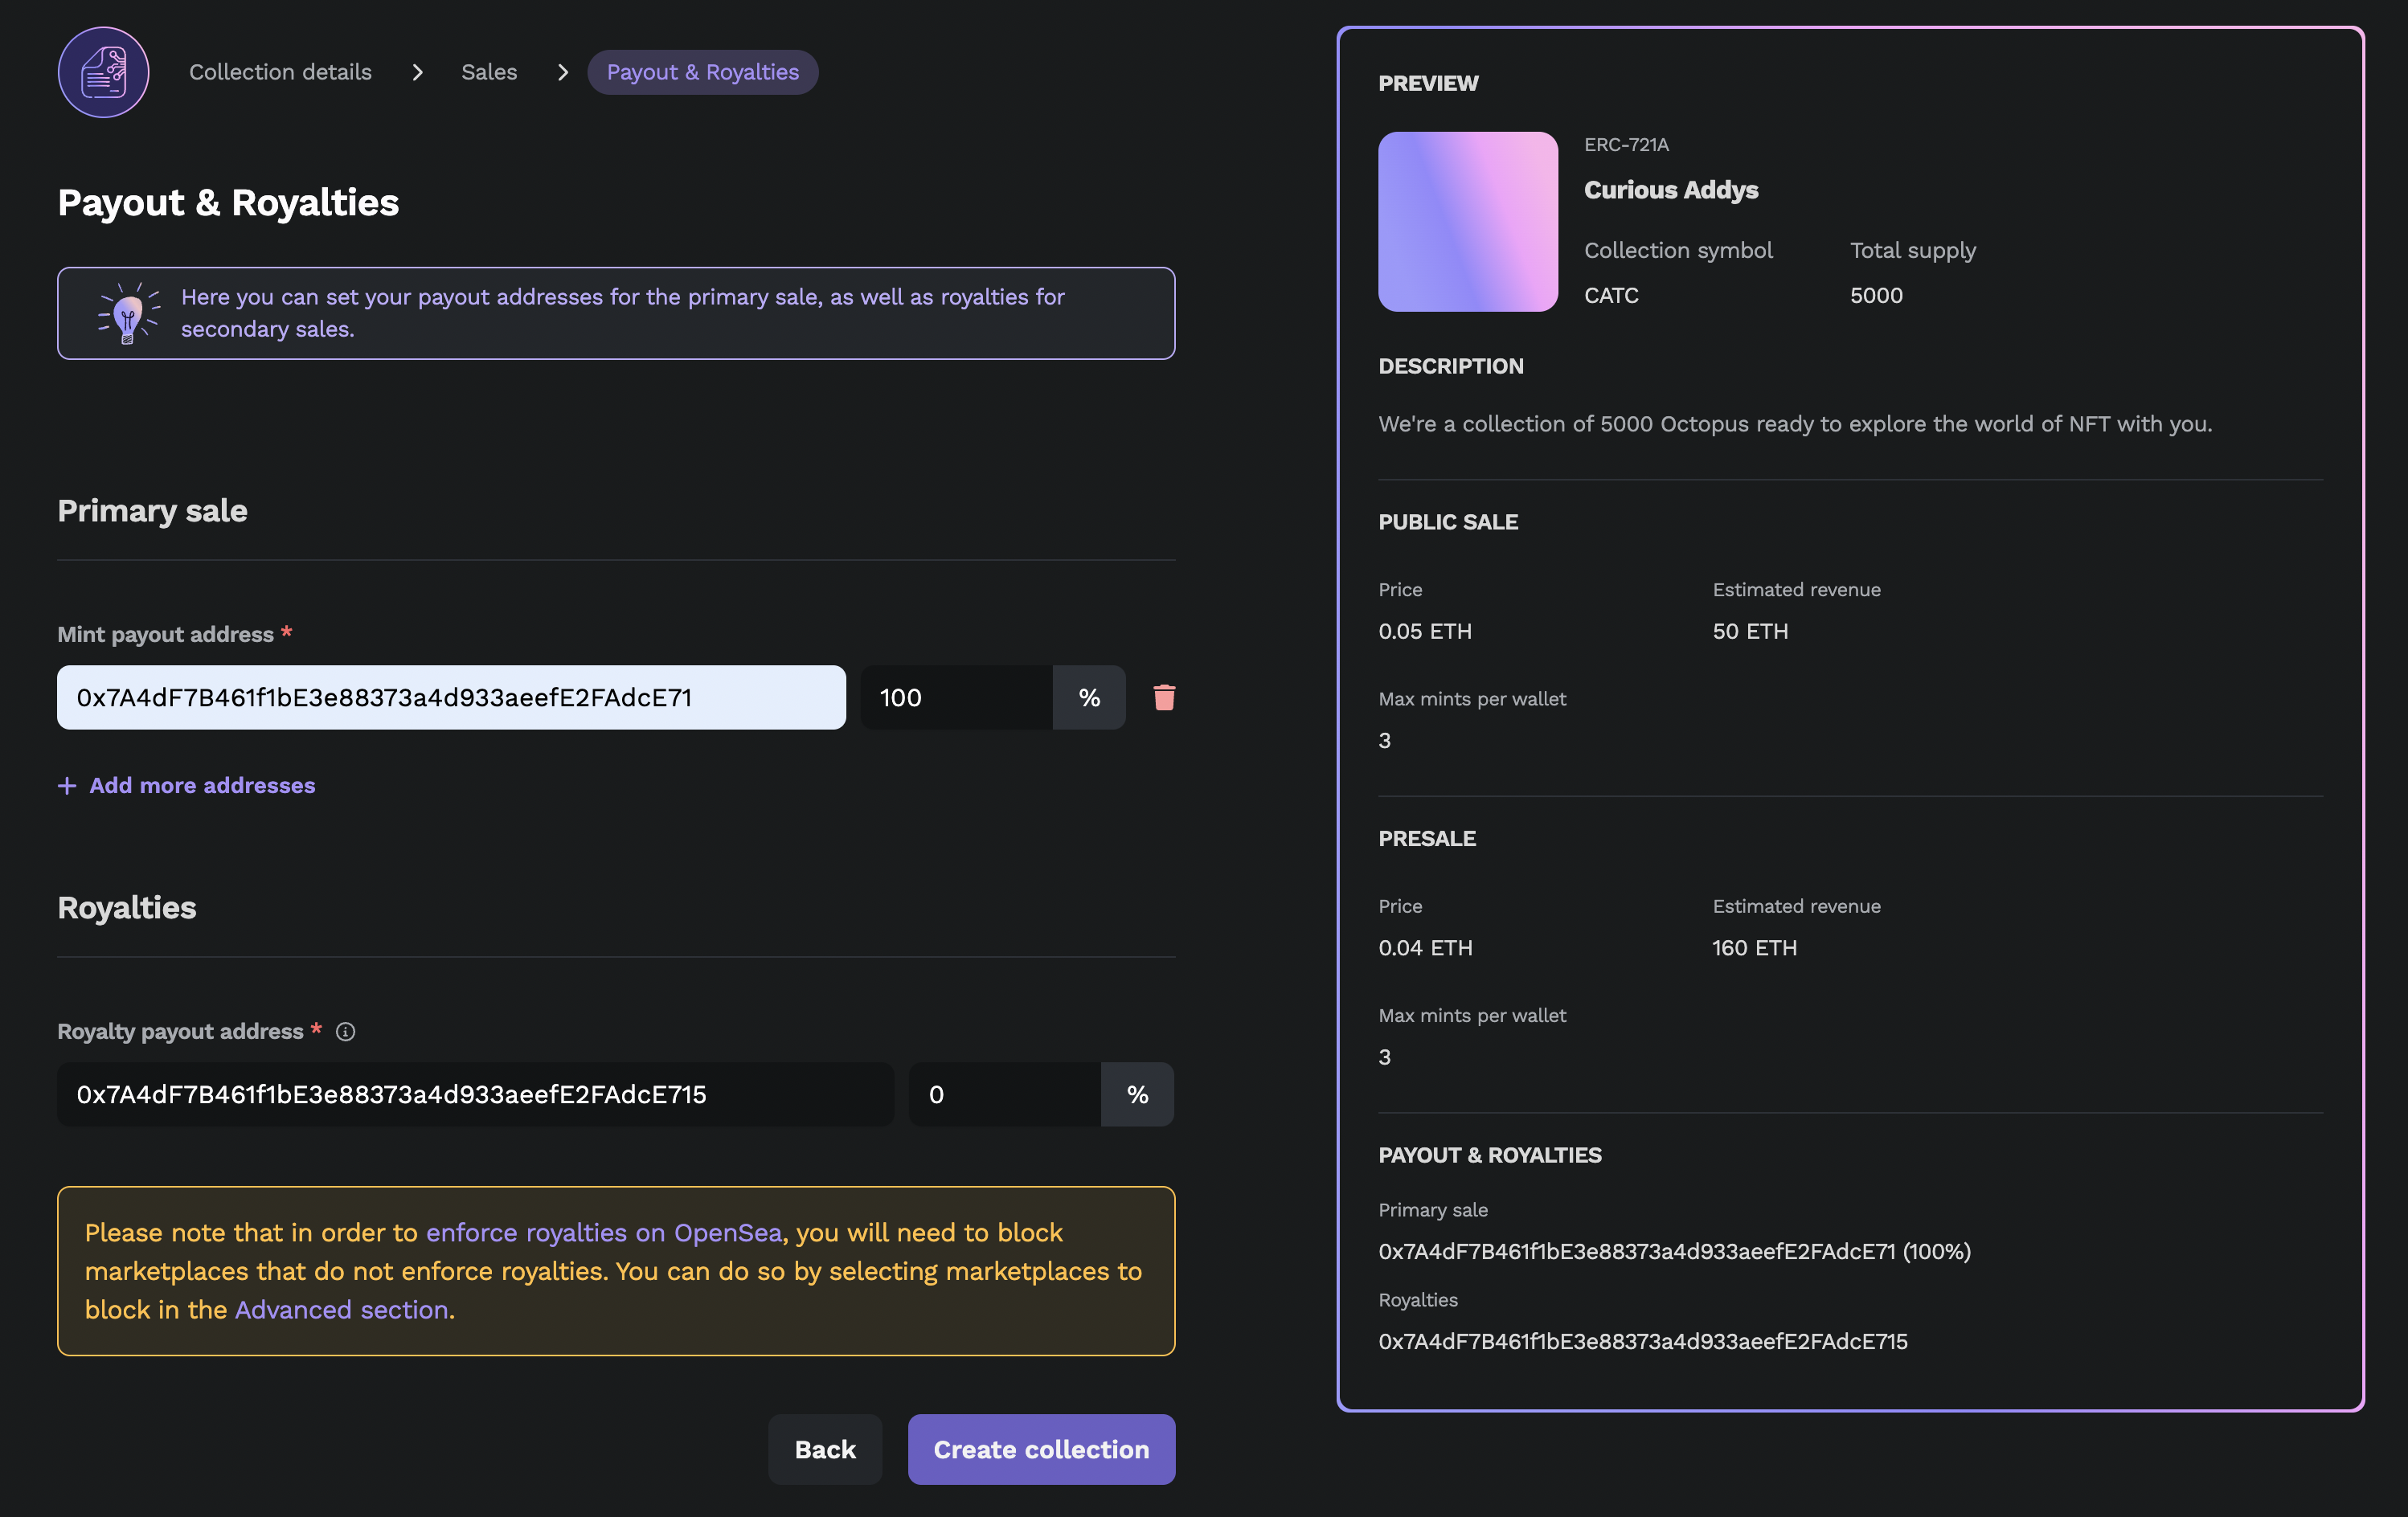
## Payout & Royalties

Lastly, fill in payout & royalties information (make sure to set the correct addresses as all your revenue goes to these addresses!)

* **Mint payout address & percentage**: Fill in the address that you want to receive payment for your primary sale. You can have more than 1 addresses to automatically split mint revenue, but the percentages assigned to all the addresses must sum up to 100%.&#x20;
* **Royalty payout address:** This will be the address where royalty payments are sent. This can be changed after deployment. Please note that merely setting this does not enforce royalties on OpenSea - to do that, you will need to enable the marketplace blocklist function in a later step and ensure all exchanges that do not enforce royalties are blocked from trading your NFTs.

<figure><img src="/files/SRfpzV5RvY7y0myD2cOf" alt=""><figcaption><p>Payment set up</p></figcaption></figure>

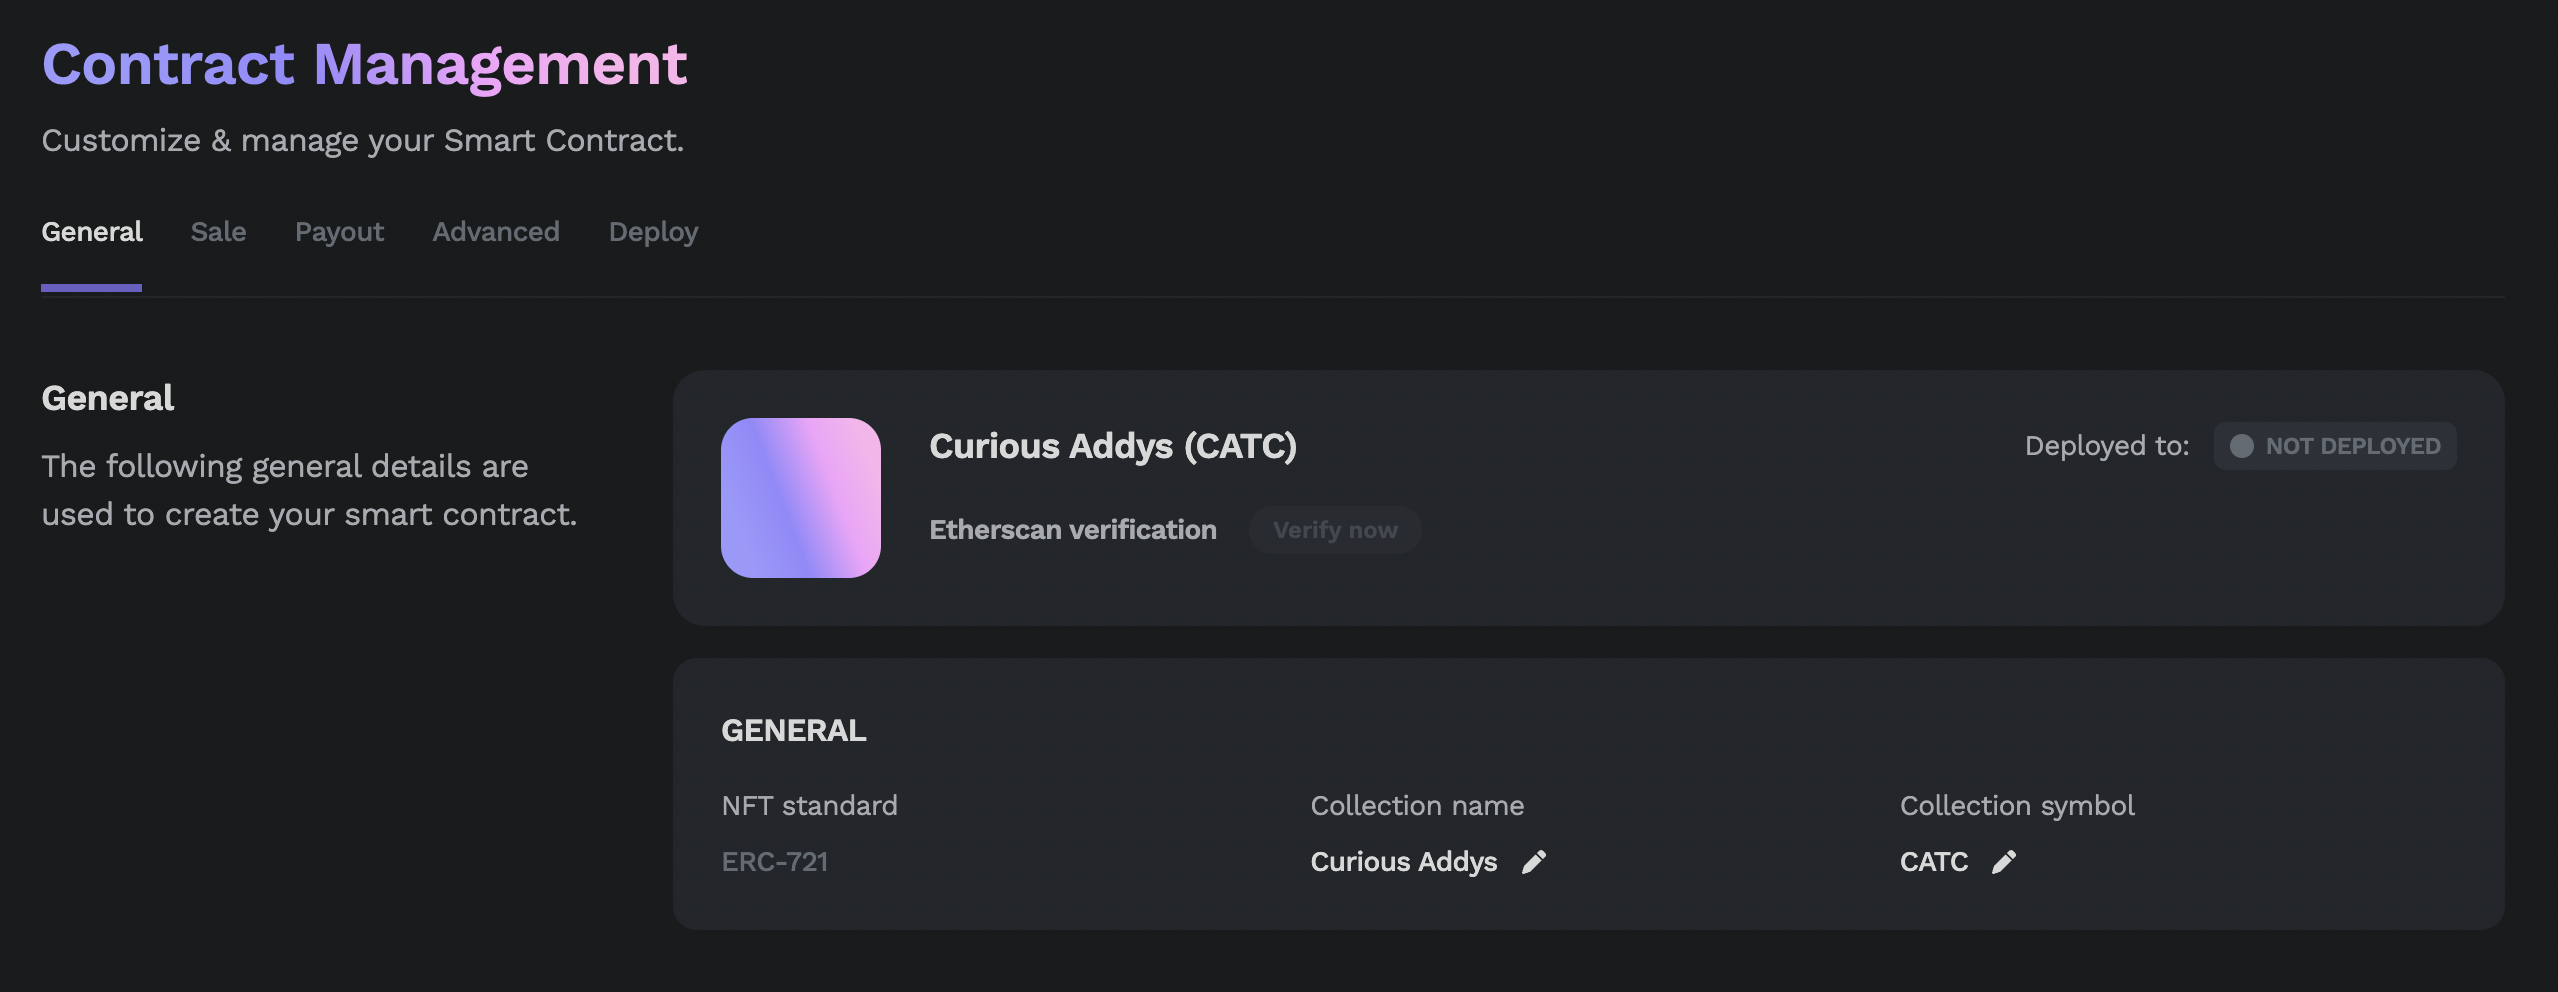
Once you set your basic information and hit "**Create collection**", you will see your contract management console!

<figure><img src="/files/rdm4ey11DimXejHQdN2G" alt=""><figcaption></figcaption></figure>

Before you deploy your smart contract, you can change configuration details at any time. There are 5 tabs where you can review and edit your configuration details:

* **General:** General information
* **Sale:** Public sale/presale information
* **Payout:** Payout/royalty information
* **Advanced:** Enable/disable and configure advanced features. Check our [advanced features page](/creators/manage-smart-contract/before-deployment/advanced-features) to learn more about what features we have
* **Deploy:** Once you are ready to deploy, you can deploy your contract from here

We will show you how to deploy your contract in a later section. First, let's dive into Art & Metadata to set up art for your collection! You should see the following banner in your management console - click "**Go to Art & Metadata**" to start the process.

<figure><img src="/files/G5LaUtBrElN4FinmlMbn" alt=""><figcaption></figcaption></figure>


# Art & Metadata

Once you configure your smart contract, it's time to generate and/or configure your art and metadata!

As different users are in different phases of creating art, we cover different scenarios you can take. Find the appropriate guide below based on your needs:

[I don't have any art ready, not sure where to start](/creators/art-and-metadata/create-layer-files)

[I have my layers ready, and need help with generating art](/creators/art-and-metadata/generate-art)

[I already have generated art but I don't have metadata](/creators/art-and-metadata/generate-metadata)

[I have both art and metadata but haven't uploaded everything to IPFS yet](/creators/art-and-metadata/advanced-upload-art-and-metadata)

[I'm a pro and I've already uploaded my art and metadata](/creators/art-and-metadata/advanced-set-token-uri)


# Create layer files

Most existing PFP NFTs are randomly generated by combining different layer files.&#x20;

Let's take a look at our Curious Addys collection as an example:

There are 5000 different Addys in our Curious Addys collection, and they are created based on 9 different layers:

* Background
* Body
* Neck item
* Head item
* Expression
* Center left arm item
* Center right arm item
* Mid left art item
* Mid right art item

Let's take a look at some examples of layers:

**Body**

<figure><img src="/files/08NUrAJKsYqVM9PSqsoe" alt=""><figcaption></figcaption></figure>

**Expression**

<figure><img src="/files/MhiyRt0uUggzmKlkQers" alt=""><figcaption></figcaption></figure>

Combining all our layers randomly, we were able to make 5000 unique Addys programmatically. Typically, PFP collections have around 150-200 traits in total across all their layers.&#x20;

So, what you will need to do is the following:

1. Think about what layers you want (Background/body/face/arm etc.)
   1. You can take a look at different collections on OpenSea to get inspiration. An easy way to start is to think about what the final image should look like and to separate that final image into different parts.
2. Design each layer
   1. Make sure you create all the layer traits with the same dimensions (2048x2048 etc.)
   2. Make sure the background of each layer is transparent (except the most bottom layer, which usually is a background layer) so that you can layer them on top of each other.
   3. Make sure to name each file to be the name of the trait that you want shown as a trait/property on OpenSea and other exchanges.

If you want to see examples of layers, take a look at our Curious Addys layers [here](https://drive.google.com/drive/u/0/folders/1PcjrQCrLMUmoT5I7ydyuMhtTxCWYlaFn).

## How to organize your art assets folder

Once you've created all your layer files, it's time to do a little organization. Before you can upload layers, you’ll need to make sure they’re organized in a way that the generator can understand. You’ll want to have 1 main folder, then subfolders inside to represent each layer.&#x20;

<figure><img src="/files/g1U8y9pN6tP0F8NZySyx" alt=""><figcaption></figcaption></figure>

<figure><img src="/files/tP50dArQ9lJdiLVROiXW" alt=""><figcaption></figcaption></figure>

If we open up one of the folders, you can see 4 different designs inside:

<figure><img src="/files/UTGTN3dnrWKYsJZFubck" alt=""><figcaption></figcaption></figure>

{% hint style="warning" %}
Before you upload, please make sure that the name of the folder and the name of the each trait file are set correctly, as our generator will be using the name of the folder as the trait type and name of each individual file as the trait name. So all the layer folder/file names will show up in OpenSea like below:
{% endhint %}

<figure><img src="/files/CARp6Hm8aO9E0DTNE9Ff" alt=""><figcaption></figcaption></figure>

Once you've created your layers and organized your files, you're all good to go!


# Generate art

As you already have layer images, you can start generating your PFP art!&#x20;

## Upload folder

Before you upload your layer folder, make sure to organize folders in a way art generator can understand. You can learn how to do so in the [How to organize folder in "Create layer files" menu](/creators/art-and-metadata/create-layer-files).

Once you are ready, you can upload your folder to our art generator.&#x20;

<figure><img src="/files/FDijWP4Kv4s318W8MSoE" alt=""><figcaption></figcaption></figure>

## Layer order

Once you upload all the folders, you will see all the layers combined together, therefore if any of the layers are wrong (such as not being transparent, not located as expected etc.) you can catch those errors by previewing an example of randomly generated art.&#x20;

As art generator doesn't know how layers should be ordered, you can configure the order here by simply drag and drop layers on the left pane.

<figure><img src="/files/xrXSt3SIgpeWKnz1bWMr" alt=""><figcaption></figcaption></figure>

Once you are done with configuring layers, go ahead and hit "**Generate collection**" button

{% hint style="info" %}
You can always go back to layer configuration at any point!
{% endhint %}

## Preview

Once you hit generate, you can see the preview of all of your tokens, you can even click each one to see what traits each token has to check if each file name is named correctly. You can see all the combinations by simply clicking "**Next**" button.&#x20;

<figure><img src="/files/REwGRm9B5TgRD8yIHBdi" alt=""><figcaption></figcaption></figure>

From here, you can straightly go to "**Upload metadata**" section to finish up art generation, or you can make some customization for your generation.&#x20;

## Set rarity

As rarity is such an important concept for NFTs, I'd recommend reading some articles on rarity to learn how rarity score works.&#x20;

[What is rarity? (Short)](https://www.tokenmetrics.com/blog/what-is-nft-rarity)

[Understanding Rarity Calculation Methods (Long)](https://raritytools.medium.com/ranking-rarity-understanding-rarity-calculation-methods-86ceaeb9b98c)

With Launchpad, you can set rarity for each trait however you like.&#x20;

Let's say you'd like Beach background to be more rare than other background, you can simply lower the percentage of beach background and increase the percentage of others (it needs to sum up to be 100%)

Once you are done with configuring rarity, you can go ahead and hit "**Save & regenerate collection**", which will take you back to preview.&#x20;

### How to check if rarity changed

You can use a filter option on the left top to see how many of them have each trait. In this case, as we lowered the rarity for beach background, we want to check the background:![](/files/cSjbMpfIWjW47SCubUHo)

As you can see here, Beach background are only 55 out of 1000 tokens, which is about 5% of entire tokens. You can also filter to show only certain traits which allows you to check if certain trait looks good after combining with other layers.&#x20;

<figure><img src="/files/VXJ3Noj5QO5ZpBv8Xmh2" alt=""><figcaption></figcaption></figure>

## Set custom rules

This is an advanced feature that not many people use - but if you want to do more custom rules, this feature is super powerful. We have [a comprehensive blog post](https://heymint.xyz/blog/how-to-use-layer-rules-on-an-nft-art-generator-to-design-your-nft-collection-2) explaining what the feature is and how to use it, so highly recommend to check it out.&#x20;

## Add custom tokens

If you have some 1/1 tokens designed for your team or randomly insert them into the collection to surprise your community, this is the feature you can use.&#x20;

You can set a custom token image, name, attributes and location to insert:

* **At the beginning of collection**: If the tokens are for team, we recommend you to add in the beginning of the collection, so that you can gift them before you start presale/public sale to your team members (For example, if you add 1 token in the beginning of the collection, you can gift the first token (token #1) to whoever's address that needs to receive)
* **Randomly inserted**: This allows you to insert tokens randomly, so you won't know where it was inserted until someone mints the token and see the token.&#x20;
* **Specify edition**: If you want to insert tokens but want to know where it's stored, you can specify the number (for instance, if you want to insert it to be token #500, input the number 500).

![](/files/ny7w4ngpf8va2YK0iMzu)

{% hint style="info" %}
Not sure how to set rules for what you want to do? Let us help! Upload your assets to Google Drive, share the folder with **<hey@heymint.xyz>**, and **send the link to the drive and a description of what you want to accomplish** to our email (<hey@heymint.xyz>) or to our customer support and our team will help you set it up!
{% endhint %}

## Upload metadata

Once you are happy with all the configurations, you can go ahead and hit "Upload tokens & metadata to IPFS" button, then we will take care of generating metadata and uploading to IPFS.&#x20;

Once it's done, you can see this screen to confirm everything is set:

<figure><img src="/files/KwtDZOGaW5mGbutZzFxR" alt=""><figcaption></figcaption></figure>

Finally, if you want to check your art or metadata again, you can download by clicking **Download art** or **Download metadata** for a $100 fee.

If for any reason, you want to re-upload, you can hit "Remove upload" to re-upload.&#x20;

That's it for art generation! If you want to set pre-reveal image, you can set it up by clicking "**Set up pre-reveal artwork**".


# Set Token Name

To add more customization to your collection, heymint launchpad has the option to set your token name.&#x20;

* To change the token name, simply go to the **Preview** tab under Art & Metadata and click on the pencil above the token image.

<figure><img src="/files/KGKBXGsuWE6bNZMZAcCr" alt=""><figcaption></figcaption></figure>

* Set a custom prefix to be used for the name of each token.

{% hint style="info" %}
This will be appended to the beginning of each token's name, i.e. entering **Addy** will result in tokens being named **Addy #1**, **Addy #2**, **Addy #3**, etc.
{% endhint %}

<figure><img src="/files/pzFaj099S0f8VGypb3ad" alt=""><figcaption></figcaption></figure>

* The customized name will be added after you click on the save button.

<div><figure><img src="/files/cPEL1QiaaFWSFlk9nfpc" alt=""><figcaption></figcaption></figure> <figure><img src="/files/l47z8JunpYWtxlVO187a" alt=""><figcaption></figcaption></figure></div>


# Set up pre-reveal image

{% hint style="info" %}
Our 'Set up Pre-Reveal Image' feature has been relocated to its own section under 'Pre-Reveal & Update Metadata' in the Smart Contract tab.

<img src="/files/UHRKmZ7GZIpkc0Uq2Fye" alt="" data-size="original">
{% endhint %}

Many projects want to set pre-reveal image and reveal the image once all the tokens are minted. We got you covered for this use case too :)

<figure><img src="/files/H3Lo4H0NkVwhPq1peuk2" alt=""><figcaption></figcaption></figure>

You can set up either image file (png, jpg, svg, gif etc.) or animation file (mp3, mp4, wav etc.). In either case, **image file is required** as animation won't show up collection summary page on the marketplaces. Go ahead upload pre-reveal image (and animation file) and you are all set!

<figure><img src="/files/aX0xp4B13c6JLkbIX92a" alt=""><figcaption></figcaption></figure>


# Generate metadata

Not all the NFTs are randomly generated PFP, some of them are hand-drawn, or AI generated and doesn't require using art generator. If you already have art but don't have metadata, you can follow the steps here.&#x20;

If you are not sure what metadata is and how it works, read [our blog post to learn more about metadata](https://heymint.xyz/blog/how-to-create-nft-metadata/).&#x20;

To get started on generating metadata, go to Upload the layer page and select "**I already generated my art myself or using a different service**" option at the bottom.

Next, select **I have art, but not metadata** option.&#x20;

<figure><img src="/files/9L6br0dGCP2z9bCEgwDU" alt=""><figcaption></figcaption></figure>

## Upload your asset to IPFS

Assuming you haven't uploaded your art to anywhere yet. If so, follow the steps to create an account on NFT storage and upload the art to IPFS using NFT storage.&#x20;

Once you uploaded your art to NFT storage, provide two information:

* **CID:** Unique identifier to find where you saved the files.&#x20;
* **Media format:** Select file extension format for your asset (.png, .jpg, .gif etc.)

<figure><img src="/files/2F71zr2CFpJLRkpEqyXB" alt=""><figcaption></figcaption></figure>

## Provide NFT storage key

Next, you will need to get NFT storage API key from NFT storage and provide the key to us. We will need the key so that we can upload the generated metadata for you so that metadata files will be saved in your account and you can have a full control over it.

<figure><img src="/files/QaHM6QJBnL3Gvq6fQHYL" alt=""><figcaption></figcaption></figure>

## Fill out CSV to generate metadata

This is the part it takes a bit time to prepare - but rest assured, we can walk you through the process step by step.

Set up the excel sheet

In order to create metadata, you will need to fill in all the token information in an excel sheet and at the end of the process, you will export it to CSV and import that into Launchpad.&#x20;

You can find the excel sheet from [here](https://docs.google.com/spreadsheets/d/1vRFc-LKKWrngAAJkxbMak23iH3ET_pPQLrJOA-ahFf0/edit#gid=0), and as this is read-only, make a copy from File menu and rename the file however you like (please look at the 3rd sheet/tab for an example). &#x20;

<figure><img src="/files/cYBNJ5fe7oSSOfK7GsxR" alt=""><figcaption></figcaption></figure>

Once you copied file, you will need to fill out the following information in the file:

* filename: Name of the file for each token (should be the exact filename including the extension name, e.g. 1.jpg, 2.jpg, 3.jpg)
* title: Name of the token
* description: Description for each token
* trait type and trait value: Each token's trait type and value (trait type goes to the header row of the column as it will be the same for all the tokens (for instance, all the tokens will have trait\_type, "background".) and each row has its own trait values.&#x20;

Let's use Curious Addys as an example - [in this IPFS link](https://bafybeic2hhrpb62upb3oii5dtem7bm72xfaaqsvwqcco2ib3ggyawz32we.ipfs.nftstorage.link/images), Curious Addys asset files are stored.

<figure><img src="/files/S0b7A1ahjdG1j6z1O8mp" alt=""><figcaption><p>If you access to the link, you should be able to see this</p></figcaption></figure>

### Filename

We named each file for each token number, so 10.png will be used for token ID 10, which will be used for "filename" column in the spreadsheet. You should put the exact filename, including the extension name, so our converter can make the correct JSON files. Once you do so, our platform will be able to find where the assets are stored and add that information to the metadata.

### Title

This will be the name of each token - you could simple put the number of token (#1 etc.) or call it differently such as Addy 1, Addy 2 etc. The name of the token will show up right next to the image:

<figure><img src="/files/FGTMdlo7Fk3ighA0A4w5" alt=""><figcaption></figcaption></figure>

### Description

Description will be displayed right under the image in the OpenSea token page:

![](/files/ntYEjTwPJRmf8SFUY2iq)

You could have a different description for each token, or have the same, whichever you prefer.&#x20;

### Trait type & trait value

Trait type or trait value is the most complex and time-consuming part - but the good news is this is optional - so if you don't need tokens to have any traits, you can skip this part and just remove the columns from the spreadsheet.&#x20;

If you decide to include, you can list what trait types you want to include (Background, body, expression etc.) and list them horizontally on the header row, and fill in each trait value in each tokens' row like below:

<figure><img src="/files/969ZuaP3H8V8T0KCXLhO" alt=""><figcaption></figcaption></figure>

Please make sure to add the correct name for trait type and correct value for trait value that correspond to your image, as it shows up on OpenSea like below alongside with the asset (so if the asset and trait values look different, holders will know).

<figure><img src="/files/iYH3ZJZT7hlEdeaLr7c1" alt=""><figcaption><p>Opensea view of the traits in your CSV</p></figcaption></figure>

Once you are done filling out all the information, it should look like this:

You can also see the example sheet from [here.](https://docs.google.com/spreadsheets/d/1MSUWu_TFg6SpKS1vYV4pP65-OEndCH5NOCPV8BaFTsA/edit?usp=sharing) (Please look at the 3rd sheet/tab for an example)

<figure><img src="/files/mbpvlZZVDb4jjPvmMoQR" alt=""><figcaption></figcaption></figure>

## Export your sheet to CSV

Once you check everything and feel it's ready to go, you can export the sheet to CSV - you can do so from File > Download > Comma Separated Values (.csv)

<img src="/files/sA6U0vE2Mv88Wt0enIRl" alt="" data-size="original">

{% hint style="warning" %}
Make sure you are exporting to **CSV**, not excel (.xlsx) or TSV (.tsv)
{% endhint %}

## Import your CSV to launchpad

Click the box, and select the CSV file you just downloaded and import the file:

![](/files/2CAdNPZK38yuZ0GHEgeg)

Once you import, you can see the preview of the first token:

<figure><img src="/files/CIX3FDlephqYYnelVb6y" alt=""><figcaption></figcaption></figure>

If you find any errors or mistakes you want to change, go back to CSV, make edits, export and import again. If it looks good, you can go ahead and hit "**Generate metadata**".

If the import succeeds, you will see the success message:

<figure><img src="/files/jWlcCJ04lVv3nqujJUia" alt=""><figcaption></figcaption></figure>

You can click NFT.Storage to see if files are stored correctly.&#x20;

If you want to regenerate, you can do so anytime by just simply hitting "**Regenerate**".

And you are all set! When you deploy your contract, we will set the url for your IPFS link to be the token uri :)


# (Advanced) Upload art & metadata

If you already have art and metadata but haven't uploaded to IPFS yet, all you need to do is:

1. Create an account on NFT storage and upload art to IPFS
2. Provide NFT.Storage API key
3. Replace the location of assets in metadata files
4. Provide us the IPFS link

To get started on uploading art & metadata, go to **Upload layers** section and select "**I already generated my art myself or using a different service**" option at the bottom.

Next, select "**I have both art & metadata"** option and select "**I need help uploading my art and/or metadata**" option.

<figure><img src="/files/EJo7IReDQVm7fW8ODfPh" alt=""><figcaption></figcaption></figure>

## Create an account on NFT storage and upload art to IPFS

Once you select your options above, you will see the guide explaining how to create an account on NFT.Storage and upload art to NFT.Storage (IPFS).

Follow the guidance and create an account and upload asset to IPFS.

## Provide NFT.Storage API key and upload metadata

After you upload art, we ask you to provide NFT.Storage API key. We will need the key so that after we modify metadata for you, we can save the metadata files in your account so that you have a full control in your asset. Fill out the API key and hit "**Save API key**".

![](/files/6PROxtWjeKAes3fUhLgu)

Now, we will need to get your metadata file folder because we will need to modify where the asset is stored.&#x20;

{% hint style="info" %}
When you generate art and metadata in another art generator, they will put placeholder url for storing the image as the generator doesn't know where you want to store the image. Therefore, we will need to read all the metadata files and replace the url with the location you just saved in NFT.Storage. &#x20;
{% endhint %}

So go ahead and hit "**Upload metadata**" file folder and upload metadata files. If it succeeds, you should be able to see this message.&#x20;

<figure><img src="/files/SDE34Kjw81AQ18Dg1FCi" alt=""><figcaption></figcaption></figure>

And you are all set!&#x20;


# (Advanced) Set token URI

{% hint style="warning" %}
Making your custom metadata causes most of the issues when using Launchpad due to incorrect metadata setup. If you are using this feature, we highly recommend to read [How to create Metadata blog post](https://heymint.xyz/blog/how-to-create-nft-metadata) to make sure your metadata is set up correctly.&#x20;
{% endhint %}

Go to **Upload layers** section and click "**I already have my art**" at the bottom.

Next, select "**Yes, both"**

<figure><img src="/files/xOHKn4z8lFOYxBFwvTap" alt=""><figcaption></figcaption></figure>

Once you select the options above, you will see the input for Token Base URI. Set the IPFS link that you saved metadata folder and hit "**Validate & Save**".

As custom metadata tends to have issues, we try validating your metadata by simply checking if the IPFS link you provide contain correctly formatted metadata.&#x20;

#### Error: Metadata files should not have extensions

If you see the following messages, your metadata files have .json file extensions which doesn't work with our Launchpad. Reformat your metadata files to be just a number with no file extension (for instance, 1,2,3 not 1.json, 2.json, 3.json - you can see the example from [here](https://bafybeigrqbssjbkd3xz4gpnulfgldstri7rv5zcycpgchlyy3ruycalkbu.ipfs.nftstorage.link/)).

<figure><img src="/files/7FHHTmnIYdjuf2EJP6wJ" alt=""><figcaption></figcaption></figure>

#### Error: Metadata files not found

If you see this error message, there is a high chance your metadata files are saved incorrectly. Please make sure:&#x20;

* Your token base URI is pointing a folder that contain metadata files (JSON format), not the folder of your asset files
* Your metadata has image\_url and image\_url points to the right location that you store your image (example [here](https://bafybeigrqbssjbkd3xz4gpnulfgldstri7rv5zcycpgchlyy3ruycalkbu.ipfs.nftstorage.link/4676)). Please note that even if you set animation\_url (mp3, mp4 files etc.), you will still need to set an image\_url

<figure><img src="/files/GgK7Nj4vZez656szBu9Z" alt=""><figcaption></figcaption></figure>

If you are sure metadata is set up correctly, you can move forward as your token base URI is saved even if it's not correctly validated.&#x20;

Once you are able to save your token base URI, you are all set!


# Upload & Pin to IPFS using Pinata

If you already have art and metadata but haven't uploaded to IPFS yet, Pinata lets you upload up to 25 GB of files & pin to IPFS for free.

### Logging into Pinata

1. Go to Pinata and create an account: <https://app.pinata.cloud/>

<figure><img src="/files/Drzhkd95hUEwJaEXrcU1" alt=""><figcaption></figcaption></figure>

### Uploading art or metadata files & getting CID

{% hint style="danger" %}
**Note**: Art & metadata files should be uploaded **separately** using these steps.
{% endhint %}

1. Click the '+ Add' button, then select 'Folder Upload'.<br>

   <figure><img src="/files/4RvNGpiuqqNOdW2w0koG" alt=""><figcaption></figcaption></figure>
2. Enter the name, then click 'Upload'.<br>

   <figure><img src="/files/9Zju72rz72S7Pl82JNNv" alt=""><figcaption></figcaption></figure>
3. Once it finishes the upload, a new CID will be displayed next to the name. Copy the CID for pasting into Launchpad:

<figure><img src="/files/ANFaHsOjYIjZKzBXGn6P" alt=""><figcaption></figcaption></figure>

4. Go back to Launchpad Art & Metadata to paste art CID:

&#x20;        Paste art/images CID:

&#x20;       ![](/files/y7BRN3RNxUcymZHGSlEi)

&#x20; 5\.     Prepare your Metadata CSV and Upload

<figure><img src="/files/8sveewpDDgYepk06RCz9" alt="" width="540"><figcaption></figcaption></figure>

6. Download the Metadata files

<figure><img src="/files/YCcGvpN16tyoxbDddn7f" alt=""><figcaption></figcaption></figure>

7. Upload Metadata to IPFS, then provide CID

&#x20;Repeat steps 1, 2, and 3 with your metadata files downloaded from the Launchpad. Paste the new CID and click "Save".

<figure><img src="/files/X2sw7lWt98Cjj8HFTmDg" alt=""><figcaption></figcaption></figure>


# Manage smart contract

Managing your contract before deployment

Once you finish setting up your smart contract, you will immediately see your contract management console. Please note that there are different states between before/after deployment. The biggest difference before/after deployment is:

<table><thead><tr><th width="167.33333333333331"></th><th>Before deployment</th><th>After deployment</th></tr></thead><tbody><tr><td>Configurations</td><td>You can change any configurations</td><td>You can change some of the configurations but not all of them. The configurations below cannot be changed:<br>- Collection name<br>- Collection symbol<br>- Max supply/presale max supply<br>- Enable/disable features</td></tr><tr><td>Blockchain transactions</td><td>Not necessary</td><td>You will need to interact with blockchain and confirm transactions every time you change any values. </td></tr></tbody></table>


# Before deployment

Before deployment, you can change any data anytime you'd like. There are 5 tabs you can review configurations

* **General:** General information
* **Sale:** Public sale/presale information
* **Payout:** Payout/royalties information
* **Advanced:** Enable/disable and configure advanced features. Check [advanced features page](/creators/manage-smart-contract/before-deployment/advanced-features) to learn more about what features we have
* **Deploy:** Once you are ready to deploy, you can deploy your contract from here

<figure><img src="/files/rdm4ey11DimXejHQdN2G" alt=""><figcaption></figcaption></figure>


# Affiliate Minting

When enabled, collectors can generate unique affiliate links to promote your collection. This feature is available for both presale and public sale. When someone mints (buys) an NFT through their link, the collector earns a commission (reward) based on your set percentage. This incentivizes them to spread the word and attract new buyers.

<figure><img src="/files/MIdV8VnuEuRIVIV3wRz7" alt=""><figcaption></figcaption></figure>

{% hint style="info" %}
Please note:&#x20;

1. You can't activate affiliate minting for collections that are already deployed.&#x20;
2. These settings **can't** be changed **after deployment**.&#x20;
3. Affiliate minting isn't available for free mint collections.&#x20;
4. Affiliate links are only compatible with Launchpad mint pages & cannot be used with self-hosted mint buttons.
   {% endhint %}

## **Step-by-Step Guide**

1. **Go to Smart Contract**

   <figure><img src="/files/8MCBb3YM9Ur4VqhltNEg" alt="" width="230"><figcaption></figcaption></figure>

2. **Click 'Affiliate'**

   <figure><img src="/files/88cPVtnEPAUnPG9PjCem" alt=""><figcaption><p> </p></figcaption></figure>

3. **Turn on Affiliate Minting:** Choose "Presale" or "Public Sale" (or both) based on where you want it active and then set the percentage. *If enabling for presale, make sure to also enable "Presale" in your "Sale" settings.*

   <figure><img src="/files/wlRxrGYURQckwwyErTZY" alt=""><figcaption></figcaption></figure>

4. **You're all set!** Affiliate minting is ready to roll.

**Remember:**

* You can't turn on affiliate minting for collections already deployed.
* When enabled, you can't change these settings later (after deployment), so choose wisely!
* Affiliate minting isn't available for free mint collections.
* Affiliate links only work on Launchpad mint pages, not self-hosted buttons.

Once deployed, head over to the "Minting" tab to [customize your minting page](/creators/manage-smart-contract/after-deployment/set-up-mint-website/use-heymint-mint-page). This is where collectors generate their affiliate links! *Don't forget to double-check **all** your settings **before** deploying your collection!*

<figure><img src="/files/PwKJUs3yrLf1hcy54myJ" alt=""><figcaption><p>Example mint page with affiliate minting enabled</p></figcaption></figure>

<figure><img src="/files/0wokRq3oFEhO5geoc7ry" alt=""><figcaption></figcaption></figure>

That's it! Now your collectors can earn rewards by promoting your NFT collection.&#x20;


# Affiliate Earnings

Ready to see how much you're earning? It's easy!

1. **Click "Affiliate"** beside the "Sign out" button.

   <figure><img src="/files/0UIZ1vTCSproD8QjN9CG" alt=""><figcaption></figcaption></figure>

2. **Your earnings dashboard:** Here you'll find a clear overview of everything, including:

* **Collection name:** Easily identify each collection you created an affiliate link for.
* **Chain:** See which blockchain each collection is deployed on.
* **Earnings:** Track the total amount you've earned for each collection.
* **Affiliate Link:** Quickly access your unique link for each collection to share with others.
* **Status:** Monitor the status of your link.

<figure><img src="/files/Y48i7Er6X1hTSKBsuqSX" alt=""><figcaption></figcaption></figure>

Whenever someone uses your unique affiliate link to mint an NFT, **your commission** (a percentage of the mint price) is **automatically deposited directly into your wallet**.

\ <br>


# Enforced Royalties

OpenSea used Operator Filter to enforce royalties for NFT creators. This mechanism ensured that creators received their designated royalties whenever their NFTs were resold on the secondary market. However, with OpenSea's decision to make creator fees optional and disable the Operator Filter, this enforcement mechanism has become no longer effective.

**Magic Eden's Solution**

In response to such challenges, Magic Eden has developed its own method to ensure the enforcement of NFT royalties. Their approach focuses on two main aspects:

1. **Royalty Enforcement Registry**: Magic Eden maintains a registry that lists NFT collections along with their respective royalty policies. This registry is used to track and enforce the payment of royalties as specified by the creators of the NFTs.
2. **Marketplace Restriction**: NFTs from collections registered with Magic Eden’s royalty enforcement mechanism can only be traded on platforms that respect and enforce these creator fees. This means if a particular marketplace does not adhere to the royalty standards set by the creators, the trading of these NFTs can be restricted or blocked on that platform.

<mark style="color:yellow;">**For previous collections that were deployed on Ethereum and Polygon chain with Opensea Open Filter Registry**</mark>, the royalty enforcement can be transferred to Magic Eden. This transition enables these collections to continue benefiting from enforced royalty payments, despite the change in OpenSea’s policy.

* Navigate to the Contract Management tab.
* Click on the Payout tab.
* The option to “Enforce Royalties” should be available at the bottom.

<figure><img src="/files/1xm08IlRxdqEf1fyLmFR" alt=""><figcaption></figcaption></figure>

{% hint style="info" %} <mark style="color:yellow;">Magic Eden</mark> supports multiple blockchain networks, including Bitcoin (specifically for Bitcoin Ordinals), Ethereum, Solana, and Polygon.
{% endhint %}


# (Presale only) Set up allowlist

If you enabled presale, you will need an allowlist, the list of wallet addresses who are allowed mint during presale. An allowlist is a powerful concept and beneficial for both creators and collectors:

### For creators&#x20;

* Have an idea of how many people will mint by collecting a wallet address
* Spread the word about the project by requiring people to follow twitter account, RT/like certain tweet, or join discord server

### For collectors

* Get a guaranteed mint
* Avoid gas war&#x20;

## How to set up an allowlist

To set up an allowlist and collect wallet addresses, we built a free tool, [HeyMint allowlist](https://heymint.xyz), used by more than **200K+** users where you can set up an allowlist easier than ever and add as many requirements as you'd like.&#x20;

In HeyMint allowlist, you can add requirements to join an allowlist such as:

* Require to follow one or more twitter account(s)
* Require to RT/like a tweet
* Require to join one or more discord server(s)
* Require to have one or more discord role(s)
* Require to own one or more NFTs
* Require to own ERC-20 token
* Require to provide an email
* Require to provide a password
* Require to answer question(s)

There is no hidden cost to use any of the features, so you can go ahead and start creating an allowlist immediately from [here](https://heymint.xyz) :)&#x20;

## Import allowlist

Once you create an allowlist and collect wallet addresses, you can export allowlist on HeyMint as a CSV and import to Launchpad from contract management page ("**Sale**" tab and "**presale**" section):

![](/files/hQ2DzH78Sis6FCyLmCn8)

{% hint style="info" %}
If you don't set any quantity, we will automatically set the quantity as 1.
{% endhint %}

Once you import the CSV, all the wallet addresses (paginated) will immediately show up:

<figure><img src="/files/0A50Cihjs08T5L0T9kwp" alt=""><figcaption></figcaption></figure>

With the allowlist feature, you can:

* Search a certain address to check if the address exists in the allowlist&#x20;
* Manually add/delete a wallet or change the allocated quantity

{% hint style="warning" %}
Please note that **you don't need any blockchain transaction or redeployment of contract** to make a change in the allowlist even after deployment. You can make a change anytime and the change will be reflected instantly.
{% endhint %}


# Advanced features

One of the advantages of using our Launchpad is that we have many advanced features that blue chip projects offer. You can include them in your smart contract by toggling on these features. As these features are advanced features, you will need to get a premium plan.&#x20;

## With Frontend  Features

### Free claim

Free claim allows holders of another ERC-721 collection to mint your NFTs for free. Zen Academy pioneered this concept by allowing [333 pass](https://opensea.io/collection/333-club) holder to be able to claim 3 [ZenChest tokens](https://opensea.io/collection/zen-chests). This feature is useful when you already have a collection and want to give free tokens to your existing token holders for your next collections.&#x20;

To enable this feature, you will need to provide:

* **Free claim NFT contract address**: The contract address of the NFT collection eligible for free claim (ERC-721 only)
* **Number of NFTs to mint per claim:** How many NFTs can holders mint per claim. For example, if this is set to 3, 3 NFTs can be minted per each free claim.

<figure><img src="/files/0wfvPop2to55r83cn7LC" alt=""><figcaption></figcaption></figure>

{% hint style="info" %}
Smart contract tracks if the certain token ID already claimed the tokens or not. Therefore, if the tokens are already claimed, it cannot be claimed again.
{% endhint %}

Once you enabled this feature, the following functionalities will be added in your smart contract:

* **Free claim:** Allows caller address to claim a new token if the address owns a token in specified contract
* **Set free claim state:** Enable/disable free claim feature

{% hint style="info" %}

#### If you need more information, Check [Free Claim](https://app.gitbook.com/o/PuWjBdHmUGS105jxI6Tq/s/gUBEZKVtA2DMYGTVBbl6/~/changes/32/creators/manage-smart-contract/before-deployment/advanced-features/fre-claim/~/comments?context=post)[ Walkthrough](https://app.gitbook.com/o/PuWjBdHmUGS105jxI6Tq/s/gUBEZKVtA2DMYGTVBbl6/~/changes/32/creators/manage-smart-contract/before-deployment/advanced-features/fre-claim/~/comments?context=post).

{% endhint %}

### Burn to mint

Burn to mint features allows holders to a given NFT collection to mint your NFTs in exchange for burning an NFT from the specified collection.&#x20;

The NFT collection specified can either be an ERC-721/ERC-721A contract, or an ERC-1155 contract, in which case a specific token id eligible for the burn to mint function must be specified.

To enable this feature, you will need to provide:

* **Burn to mint contract address**: The contract address of the NFT eligible for burning to mint.
* **Contract address type**: The standard type of contract for the contract you set for burn.
* **Token ID eligible for burning:** (Required only with ERC-1155): The token id of the NFT in the ERC-1155 collection eligible for burning.

{% hint style="warning" %}
Please note that in order for the burn to mint function to work, users must first complete a setApprovalForAll function authorizing your NFT smart contract to transfer NFTs from the collection to be burned.
{% endhint %}

<figure><img src="/files/BkhnMODqb5AyLycrwC9i" alt=""><figcaption></figcaption></figure>

## Only Smart Contract Functionality Features

{% hint style="warning" %}
Please note that we offer only smart contract functionality for these features, therefore you will need to build frontend features by yourselves.&#x20;
{% endhint %}

### Soulbinding

Soulbinding feature allows NFTs to be non-transferrable. Soulbound tokens are used for certificates, diploma, identity, resume, anything that can be associated with the wallet owner. One of the examples of Soulbound tokens are what our team did for [credentials](https://opensea.io/collection/curious-credentials) to record the activities and scores on our Q\&A platform, [curious.xyz](https://curious.xyz/).

We offer two types of soulbinding functionality:&#x20;

* **All**: All NFTs are soulbound by default
* **Optional**: Users can optionally choose to soulbind their own NFTs.

So you can select your desired functionality after enabling this feature.

Soulbinding a token will make it permanently non-transferable, except optionally by a designated admin address that can help transfer NFTs from wallets that are lost or stolen. Therefore, you are required to set **Soulbinding admin address**.&#x20;

<figure><img src="/files/y2LqalNBJbN2uxxjugQb" alt=""><figcaption></figcaption></figure>

### Credit card payment (Beta)

As many people who are new to Web3 don't feel comfortable with setting up a wallet and buying an NFT from wallet, we added credit card payment feature to make it easier for them to get access to NFTs. As this feature is currently on beta, you might experience some issues. Therefore, if you are going to use this feature, please make sure to thoroughly test on your end before launching your collection.&#x20;

{% hint style="warning" %}
There are a couple of limitations in using this feature:

* Only available for public mint, not presale mint as we require a user's wallet address for presale mint
* Only available for mint page where you can build on Launchpad. You can't use this feature for embedded mint button.&#x20;
* Only available on Ethereum and Polygon
* You will need to create an account and collection on [crossmint](https://www.crossmint.com/) and go through KYC process with them as we use them for the credit card payment service provider.&#x20;
  {% endhint %}

In order to enable credit card payment, you will need to enable feature before deployment and set up a collection on crossmint after deployment. To learn more details on how you can set it up, check out this [guide](https://docs.launchpad.heymint.xyz/creators/manage-smart-contract/after-deployment/set-up-credit-card-payment-beta).&#x20;

### Staking

Staking feature allows holders to stake their NFTs. Our staking implementation is similar to Moonbirds' nesting, and does not require the user to transfer their NFT to another address in order to stake it.&#x20;

Once you enabled this feature, the following functionalities will be added in your smart contract:

* **Stake/unstake tokens:** Allows users to stake/unstake tokens
* **Set staking state:** Enable/disable staking feature
* **Admin unstake:** Allows admin (owner of the contract) to unstake a token
* **Total token stake time:** Get a total time of how long a certain token is staked
* **Current token stake time:** Get current time of how long a certain token is stake&#x20;

### Loan

Loaning feature allows holder to loan their NFTs to other users. [Meta Angels](https://opensea.io/collection/metaangelsnft) pioneered this concept by allowing their holders to loan their NFTs to others so that people who can't afford their NFTs can get their benefits by borrowing the NFT.&#x20;

{% hint style="info" %}
While loaned NFTs will be transferred to the borrower's wallet, owners can always retrieve their NFTs at any time, and loaned NFTs cannot be sold or transferred.
{% endhint %}

Once you enabled this feature, the following functionalities will be added in your smart contract:

* **Loan**: Allows owner of a token to other address
* **Retrieve loan**: Allows owner of a token to retrieve a loaned token
* **Admin Retrieve loan**: Allows contract owners to retrieve a loan
* **Total Loaned**: Get a number of total number of loaned tokens
* **Loaned Balance of**: Get the loaned balance of the address
* **Loaned tokens by Address**: Get all the token ids owned by a given address

### Random Hash

* **Random Hash Generation**: Each NFT minting produces a pseudo-random SHA256 hash.
* **SHA256 Hash Function**: A cryptographic function that outputs a unique, fixed-size 256-bit hash.
* **Pseudorandomness**: The hashes appear random but are deterministically produced using blockchain data like block information and token ID.
* **Use Case for Randomness**: Useful for creating fair and unpredictable outcomes, such as random rewards for NFT minters.
* **Example Application**: Rewarding 1% of NFT minters randomly by pre-announcing that certain hash outputs will correspond to prizes.
* **Transparency and Fairness**: The process is open and verifiable, ensuring that the reward mechanism is executed impartially.


# Free Claim

This page is a more detailed walkthrough for our free claim feature.

### Before Deployment

* To be able to use free claim, You should Enable the Free Claim feature before deployment. It is found under the **Contract Management tab > Advanced.**

<figure><img src="/files/4gEPu2zGKhBkEgUYNzPM" alt=""><figcaption></figcaption></figure>

* Scroll down on the features and enable  **Free Claim** Tab.

{% hint style="info" %}
Enabling a free claim allows holders of another ERC-721 NFT collection to mint your NFTs for free.
{% endhint %}

<figure><img src="/files/HtLtGD4GcIrToZR8bYc8" alt=""><figcaption></figcaption></figure>

* Enter the necessary details: the **Free claim NFT contract address** that the user should have in their wallet and the corresponding **Number of NFTs to mint per claim** then hit **Save**.

<figure><img src="/files/FhAjb90jyA6p86NzMLPz" alt=""><figcaption></figcaption></figure>

{% hint style="info" %}
Each NFT from the specified collection eligible for free claim can be used once to mint your NFTs, and you can choose the number of NFTs that will be minted in each claim.
{% endhint %}

After these steps, the Free Claim feature is already added to your contract. Go ahead and set up the other details of the collection and then deploy the contract to the blockchain.

### After Deployment

Our Free Claim feature has a frontend, this part will show you how it shows on your mint page.

* After setting up and publishing your mint page, go ahead and start the free claim, it is under the **Advanced** tab on your **Contract Management** page.

{% hint style="warning" %}
This will require a blockchain transaction and a gas fee is required.
{% endhint %}

<figure><img src="/files/nLZXvzO7DKLEk5ePUtjb" alt=""><figcaption></figcaption></figure>

<figure><img src="/files/sqgQTZQqxuKiVWIQKp3i" alt=""><figcaption></figcaption></figure>

* When you start the sale of your collection, your mint page will be like this:

<figure><img src="/files/jTFaVVAYMTB1Idn8aWKg" alt=""><figcaption></figcaption></figure>

* If the user clicks on the **Select token for claim** this tab will pop and if their wallet is qualified for the free claim they will be select which token to use and able to continue and mint.

<figure><img src="/files/JO6KdmF3AqbYhPzTzdbu" alt=""><figcaption></figcaption></figure>

![](/files/YKSbW5PGL9UGjr9UycSG)


# Burn to Mint Feature

Our burn to mint feature is an exciting addition that allows for new tokens to be minted by burning existing NFTs from other collections or contracts. It's important to note that this feature is only available for mint pages hosted by HeyMint, and cannot be used with the mint button embed for external websites.

<figure><img src="/files/0JBwJLhSnUx8rGol0K6Q" alt=""><figcaption><p>Burn to Mint Frontend</p></figcaption></figure>

This feature is incredibly flexible and allows you to burn any number of NFTs from any ERC-721 or ERC-1155 contract to mint any number of NFTs from your contract. For example, you can require burning a single NFT from another contract to mint a single NFT from your contract or you can require burning multiple NFTs from different contracts to mint multiple NFTs from your contract.

Please keep in mind that users must first complete a setApprovalForAll function to authorize your NFT smart contract to transfer NFTs from the collection\[s] to be burned in order for the burn to mint feature to work.<br>

<figure><img src="/files/bPkhU8pDGz20GHh14jwd" alt=""><figcaption><p>setApprovalForAll</p></figcaption></figure>

<br>


# Creating a Burn to Mint Collection

This is a step-by-step guide for setting up the Burn to Mint feature before deployment

1. Go to launchpad.heymint.xyz&#x20;
2. Click on "Create a new collection"&#x20;

<figure><img src="/files/in1FjQjOu0utG9RqwKz5" alt=""><figcaption></figcaption></figure>

3. Choose any ERC-721A flow

<figure><img src="/files/4KCxOuMtWMoTAwcnqMCa" alt=""><figcaption></figcaption></figure>

4. Click on "Create"&#x20;

   <figure><img src="/files/OpQHjKL0ghVWpDEDU258" alt=""><figcaption></figcaption></figure>
5. Enter collection details&#x20;

   <figure><img src="/files/R4LFPd8PRk4UEGGcCc0m" alt=""><figcaption></figcaption></figure>
6. Click on "Create Collection"&#x20;

   <figure><img src="/files/HM425FmJXYSu8xZjVWXb" alt=""><figcaption></figcaption></figure>
7. Enter sale details and continue with the art & metadata flow

<figure><img src="/files/2LY4kb8YoJwN0wKW2jFZ" alt=""><figcaption><p>Enter sale details </p></figcaption></figure>

9. After proceeding to [get creative with your Art & Metadata](https://docs.launchpad.heymint.xyz/creators/art-and-metadata), and uploading the metadata to IPFS, proceed to Contract Management by clicking on 'Smart Contract'.<br>

   <figure><img src="/files/FMI3fM8Cq0skoRXgqxeh" alt=""><figcaption></figcaption></figure>
10. Click on "Advanced"&#x20;

    <figure><img src="/files/33bfboXfxnWaQbuXV1y5" alt=""><figcaption></figcaption></figure>
11. Scroll down to the "Burn to mint" section and enable it&#x20;

<figure><img src="/files/KRAtZho0Evj7v7nC5JbJ" alt=""><figcaption><p>Scroll down to the "Burn to mint" section and enable it </p></figcaption></figure>

13. Type the number of NFTs to mint per burn&#x20;

<figure><img src="/files/UNFPuJW7SrSMpbKXycmT" alt=""><figcaption><p>Type the number of NFTs to mint per burn</p></figcaption></figure>

14. Click on "Add token"&#x20;

<figure><img src="/files/ziGtlhypJ9SKMa8Fi85C" alt=""><figcaption><p>Click on "Add token" </p></figcaption></figure>

15. Paste the burn contract address, token type, and required burn quantity

<figure><img src="/files/xGueoriTHX6pw7ESHa6w" alt=""><figcaption><p>Paste the burn contract address, token type, and required burn quantity</p></figcaption></figure>

16. Double-check that all details are correct&#x20;

<figure><img src="/files/W8YzXXvwAWucnS6Wc9SJ" alt=""><figcaption><p>Double check that all details are correct </p></figcaption></figure>

17. Click on "Save"

<figure><img src="/files/aPjdFqPouEGA9xEx84M4" alt=""><figcaption><p>Click on "Save"</p></figcaption></figure>

After hitting that save button, you can configure the other features that you want to enable and eventually deploy.


# Map URI to first burn token ID

This is optional

Map URI functionality is designed just for the use case of contract migration. Migration works by setting the old contract as a burn contract, creating a new one, and letting existing holders burn the current collection and mint a new one. The benefit of doing so is by migrating the contract, you can add new features (the biggest one is on-chain royalty enforcement - as most of the old collections don't have on-chain royalty enforcement to their existing contract, which makes them lose royalties on trade) to your contract and you are basically moving your users to a new contract.

If enabled, newly minted tokens will display the exact same name, image, and other metadata as the token burned. Please note that the true token id of the newly minted token will not be the same as the old one, but the metadata will remain the same.

### Step-by-step guide:

1. Enable Map URI to first burn token ID

<figure><img src="/files/o84KiUF62ytc1zGU4dB9" alt=""><figcaption><p>Enable Map URI to first burn token ID</p></figcaption></figure>

2. Click on Add token

<figure><img src="/files/MYSCkmlz0KnsMsuA7QWb" alt=""><figcaption><p>Click on Add token</p></figcaption></figure>

3. Paste Burn to mint contract address

<figure><img src="/files/UMfOuiZqV0zz3366raUG" alt=""><figcaption><p>Paste Burn to mint contract address</p></figcaption></figure>

4. Double-check all details

<figure><img src="/files/ssdYCSxhNjzwxtp5gp0w" alt=""><figcaption><p>Double-check all details</p></figcaption></figure>

5. Click on Save

<figure><img src="/files/y9hWeTLuSHDAUp2816v0" alt=""><figcaption><p>Click on Save</p></figcaption></figure>

6. Copy the token base URI of your old contract.
7. Click on Art & Metadata and select the following options:

<figure><img src="/files/yT9PZnk4L0zyf79KtcLp" alt=""><figcaption><p>Click on Art &#x26; Metadata and select the following options:</p></figcaption></figure>

6. Paste the token URI of your old contract address.

<figure><img src="/files/NSf2Ruz0OnBYCBUF2szD" alt=""><figcaption><p>Paste the token URI of your old contract address.</p></figcaption></figure>

{% hint style="danger" %}
Be sure to enter the IPFS link that points to the folder that has metadata files, .json files, NOT image files. To learn more about how to create and set metadata correctly, check out the article explaining [how to set your own metadata](https://heymint.xyz/blog/how-to-create-nft-metadata) in Launchpad.
{% endhint %}

7. Click on Validate & save

<figure><img src="/files/T1vUI6nwFoBTrmlGkmr1" alt=""><figcaption><p>Click on Validate &#x26; save</p></figcaption></figure>

8. Now you can proceed to deploy your new contract! After deployment, please check out how to [Enable Burn to Mint](/creators/manage-smart-contract/after-deployment/enable-burn-to-mint).


# Deployment (Testnet)

Now it's time to deploy!

Once you set everything, you are ready to deploy your contract!&#x20;

## Select network you want to deploy your contract

As we support Ethereum mainnet + 3 major EVM compatible chains (Polygon, Arbitrum, Optimism) and all the chains understand the same smart contract, you can deploy smart contract whichever chain you'd like or how many you'd like without modifying any configurations.&#x20;

### Test on testnet first

Before deployment, we highly recommend to test on testnet and make sure everything works as it costs some money to deploy contract to mainnet.&#x20;

Here is the mainnet/testnet pair we offer:

| Mainnet         | Testnet                |
| --------------- | ---------------------- |
| Ethereum        | Sepolia                |
| Base            | Base Sepolia           |
| Polygon         | Polygon Amoy           |
| Blast           | Blast Sepolia          |
| Arbitrum One    | Arbitrum Sepolia       |
| Optimism        | Optimism Sepolia       |
| BNB Smart Chain | BNB Smar Chain Testnet |
| RARI            | RARI Testnet           |

In this case, as majority of the projects use Ethereum, we will select the Sepolia testnet option from drop down:

![](/files/44wU4Gj4MYAV7J5bQv27)

As you select, Metamask will pop up a message to switch the network:

![](/files/FyPEctjMUOOb3jImQgv2)

Confirm by clicking "**Switch network**" and you should be on the network you selected.&#x20;

## Make sure there is no errors

You might see some yellow warning message like this - as this is a warning, it won't block your deployment, but we recommend you to take a look and fix if you can.&#x20;

<figure><img src="/files/MNktzZm8Knu1gHMGUoh6" alt=""><figcaption></figcaption></figure>

If you are seeing red error message, that means you haven't provided the information that is necessary to deployment. If you see this message, go back to configuration and fill out the information that is missing.&#x20;

<figure><img src="/files/z6pmxoiRWnJgm9XtQy22" alt=""><figcaption></figcaption></figure>

Once you resolved all the warnings and errors, go ahead and click "**Generate smart contract**".

## Check contract summary

Before you deploy, we highly recommend to check every single settings in the contract summary to make sure you are setting all the information correctly (especially before you deploy to mainnet!).&#x20;

Click "**View Contract Summary**" and check if all the configurations look correct. If you want to change, you can click edit button in each section to go back and edit. (At this point, you can change any configurations without any blockchain transactions)

## Get Testnet ETH

{% hint style="warning" %}
Sometimes the gas fee on Goerli network could get high due to the network conditions and you may not have enough Goerli ETH to deploy your test contract. If that happens, we recommend to manually set the gas price so that when the gas fee falls, the contract deployment transaction goes through automatically. Check out [this guide](https://medium.com/@maimai816/advanced-metamask-gas-tutorial-how-to-set-your-own-gas-prices-236d59f563b7) on how to manually set the gas price on Metamask. Alternatively, you can use Testnet of other chains (Polygon, Arbitrum, Optimism) as you can test the functionality exactly the same on all the other chains.&#x20;
{% endhint %}

Check out [the guide for how to get testnet ETH](/creators/manage-smart-contract/before-deployment/how-to-get-eth-on-testnet) for each network.

## Deploy

Once you check all the configurations, go ahead and deploy your contract by clicking "**Deploy contract**". Launchpad will compile your contract, and Metamask prompts transaction details, confirm the transaction.&#x20;

![](/files/tiKerasjzngAiWI4wACv)

### Confirm additional transaction for your advanced features

{% hint style="warning" %}
We introduced proxy deployment as of April 2023 and it significantly reduces the size of the contracts and the transaction fees for deployment. If certain advanced features are enabled multiple transactions will be required in order to fully configure your smart contract. The first transaction will deploy your contract with basic config settings, and the second transaction will initialize all advanced configuration options. Once the first transaction completes, we will prompt you to confirm the second transaction.
{% endhint %}

* Click on **Request transaction** to deploy the additional features of your contract

<figure><img src="/files/pRuGYdjXaDxa9dpw5qSl" alt=""><figcaption></figcaption></figure>

* after clicking on the Request transaction, Launchpad will deploy your additional feature contracts and Metamask prompts another transaction details, **confirm** the transaction.&#x20;

<div align="left"><figure><img src="/files/2KqKJTu4GWHquoSEyyTv" alt=""><figcaption></figcaption></figure></div>

* If you see the following success messages, your contract is deployed!

<figure><img src="/files/5g9DkzrvUGMVUiYnvkLb" alt=""><figcaption></figcaption></figure>

Congratulations! You deployed your smart contract to blockchain!&#x20;

Now, let's move on to Contract management section to manage your contract.&#x20;


# How to get ETH on Testnet

In order to deploy your smart contract to testnet, you will need ETH on testnet as you will need ETH to deploy your contract on mainnet. As different testnet has different ways of getting ETH, we will list how to get ETH on each testnet.&#x20;

## Ethereum Sepolia testnet

Alchemy offers Sepolia faucet where you can get 0.5 ETH/day to your address.&#x20;

Go to [Alchemy Sepolia](https://sepoliafaucet.com/) faucet and put your wallet address you want to receive testnet ETH (You will need to create an account for Alchemy).&#x20;

<figure><img src="/files/DNHi0YVsaiWuM0kBOyts" alt=""><figcaption></figcaption></figure>

Immediately after you hit "**Send me ETH**", you will see the transaction hash and you will receive 0.5 ETH within a couple of mins (Might take longer if Sepolia usage is high).&#x20;

## Polygon Mumbai testnet

Alchemy also has a faucet for Polygon Mumbai network, go to [Polygon Mumbai faucet](https://mumbaifaucet.com/), provide your wallet address (create an Alchemy account if you haven't) and you will receive MATIC immediately.

<figure><img src="/files/fHQVm1OJjuWch4Nx20rt" alt=""><figcaption></figcaption></figure>

## Arbitrum Goerli testnet

First, get Ethereum Goerli testnet ETH from the guide above.&#x20;

Next, go to [Arbitrum Bridge](https://bridge.arbitrum.io/) and select from as Ethereum Goerli network and to as Arbitrum Goerli network:

<figure><img src="/files/aLVWSu69hD38OihaSWZQ" alt=""><figcaption></figcaption></figure>

Click "**Move funds to Arbitrum Goerli**" and confirm transaction on your wallet. Once the transaction goes through, you will receive the fund.&#x20;

## Optimism Goerli testnet

First, get Ethereum Goerli testnet ETH from the guide above.&#x20;

Next, go to [Optimism Bridge](https://app.optimism.io/bridge/deposit) and select from as Ethereum Goerli network and to as Optimism Goerli network:

![](/files/FXlA5WNZ94sDkVRFHJWd)

Click "**Review deposit**" and confirm transaction on your wallet. Once the transaction goes through, you will receive the fund.&#x20;


# What to test on Testnet

We recommend you to try the following so that you can make sure everything works smoothly when you launch your project.&#x20;

* [Start presale/public sale](/creators/manage-smart-contract/after-deployment/start-stop-public-sale-presale)
* Set up [mint website](/creators/manage-smart-contract/after-deployment/set-up-mint-website) or [mint embed button](/creators/manage-smart-contract/after-deployment/set-up-mint-website/use-mint-button-embed) and mint one token
* [Withdraw funds](/creators/manage-smart-contract/after-deployment/withdraw-your-funds)

On Launchpad, everything works exactly the same on both Testnet/Mainnet - so once you test everything on Testnet, everything should work as expected on Mainnet as well.&#x20;


# Deployment (Mainnet)

Once you tested everything on testnet and feel everything is good to go, you can go ahead and deploy your contract to mainnet!&#x20;

Go to "**Deploy**" tab and switch network to Ethereum by selecting "**Ethereum**" from the dropdown.&#x20;

![](/files/44wU4Gj4MYAV7J5bQv27)

Once you are on the Ethereum mainnet, you can hit "**Deploy contract**" and confirm the transaction. <br>

{% hint style="info" %}
If the gas fee is too high, you can check this [article ](https://medium.com/@maimai816/advanced-metamask-gas-tutorial-how-to-set-your-own-gas-prices-236d59f563b7)to help **set your own gas prices.**
{% endhint %}

{% hint style="warning" %}
Since we already use proxy contracts, multiple transactions will be required to configure your smart contract fully. Once the first transaction completes, we will prompt you to fully confirm the second transaction to deploy your smart contract to the blockchain.
{% endhint %}


# After deployment

After you deploy your contract, you still can change some of the configurations, but not everything.  Also, you will need to interact with blockchain and pay for transactions if you want to change any contract information.&#x20;

These are information you can't change after deployment, so if you want to change these information, you will need to deploy the smart contract.&#x20;

{% hint style="warning" %}
In other words, except these ones, **you never need to redeploy smart contract to change configurations**.&#x20;
{% endhint %}

* Collection name
* Collection symbol
* Max supply
* Presale max supply
* Enable/disable features (public sale/presale/advanced features)
* (Advanced) Free claim contract address
* (Advanced) Burn to mint contract address

After deployment, your contract management will look slightly different and you will see the following menu:

* **Overview:** Overview of the contract
* **Sale:** Public sale/presale information
* **Payout:** Payout/royalties information
* **Advanced:** Configure advanced features if you enabled any of the features
* **Deploy:** Redeploy your contract from here if needed
* **Airdrop:** Gift/airdrop your tokens
* **Withdraw**: Withdraw your funds&#x20;
* **Minting:** Configure your mint button or mint page
* **Reveal:** Reveal your art

<figure><img src="/files/lq7S3UpkbkstFVT0pPOt" alt=""><figcaption></figcaption></figure>

We will walk you through a couple of things you can do after deployment.&#x20;


# Verify contract

Many collectors want the contract to be verified so that they can see the code and see what functions the smart contract has to make sure it's not a rug pull project. Therefore, we highly recommend you verifying the smart contract before your launch.&#x20;

Launchpad has a super easy way to verify your contract, all you need to do is to go to the top page for contract management (click the "Contract Management" in contract menu) and click "**Verify now**" button.

<figure><img src="/files/T4aG3wR74Kq3KJ5RVxNW" alt=""><figcaption></figcaption></figure>

It will take a min or less to verify the contract - once it's verified, you can see the verified mark.&#x20;

<figure><img src="/files/RCNT67SaJJgGtSFQthtB" alt=""><figcaption></figcaption></figure>


# Start/stop public sale/presale

{% hint style="warning" %}
In order to update any the information here, you will need to execute a blockchain transaction. Please note that **all of the actions cost transaction fees.**
{% endhint %}

In order to launch your collection, you will need to start your public sale/presale.&#x20;

You can do so from "Sale" tab in the contract management console by simply clicking "**Start the sale**".&#x20;

If you want to stop the sale, you can do so by clicking "**Stop the sale**".

You can also change the following information:

* Public sale mint price
* Public sale max mints per wallet
* Presale mint price
* Presale max mints per wallet


# Allowlist Checker

This is an optional feature that you can share with your collectors to check if their wallet is on the allowlist before the mint.

<figure><img src="/files/DDStXd1PoAGc5P36xOQI" alt=""><figcaption></figcaption></figure>

### Here's how to set it up:

1. On the "Sale" section under Contract Management, import an allowlist via CSV or manually add addresses and set the quantity below using the "+ Add" button.

<figure><img src="/files/b5u7dpcxB3tMCuccMcBk" alt=""><figcaption></figcaption></figure>

2. Once wallet addresses are added, you can copy the link for your allowlist checker by clicking on the copy button next to it. You can then share it with your community members. You can also try it yourself by opening a new tab and pasting the URL to display and give the wallet checker a try.

<figure><img src="/files/0hUDQh6fBflDbQ0E0ABU" alt=""><figcaption></figcaption></figure>


# Set up mint website

Launchpad offers two ways to build your mint website:

* **Use HeyMint mint page**: Create a page on HeyMint domain (c.f. <https://launchpad.heymint.xyz/mint/{slug}>)
* **Use mint button embed**: Embed a custom designed button to existing website


# Use HeyMint mint page

If you don't want to create your own mint website, this will be the easiest way to set up mint website. All you need to do is to provide your project information and we will create a mint page for you!

Select the following option to get started:

<figure><img src="/files/7xQ55Z4PF5wXJjhjqv7e" alt=""><figcaption></figcaption></figure>

In the setup page, you can set up your mint page by providing following information:

* Collection avatar: Your project's PFP (Recommended to use square image)
* Background image: Your project's signature image (Recommended to use square image)
* Collection page title: Your collection name
* Custom url: The url you'd like to have for your mint website
* Created by: The name of the creator
* Description: The description of your collection
* Website/Twitter/Discord url

While you input the information, you can see how it looks on the right panel.&#x20;

<figure><img src="/files/10JusN7QU9lMA6kuB2VU" alt=""><figcaption></figcaption></figure>

Once you are done setting up your page, hit "Preview & publish", and you can see the preview of the page!

<figure><img src="/files/TZ8YZJvGDcWJvCEa9DRF" alt=""><figcaption></figcaption></figure>

<details>

<summary>Why is my mint closed?</summary>

In most of the cases, the mint is closed because you haven't start any of your sale. You can start public sale/presale from contract management (See how to do so from [Start/stop public sale/presale](/creators/manage-smart-contract/after-deployment/start-stop-public-sale-presale) guide).

If you start the sale and still see the mint closed message, you might be setting start time for your contract and start time hasn't come yet. If you want to start, you can remove start time settings.&#x20;

</details>


# Warpcast Integration for Mints

Collectors can mint directly through your Warpcast post (the collection must be deployed on BASE and using the HeyMint minting page).

We’ve combined the best of both worlds - now you can share your mint on Warpcast and allow collectors to mint directly from your post!&#x20;

### **Here’s how it works:**

1. **Deploy your collection on Base**: Use our [Launchpad](https://nft-launchpad.heymint.xyz/) to create and launch your NFT collection on Base. (You can try this on Base Sepolia testnet too!)<br>

   <figure><img src="/files/YpZKSVLMykrZTeZjXJmL" alt=""><figcaption></figcaption></figure>
2. **Build & customize your minting page**: After deployment, follow these steps to build and customize your minting page:&#x20;

   * Go to Minting > Minting Page in your dashboard.
   * Click on Customize Page to start building your minting page.

   For this feature to work, make sure to create a minting page under HeyMint’s domain - it’s free!

   <figure><img src="/files/0ld9F27MgY040P2XG3jI" alt=""><figcaption></figcaption></figure>
3. **Start the sale**: make sure that minting is open for your collection. Navigate to the Sale tab in your dashboard. From there, click on the "Start the sale" button to open the mint.<br>

   <figure><img src="/files/bPK0ihZFOurerdaGpoF9" alt=""><figcaption></figcaption></figure>
4. **Share your mint page link on Warpcast**: After creating your mint page and starting the sale, share your mint page link on Warpcast.<br>

   <figure><img src="/files/GYWSepLlu0sBrISNPD7S" alt=""><figcaption></figcaption></figure>

That's it! Share your Warpcast post to let collectors mint!


# Use mint button embed

If you already have your website and want to keep your holders in your branded site, you can use mint button embed feature.&#x20;

Select the following option to get started.

<figure><img src="/files/nsPXXDfWD4peDGpfTItJ" alt=""><figcaption></figcaption></figure>

## Design embed button

Launchpad lets you fully customize the mint button so that it will match with the branding of your website.&#x20;

You can customize following properties for enabled/disabled states:

* Background color
* Text color
* Font
* Radius
* Label for the button

<figure><img src="/files/FLN8xqagNujQXKO9TBfw" alt=""><figcaption></figcaption></figure>

Once you finish customizing, hit "**Save design settings & get embed code**" to save the settings.

## Embed code

You will find the embed code that is unique to your project. Click "**Copy to clipboard**" to copy the code and paste in the website builder where you want to show the button.&#x20;

<figure><img src="/files/Pps1yAZVdrqUbDlKKZil" alt=""><figcaption></figcaption></figure>

#### **Using Wix?**

Wix requires you to have \<body> tag around the snippet to make it work. Add \<body> at the beginning and add \</body> at the end of snippet.&#x20;

```
<body>
  <script
    defer
    src="https://launchpad.heymint.xyz/api/embed.js"
    data-project-id="30"
    data-chain="ETH_GOERLI"
  ></script>
</body>
```

## Test mint button

At the end of the page, you can see "**Test mint button**", by clicking the button, it will take you to preview of the mint button.&#x20;

<figure><img src="/files/bk2kodMM8zNBvbSayXF9" alt=""><figcaption></figcaption></figure>

From the preview mint button, you can test mint one of your NFTs and see the exact behavior your collector will see in the mint.

![](/files/SSY9Tg20uzN7gBFDdvy5)![](/files/xhdKzgh2MSy3YXmMlIMR)

&#x20;You can confirm your transaction and finish testing your mint!


# Website builder incompatibility

Integrating mint buttons into websites can be challenging with certain website builders. These challenges arise due to the embedding methods used, resulting in compatibility issues with Metamask.&#x20;

Website builders use different embedding techniques, such as **iframes**, which can hinder mint button interaction with Metamask. As a result, the wallet may not be automatically detected, prompting users to scan instead.\
![](/files/eDuoB7JzCPnGZ4i8hYQ3)

Reasons for Incompatibility:

1. Isolated Embedding: Iframes isolate code snippets, preventing direct communication between mint buttons and Metamask.
2. Varied Approaches: Different website builders handle code snippets differently, leading to compatibility challenges.

Look for website builders known to be compatible with mint button embeddings, such as Wix, Google Sites, or WordPress.

Integrating mint buttons in websites can be challenging with certain website builders. Isolated embedding and varied approaches to code snippets can hinder interaction with Metamask and for some, It can also affect the window size for the embedded button. \
\
To make sure that it is a Builder incompatibility issue you can look at the source of the site and look and see if the button is a descendent of an iframe.\
\
here's a [video ](https://drive.google.com/file/d/1PfEbQboKRxWpaqdOm4_s48wO6e4kJuo2/view?usp=sharing)on how to check the source of your site.<br>


# Set up credit card payment

Set up credit card payments using Crossmint as our credit card payment service provider.

Credit card payments are now enabled by default for ERC-721 contracts. You may set up this feature **after** deployment.

{% hint style="info" %}
Credit cards are supported on these **mainnets**: Arbitrum One, Base, BNB, Ethereum, Optimism, and Polygon.
{% endhint %}

As this feature is currently in beta, it's possible to encounter some issues. To ensure a smooth experience for your users, we recommend thoroughly testing the feature on a testnet like Sepolia before launching your collection on mainnet. It's always better to be prepared!

{% hint style="info" %}
You can use Crossmint to test and deploy your projects on these supported **testnets**: Arbitrum Sepolia, Base Sepolia, BNB Testnet, Ethereum Sepolia, Optimism Sepolia, and Polygon Amoy.
{% endhint %}

{% hint style="warning" %}
There are a few limitations to using this feature:

* Only available for public minting (credit card presale mints are currently not supported on HeyMint).&#x20;
* Only available for mint pages built on Launchpad. You can't use this feature with our embedded mint button.
* Affiliate links are not supported.
* You will need to create an account and collection on [Crossmint](https://www.crossmint.com/) and go through the KYC process to verify your identity and collection on Crossmint, which could take up to 2 business days.
  {% endhint %}

### Steps

1. Go to "Minting" page and click on "Customize page"<br>

   <figure><img src="/files/x0fgY7NsHzHK7eXX9uDL" alt=""><figcaption><p>Click on "Customize page"</p></figcaption></figure>

2. Scroll down to the '**Credit card payments'** section and click the "Get started" button.<br>

   <figure><img src="/files/d7mlDBtrpqEifTqap9jq" alt=""><figcaption><p>Click the "Get started" button</p></figcaption></figure>

3. Click the **'Click here to begin'** button to start configuration.<br>

   <figure><img src="/files/kutO09EVaXWyExhddA6a" alt="" width="272"><figcaption></figcaption></figure>

4. Create a Crossmint account. \
   \
   Crossmint offers separate accounts for testing and live environments:

   * **Staging Account:** Use this for testing your collection on testnet networks (Goerli for Ethereum, Mumbai for Polygon). It's free and provides a safe space to experiment.
   * **Production Account:** Use this for deploying your collection on mainnet (live Ethereum or Polygon networks).

   **Important:**

   * **Testnet contract addresses only work with staging accounts.**
   * **Mainnet contract addresses only work with production accounts.**

   We highly recommend that you start by creating a staging account and thoroughly testing your contract's functionality on testnet before moving to a production account.\
   \
   ![](https://files.gitbook.com/v0/b/gitbook-x-prod.appspot.com/o/spaces%2FgUBEZKVtA2DMYGTVBbl6%2Fuploads%2FwcmEXlcaqYSYGO3C6ug2%2FScreen%20Shot%202023-03-18%20at%2011.09.38%20AM.png?alt=media\&token=64ba5197-5ec8-4ad3-a2cf-4909066d455c)​<br>

5. Go to '**Collections**' and click on '**New collection**'.<br>

   <figure><img src="/files/usHoZGI4PJzF1q9FYFeA" alt=""><figcaption></figcaption></figure>

6. Enter your collection information then click 'Nex&#x74;**'**<br>

   <figure><img src="/files/2JT4CUcHhCiDYLlsQhtR" alt=""><figcaption><p>Enter your collection information</p></figcaption></figure>

7. Choose '**Import an existing contract**' then click 'Nex&#x74;**'**<br>

   <figure><img src="/files/a0cBTt34ftEcs6mXFqsx" alt=""><figcaption><p>Choose '<strong>Import an existing contract</strong>'</p></figcaption></figure>

8. Choose the blockchain and '**Import my own contract**' for Contract provider.<br>

   <figure><img src="/files/Z6xFEv9uHoslRd90QzqX" alt=""><figcaption><p>(Mainnet) Choose the blockchain then, '<strong>Import my own contract</strong>' for Contract provider.</p></figcaption></figure>

   <figure><img src="/files/l5QhNK5bOYeqHMwgJdey" alt=""><figcaption><p>(Testnet) Choose the blockchain then, '<strong>Import my own contract</strong>' for Contract provider.<br></p></figcaption></figure>

9. Import your contract\
   \
   To find your contract address, return to HeyMint Launchpad minting page and look for the "Contract address" section and copy. Then, paste it into 'Token or Proxy Contract Address' field on Crossmint.<br>

   <figure><img src="/files/bkwpueUK9TNUpOHi8ysT" alt=""><figcaption><p>Look for the "Contract address" section on HeyMint minting page and copy. Then, paste it into 'Token or Proxy Contract Address' field on Crossmint<br></p></figcaption></figure>

   <figure><img src="/files/5MQnyS18rTAkoTLIVuwq" alt=""><figcaption><p>Copy contract address</p></figcaption></figure>

10. Copy the '**ABI**' from HeyMint minting page and replace the default '**ABI**' on Crossmint.<br>

    <figure><img src="/files/0qfQYhiwuYH9NhM6Hk8f" alt=""><figcaption><p>Copy the '<strong>ABI</strong>' from HeyMint</p></figcaption></figure>

    <figure><img src="/files/cnwYKIsHHTnPnWmPtZvB" alt=""><figcaption><p>Replace the default '<strong>ABI</strong>' on Crossmint</p></figcaption></figure>

11. Make sure the '**Mint function**', '**Parameter for recipient address**', and '**Parameter for quantity of NFTs purchased**' match those in HeyMint Launchpad.<br>

    <figure><img src="/files/8k2F8VoLOb7VxtviajkS" alt=""><figcaption><p>Fields to match<br></p></figcaption></figure>

    <figure><img src="/files/DeOURX4K8BcRC08yU1Dx" alt=""><figcaption><p>Match the fields</p></figcaption></figure>

12. Register your collection.<br>

    <figure><img src="/files/9AGDR278AQJ5NcYuPkwG" alt=""><figcaption><p>Register your collection</p></figcaption></figure>

13. Enable Crypto and Credit Card payments.<br>

    <figure><img src="/files/bEo52NDhks4evnOJkWOY" alt=""><figcaption><p>Enable Crypto and Credit Card payments</p></figcaption></figure>

14. Copy the Project ID and Collection ID from Crossmint, then go back and paste them into the appropriate fields on HeyMint Launchpad minting page. Then, click on '**Save**'.<br>

    <figure><img src="/files/Da0whWKGuS9PzzOp9eFJ" alt=""><figcaption><p>Copy the Project ID and Collection ID<br></p></figcaption></figure>

    <figure><img src="/files/vVgQl6JjcqJRlOEoKAv3" alt=""><figcaption><p>Paste them into the appropriate fields on HeyMint Launchpad minting page</p></figcaption></figure>

15. Click '**Save changes**'<br>

    <figure><img src="/files/jTegVSNpEERuOGzIRZTY" alt=""><figcaption></figcaption></figure>

You may share this page -> ( [Mint Using a Credit Card](/creators/manage-smart-contract/after-deployment/set-up-credit-card-payment/mint-using-a-credit-card) ) with your collectors for steps on how to mint using a credit card.


# Mint Using a Credit Card

For collectors minting NFTs using a credit card.

### Steps

1. Click the '**MINT NOW**' button.<br>

   <figure><img src="/files/qJDYcax2ODUT3ttM9Hrx" alt=""><figcaption><p>Click the '<strong>MINT NOW</strong>' button</p></figcaption></figure>

2. Click '**Buy with credit card**'.\
   \
   ![](/files/yHGxZClvhQHwqG8aamTW)<br>

3. Choose '**Pay with card**' payment method.\
   \
   ![](/files/kT3PqdkTU7QqvngShixR)<br>

4. Enter credit card details.\
   \
   ![](/files/k24gC9RLdzm6CpV5QC28)<br>

5. View order details and then click '**Open in Crossmint**' to view your NFT collection in your Crossmint wallet.\
   \
   ![](/files/2hF9rpo56Nw706aRFTdZ)<br>

6. (Optional) Transfer your NFTs from your Crossmint wallet to your main wallet by clicking the NFT image and then clicking the '**Transfer**' button.<br>

   <figure><img src="/files/SnlA02WGm6r5kbVdtCWg" alt=""><figcaption></figcaption></figure>

   <figure><img src="/files/p5B8yCXQ4Xlcf585tPGl" alt=""><figcaption></figcaption></figure>


# Reveal art

Art reveal is one of the most exciting moment of your collection. We make the reveal process super easy for you so that you don't need to be stressed out :)

{% hint style="warning" %}
Revealing art will require a blockchain transaction which costs you transaction fees.
{% endhint %}

Go to "**Reveal**" tab on contract management page and click "**Reveal**". Your wallet will prompt you to confirm the transaction. Once you confirm the transaction, you are all set!

<figure><img src="/files/aCWO9NAU2I2tEujU7tQL" alt=""><figcaption></figcaption></figure>

{% hint style="info" %}
Revealing art is basically we are swapping token base uri, so in case you want to do it manually, you can set the url that points to the IPFS link that stores your main asset to token base uri.
{% endhint %}


# Withdraw your funds

The final step for you is to withdraw your funds to get the revenue of your sales!

{% hint style="danger" %}
This action is irreversible and once you withdraw funds, there is no way to get it back.&#x20;
{% endhint %}

Go to "**Sale**" tab and click "**Withdraw**" button make sure that the wallet address you are sending and percentage looks correct. If you want to change the payout address or percentage, you can go to "**Payout**" tab and change the configuration.&#x20;

Once you are ready, you can hit "**Withdraw Funds**" and confirm the transaction, you are all set! Make sure you receive your funds (minus gas price) to address you specified.&#x20;

<figure><img src="/files/6tRLsr0T6DEzvULU7KtP" alt=""><figcaption></figcaption></figure>


# Enable Burn to Mint

How to add the burn to mint feature to your already deployed collection

### Steps to enable the burn to mint feature:

Click on Advanced

<figure><img src="/files/NRQyn7WXaGkxWXRyZVEh" alt=""><figcaption><p>Click on Advanced</p></figcaption></figure>

Click on Add token

<figure><img src="/files/NbNTdhcjWIfCIPSqdjkz" alt=""><figcaption><p>Click on Add token</p></figcaption></figure>

Double-check all details

<figure><img src="/files/JrxFN3TVYfpMSOx102D8" alt=""><figcaption><p>Double-check all details</p></figcaption></figure>

Click on Save

<figure><img src="/files/j34RvXUvhZOWJUxLXd7o" alt=""><figcaption><p>Click on Save</p></figcaption></figure>


# Set up burn to mint page

Customize a user-friendly front-end that your collectors will love!

Creating this page is the same as [setting up a mint website.](/create-a-erc-1155-collection/manage-smart-contract/after-deployment/set-up-mint-website)

1. Click on Minting

<figure><img src="/files/DFKjf9reizCUOtpFeTxp" alt=""><figcaption><p>Click on Minting</p></figcaption></figure>

2. Click on Customize page

<figure><img src="/files/VRd7I0hsDmdCkfFwLQAy" alt=""><figcaption><p>Click on Customize page</p></figcaption></figure>

3. Enter details

<figure><img src="/files/I8eiz2l9VbCu4cMyXU8C" alt=""><figcaption><p>Enter details</p></figcaption></figure>

4. Click on Save changes

<figure><img src="/files/paOrP2ODqmZWaDh2zvfw" alt=""><figcaption><p>Click on Save changes</p></figcaption></figure>

5. Click on "Preview & publish" and then click "Publish" once everything looks good

<figure><img src="/files/jypqiauXziu30Gmt46Wo" alt=""><figcaption><p>Click on Preview &#x26; publish</p></figcaption></figure>

6. Click on Back to customize

<figure><img src="/files/9TOtLmvA7ajwnEBmvejF" alt=""><figcaption><p>Click on Back to customize</p></figcaption></figure>

7. Click on "Back to Minting Overview"

<figure><img src="/files/gExRH2UyrR2pRlRUdWeH" alt=""><figcaption><p>Click on Back to Minting Overview</p></figcaption></figure>

8. Click on "View page" to see your minting page

<figure><img src="/files/hLMvn9ezzVhWRn7IwVEF" alt=""><figcaption><p>Click on View page</p></figcaption></figure>

You're almost there! Starting the burn to mint feature is up next. Once enabled, your collectors can start burning their tokens to mint new ones. Until then, they will see a message that says "Mint closed."

<figure><img src="/files/Znx9xntOuaEPycftuRCx" alt=""><figcaption></figcaption></figure>

You are now ready to [activate your burn to mint feature!](/creators/manage-smart-contract/after-deployment/enable-burn-to-mint/start-stop-burn-to-mint-feature)<br>


# Start/stop burn to mint feature

Now we enable the feature! :)

Click on Advanced&#x20;

<figure><img src="/files/qmNHsYI0LTTZG0qYqYRY" alt=""><figcaption><p>Click on Advanced </p></figcaption></figure>

Click on Start the burn to mint&#x20;

<figure><img src="/files/VlwvpqhZXPZcvtX3Idcz" alt=""><figcaption><p>Click on Start the burn to mint</p></figcaption></figure>

Wait a few seconds for the update

<figure><img src="/files/YF7BVwcTqD94Fh09VcgE" alt=""><figcaption><p>Wait a few seconds for the update</p></figcaption></figure>

Status check

<figure><img src="/files/iKJ9rF4DyTZ6ncsjffg2" alt=""><figcaption><p>Status check</p></figcaption></figure>

To view your updated minting page, click on Minting&#x20;

<figure><img src="/files/GjoPvZ5mDTLLSd8Rhi8N" alt=""><figcaption><p>To view your updated minting page, click on Minting </p></figcaption></figure>

Click on View page&#x20;

<figure><img src="/files/7A78h2GmqWlf4SgZyvAa" alt=""><figcaption><p>Click on View page</p></figcaption></figure>

This is what collectors will see when the feature is enabled.

<figure><img src="/files/kZ6YZ81uP6SPKgITFZzg" alt=""><figcaption><p>This is what collectors will see when the feature is enabled.</p></figcaption></figure>

### Stop burn to mint

Click on Advanced

<figure><img src="/files/VO2jJ78Bs8fogAO2L5XQ" alt=""><figcaption><p>Click on Advanced</p></figcaption></figure>

Click on "Stop the burn to mint"

<figure><img src="/files/YkvXnmLzYxpayHLTrm7m" alt=""><figcaption><p>Click on "Stop the burn to mint"</p></figcaption></figure>


# Create a ERC-721A collection using generated Art

Our platform offers three tools for creating an ERC-721A collection: 'Generative Collection' using our art generator, 'Tokens (Beta)' and 'Edition (single owner)' for collections with existing art.


# Edition (Single Owner)

Enables the creation of multiple instances of a single NFT, each with a customizable supply limit. Despite the multiple copies, each NFT remains uniquely ownable, ensuring that only one individual can possess a specific copy at any given time.\
\
In this workflow, creators are tasked with uploading their digital images and defining the percentage each image represents within the total NFT collection. For example, with a collection that encompasses 1,000 NFTs across two images, the creator has the discretion to allocate a distribution ratio, such as an equitable 50% for each image, or any other desired proportion like 30% for one image and 70% for the other. It is essential that the combined percentages for all images collectively equal 100%. Once this allocation is set, our platform leverages the IPFS to mint the exact quantity of NFTs in accordance with the established supply ratio, ensuring consistency with the creator's distribution plan.

\ <br>

<figure><img src="/files/dvrQvLZ4dEUX9aNYYFS1" alt=""><figcaption></figcaption></figure>


# Tokens (Beta)

A flexible new tool for more fine-tuned control over how you create your NFT collection. Supports 1 of 1s, editions, and more. Each NFT is ownable by only one person.

This tool is a brand-new and intuitive way of creating NFT collections. It offers features that will help you conveniently create your NFT project.

<figure><img src="/files/r29a2t4ZvF6hFa27oo9A" alt=""><figcaption></figcaption></figure>

Start by hitting the **+ Create** button and providing the collection details. Then, click on **Create Collection** to proceed to the next step.

<div align="left"><figure><img src="/files/2WARLWMIAl0InQZJzNZh" alt=""><figcaption></figcaption></figure></div>

### A. Upload assets&#x20;

Click on **Upload some assets!** to import your art. This will also enable you to Bulk Import.

<div align="left"><figure><img src="/files/eEDx2ICYnz5UTm11rsLB" alt=""><figcaption></figcaption></figure></div>

After the upload, all the assets will be on your screen.

<figure><img src="/files/OiiXuDGuBN3sGsQrphpX" alt=""><figcaption></figcaption></figure>

There are buttons that can be used for deleting and adding assets. They are located at the upper right corner of the screen.

* To add more assets, click on the **+Add** button.
* To delete all the uploaded assets, click on the **Reset** button.\
  ![](/files/hNxh4srjY7OrK0Kfac2C)
* To individually delete an asset, go to the token and click on the drop-down arrow; an option to delete that specific image will appear.\ <br>

  <div align="left"><figure><img src="/files/X4uYcwFLgYO5Uljtr4Fl" alt=""><figcaption></figcaption></figure></div>

  <div align="left"><figure><img src="/files/F0VUMf9tDVtCofnqo4qp" alt=""><figcaption></figcaption></figure></div>

### B.  Edit assets

After all the assets are uploaded, proceed with editing the details of the tokens.

1. **Change the name, add a description,and  add attributes of each token**

Click on each token to start editing its details. This window will pop up.

<div align="left"><figure><img src="/files/hZJ6i4bn2Xjhmmv8PVZ7" alt=""><figcaption></figcaption></figure></div>

* #### Change name

By default, the Token IDs are just the edition numbers. **Edition** indicates the arrangement or sequence of the tokens during the minting process. <br>

<div align="left"><figure><img src="/files/b2CEpGZZIvmtWzPnQwJa" alt=""><figcaption><p>(1 is the very first token minted, 2 second, 3 third.)</p></figcaption></figure></div>

To change the token ID, just put your desired name in the textbox.

<div align="left"><figure><img src="/files/wGJK4xMXzVoackCCGrPF" alt=""><figcaption></figcaption></figure></div>

<div align="left"><figure><img src="/files/M1PlsvlZ2SlGnWOEvuEg" alt=""><figcaption><p>This is what it looks like on opensea</p></figcaption></figure></div>

To add the edition number with the token ID, just add **{edition}**; it can be placed before, after, or in between the nam&#x65;**.** <br>

<div align="left"><figure><img src="/files/od4oadht9x8zgxbEp1Ea" alt=""><figcaption><p>Before</p></figcaption></figure></div>

<div align="left"><figure><img src="/files/d037wsTJOjqRPU9kl88X" alt=""><figcaption><p>In Between</p></figcaption></figure></div>

<div align="left"><figure><img src="/files/TXB6i92ibBSKYXEVdLT2" alt=""><figcaption><p>After</p></figcaption></figure></div>

<div align="left"><figure><img src="/files/eMeoUOVX1PEKVNNBVNIM" alt=""><figcaption><p>This is what it looks like on opensea</p></figcaption></figure></div>

* **Add description**

To add a token description just type in the textbox under Description and hit **SAVE**.

<div align="left"><figure><img src="/files/MuhVzVH7Ej84YXBTNhAd" alt=""><figcaption></figcaption></figure></div>

<div align="left"><figure><img src="/files/fcdusljO20CQnEo59suH" alt=""><figcaption><p>This is what it looks like on opensea</p></figcaption></figure></div>

* **Add attributes**

To add token traits, just click on **+ Add** below the attributes. Two textboxes will appear; the first is for your trait name, and the second is the corresponding value.

<div align="left"><figure><img src="/files/BiActdCluqdlFPlJPVXP" alt=""><figcaption></figcaption></figure></div>

To add more traits or attributes, just keep on clicking on **+ Add**.<br>

<div align="left"><figure><img src="/files/nYfByahuC7NeQx9uw9W5" alt=""><figcaption></figcaption></figure></div>

After everything is set, don't forget to hit **SAVE.**&#x20;

<div align="left"><figure><img src="/files/sFhhY4Ef289vIuhbDViu" alt=""><figcaption><p>This is what it looks like on opensea</p></figcaption></figure></div>

2. **Clone**

Use **Clone** to make multiple copies of a token. To do this, go to the token and click on the drop-down arrow at the upper left part.

<div align="left"><figure><img src="/files/JwV9WWBNrCiZCHTYJaw8" alt=""><figcaption></figcaption></figure></div>

<div align="left"><figure><img src="/files/aqonY124SMdMAP2Eos9c" alt=""><figcaption></figcaption></figure></div>

A text box will pop up; put the desired number of copies. (there is no limit).<br>

<div align="left"><figure><img src="/files/hspTNw1s4heB5jHDiZ2o" alt=""><figcaption></figcaption></figure></div>

<div align="left"><figure><img src="/files/ziKDqHChRVCzXuuOKQ0C" alt=""><figcaption><p>This is what it looks like after cloning</p></figcaption></figure></div>

{% hint style="info" %}
Cloning also copies the name, description, and attributes of the token, so make sure to edit these things first before cloning.
{% endhint %}

3. **Bulk Edit**&#x20;

To edit all tokens at once, use ![](/files/l70jAEbp9zNyaCEcRAmu).&#x20;

It is located at the upper left part of the screen.<br>

<div align="left"><figure><img src="/files/koDbxfAX9yfXHou6p3zu" alt=""><figcaption></figcaption></figure></div>

{% hint style="info" %}
Don't forget to hit the **SAVE** button after editing.
{% endhint %}

**Filter + Bulk Edit** can also be used to edit specific groups of tokens, especially if they already have attributes. Just type in the word that filters the tokens on the search box, then click on **Bulk Edit**.

<div align="left"><figure><img src="/files/GViA3yyqkvPDhtbTgInX" alt=""><figcaption></figcaption></figure></div>

<div align="left"><figure><img src="/files/T1yrQDr9xZSD6Acqz8kE" alt=""><figcaption></figcaption></figure></div>

4. **Shuffle**

After editing the token information, the last step before uploading to IPFS is to arrange the sequence of the tokens; this will determine their edition.&#x20;

If tokens were cloned, they can be shuffled by clicking on the **Shuffle** button. It is beside the Bulk Edit (it can be clicked multiple times).

<div align="left"><figure><img src="/files/uxD3Q4P81GMsQXJYbSmE" alt=""><figcaption></figcaption></figure></div>

Tokens can also be manually arranged by just clicking and dragging on the 6-dot button at the upper right part of the token.

<figure><img src="/files/tVGDjWLFZXdweYvbC8Wk" alt=""><figcaption></figcaption></figure>

### C. Upload to IPFS

Finally, after customizing the collection hit the NEXT button on the upper left part of the screen.

<div align="left"><figure><img src="/files/pT4ZvPznUfEgLv2934df" alt=""><figcaption></figcaption></figure></div>

Then click on Upload Metadata.<br>

<div align="left"><figure><img src="/files/6ZqDUWHmeDNPoO6iHxrQ" alt=""><figcaption></figcaption></figure></div>

Wait for it to finish the upload.

<div align="left"><figure><img src="/files/01ZvuY2hf6rZgp1n93li" alt=""><figcaption></figcaption></figure></div>

Then proceed on setting the other details of the collection on Contract Management before finally deploying.

<div align="left"><figure><img src="/files/B1XKd2KyhsymSpW29TOh" alt=""><figcaption></figcaption></figure></div>


# Set up smart contract

Configure smart contract for your NFT

The first step for setting up your NFT collection is to configure your smart contract.&#x20;

## Collection details

First, fill in some basic information about your collection:

* **Collection name:** This will be the official name of your NFT collection that will appear by default on NFT marketplaces like OpenSea, and on Etherscan. This can never be changed after smart contract deployment.
* **Collection Symbol**: This is a short symbol, typically all caps and 3-5 characters in length, that serves as an abbreviation for the name of your NFT collection. This will show up on token trackers such as Etherscan and can never be changed after smart contract deployment. Example: BAYC (for Bored Ape Yacht Club)
* **Collection description**: This is a short description that will be in your token metadata and displayed in the description section for each token on OpenSea.

{% hint style="warning" %}
Please note that this information cannot be changed after you deploy your smart contract. Please make sure all information is correct before you deploy your contract.
{% endhint %}

<figure><img src="/files/iT8UE2Md5ctzcOVGoNwq" alt=""><figcaption><p>Collection details set up</p></figcaption></figure>

## Add token(s)

ERC-1155 standard allows you to add as many as tokens you want, and each token can have its own presale/public sale configurations, image/animation, token supply, mint page.&#x20;

{% hint style="warning" %}
Please note that Launchpad doesn't support adding tokens after deployment. If you want to use ERC-1155, make sure you add all the tokens you need for your collection.&#x20;
{% endhint %}

Add token by clicking "**Add token**" button and you will see the modal pop up that allows you to provide information for each token.&#x20;

### Token details

Fill in the following information:

* **Token name**: Name of each token, This will be displayed as the name of this NFT on exchanges such as OpenSea.
* **Token ID**: Unique ID assigned to this NFT. This can be any arbitrary number, but can never be changed after contract deployment.
* **Max token supply**: This is the maximum number of times that this token can be minted. If you leave it blank, the token will be an open edition and there will be no limit in supply.&#x20;
* **Token description**: This will show up on exchanges such as OpenSea as the description text for this specific NFT.

### Artwork

Upload image (required) and animation (optional) for your token.

* **Image**: Upload any common image format, including animated GIFs.&#x20;
* **Animation**: Animation must be a .gltf, .glb, .webm, .mp4, .m4v, .ogv, .ogg, .mp3, .wav, or .oga file. Please note that GIFs are considered images and should be uploaded above in the Image section.

{% hint style="warning" %}
Even if your NFT is an animation, a fallback image is required for certain situations when the animation cannot be displayed or must be manually triggered.
{% endhint %}

* **Attributes**: Attributes will be displayed on exchanges such as OpenSea (where they are known as Properties).&#x20;

<figure><img src="/files/MXkzIXn8s77B8dVVfky3" alt=""><figcaption></figcaption></figure>

**Already uploaded your art to IPFS?**

You can set your IPFS link that points to the metadata to "Token metadata URI" field in the advanced section.&#x20;

{% hint style="warning" %}
Enabling this will remove any unsaved image, animation, or attribute that you added.
{% endhint %}

Please make sure that metadata is set up correctly otherwise your NFT won't show up correctly on marketplaces. Please make sure that:

* The IPFS link you provide is pointing to a metadata file, not the asset file.
* The metadata file content is formatted as JSON.
* The metadata file does NOT have .json file extension as our contract doesn't support .json, make sure to format the file without it.
* The metadata file has image\_url that points to the correct location where your asset is store.

If you'd like to see a correct example of metadata, check out [here](https://artdrops.curiousaddys.com/tokens/2).&#x20;

{% hint style="info" %}
Creating and setting metadata on your own tends to cause the issue in displaying your NFT due to incorrect metadata settings. We highly recommend to read [How to create metadata blog post](https://heymint.xyz/blog/how-to-create-nft-metadata) and make sure it's set up correctly.
{% endhint %}

### Sale details

Next, fill in your public sale/presale information. You can toggle on/off both sales to enable/disable them in your contract.

### Public sale

**Basic**

* **Public sale price:** This is the price collectors will pay to mint each NFT in the public sale. This number can be changed at any time after smart contract deployment. Please leave this blank for a free mint. Once you set the price, you can see the estimated revenue you'll earn if your mint sells out.

**Advanced**

* **Schedule minting time**: Enabling this allows you to set the time to start/end your public sale automatically. No minting will be allowed outside of this range of time.&#x20;

{% hint style="warning" %}
Even if you enable the scheduling minting time feature, you still need to manually start public sale beforehand from contract management page. Once you start the public sale, when the start time you set comes, it will automatically start the sale.&#x20;
{% endhint %}

* **Max mints per wallet:** This is maximum number of NFTs that can ever be minted by a single address across multiple transactions for your public sale. This number can be changed after deployment. You can leave this blank to keep this unlimited.

### Presale

{% hint style="info" %}
You will need to enable the presale option to add the presale feature.&#x20;
{% endhint %}

**Basic**

* **Presale price:** This is the price collectors on your allowlist will pay to mint each NFT in your presale. This number can be changed at any time after smart contract deployment.
* **Presale supply:** If you would like to limit presale mints, please enter the number of total NFTs available for minting during presale. Once mints reach this limit, the presale will automatically turn off and all remaining NFTs can only be minted in the public sale. **This number cannot be changed after deployment.**&#x20;

**Advanced**

* **Max mints per wallet:** This is maximum number of NFTs that can ever be minted by a single address across multiple transactions for your presale. This number can be changed after deployment. You can leave this blank to keep this unlimited.
* **Schedule minting time**: Enabling this allows you to set the time to start/end your presale automatically. No minting will be allowed outside of this range of time.&#x20;

{% hint style="warning" %}
Even if you enable the scheduling minting time feature, you still need to manually start public sale beforehand from contract management page. Once you start the public sale, when the start time you set comes, it will automatically start the sale.&#x20;
{% endhint %}

## Payout & Royalties

Lastly, fill in payout & royalties information (make sure to set the correct addresses as all your revenue goes to these addresses!)

* **Mint payout address & percentage**: Fill in the address that you want to receive payment for your primary sale. You can have more than 1 addresses to automatically split mint revenue, but the percentages assigned to all the addresses must sum up to 100%.&#x20;
* **Royalty payout address:** This will be the address where royalty payments are sent. This can be changed after deployment. Please note that merely setting this does not enforce royalties on OpenSea - to do that, you will need to enable the marketplace blocklist function in a later step and ensure all exchanges that do not enforce royalties are blocked from trading your NFTs.

Once you set your basic information and hit "**Create collection**", you will see your contract management console!

We will show you how to deploy your contract in a later section. but next step is to upload your token asset to IPFS! You can click "**Go to upload**" to start the process.

<figure><img src="/files/BV0e8uTMGDOwsF6y2svg" alt=""><figcaption></figcaption></figure>


# Upload assets to IPFS

Once you create all the tokens, we will automatically generate metadata and upload art and metadata to IPFS.&#x20;

Go to "**Upload**" tab in contract management and click "**Upload tokens & metadata to IPFS**".&#x20;

If you see the success message, all of the assets are uploaded and you are good to go :)

<figure><img src="/files/lFYknkyeFrBwMfBLTsgy" alt=""><figcaption></figcaption></figure>


# Manage smart contract

Managing your contract before deployment

Once you finish setting up your smart contract, you will immediately see your contract management console. Please note that there are different states between before/after deployment. The biggest difference before/after deployment is:

<table><thead><tr><th width="167.33333333333331"></th><th>Before deployment</th><th>After deployment</th></tr></thead><tbody><tr><td>Configurations</td><td>You can change any configurations</td><td>You can change some of the configurations but not all of them. The configurations below cannot be changed:<br>- Collection name<br>- Collection symbol<br>- Max supply/presale max supply<br>- Enable/disable features<br>- Add/remove tokens </td></tr><tr><td>Blockchain transactions</td><td>Not necessary</td><td>You will need to interact with blockchain and confirm transactions every time you change any values. </td></tr></tbody></table>


# Before deployment

Before you deploy your smart contract, you can change configuration details at any time. There are 5 tabs where you can review and edit your configuration details:

* **General:** General information
* **Token(s):** Each token's art, public sale/presale information
* **Payout:** Payout/royalty information
* **Upload**: Upload your token assets to IPFS
* **Deploy:** Once you are ready to deploy, you can deploy your contract from here


# (Presale only) Set up allowlist

You can set an allowlist for each token separately. Select the token you'd like to set the allowlist for and follow the guide [here](/creators/manage-smart-contract/before-deployment/presale-only-set-up-allowlist) to create an allowlist.


# Deployment (Testnet)

Check out a guide for how to deploy to Testnet from [here](/creators/manage-smart-contract/before-deployment/deployment-testnet).


# What to test on Testnet

We recommend you to try the following so that you can make sure everything works smoothly when you launch your project.&#x20;

* [Start presale/public sale](/create-a-erc-1155-collection/manage-smart-contract/after-deployment/start-stop-presale-public-sale) for each token ID
* Set up [mint website](/creators/manage-smart-contract/after-deployment/set-up-mint-website) or [mint embed button](/creators/manage-smart-contract/after-deployment/set-up-mint-website/use-mint-button-embed) and mint one token for each token ID
* [Withdraw funds](/creators/manage-smart-contract/after-deployment/withdraw-your-funds)

On Launchpad, everything works exactly the same on both Testnet/Mainnet - so once you test everything on Testnet, everything should work as expected on Mainnet as well.&#x20;


# Deployment (Mainnet)

Check out the guide on [how to deploy on Mainnet](/creators/manage-smart-contract/before-deployment/deployment-mainnet).


# After deployment

After you deploy your contract, you still can change some of the configurations, but not everything.  Also, you will need to interact with blockchain and pay for transactions if you want to change any contract information.&#x20;

These are information you can't change after deployment, so if you want to change these information, you will need to deploy the smart contract.&#x20;

{% hint style="warning" %}
In other words, except these ones, **you never need to redeploy smart contract to change configurations**.&#x20;
{% endhint %}

* Collection name
* Collection symbol
* Max supply
* Presale max supply
* Enable/disable features (public sale/presale/advanced features)
* (Advanced) Free claim contract address
* (Advanced) Burn to mint contract address

After deployment, your contract management will look slightly different and you will see the following menu:

* **Overview:** Overview of the contract
* **Sale:** Public sale/presale information
* **Payout:** Payout/royalties information
* **Advanced:** Configure advanced features if you enabled any of the features
* **Deploy:** Redeploy your contract from here if needed
* **Airdrop:** Gift/airdrop your tokens
* **Withdraw**: Withdraw your funds&#x20;
* **Minting:** Configure your mint button or mint page
* **Reveal:** Reveal your art

<figure><img src="/files/lq7S3UpkbkstFVT0pPOt" alt=""><figcaption></figcaption></figure>

We will walk you through a couple of things you can do after deployment.&#x20;


# Verify contract

Check out [the guide on how to verify contract](/creators/manage-smart-contract/after-deployment/verify-contract).


# Start/stop presale/public sale

{% hint style="warning" %}
In order to update any the information here, you will need to execute a blockchain transaction. Please note that **all of the actions cost transaction fees.**
{% endhint %}

In order to launch your collection, you will need to start your public sale/presale for your each token.

{% hint style="info" %}
Each token has its own presale/public sale state, so you can start/stop sale for each token separately.
{% endhint %}

You can do so from "**Token(s)**" tab and "**Sales**" on the left menu in the contract management console by simply clicking "**Start the sale**".&#x20;

If you want to stop the sale, you can do so by clicking "**Stop the sale**".

You can also change the following information:

* Public sale mint price
* Public sale max mints per wallet
* Presale mint price
* Presale max mints per wallet


# Set up mint website

Launchpad offers two ways to build your mint website:

* **Use HeyMint mint page**: Create a page on HeyMint domain (c.f. <https://launchpad.heymint.xyz/mint/{slug}>)
* **Use mint button embed**: Embed a custom designed button to existing website

Check out the following guides to learn how to set up your mint website.&#x20;

[Set up a mint page on HeyMint](/creators/manage-smart-contract/after-deployment/set-up-mint-website/use-heymint-mint-page)

[Use mint button embed](/creators/manage-smart-contract/after-deployment/set-up-mint-website/use-mint-button-embed)


# Withdraw your funds

Check out the guide for how to withdraw funds from [here](/creators/manage-smart-contract/after-deployment/withdraw-your-funds).


# Set up a collection in marketplaces

One of the questions we often get from NFT creators is, "So I deployed a smart contract on blockchain - how does my NFT collection show up on all the marketplaces?". There is often a misconception on how NFT collections get listed on marketplaces, so we decided to make a super quick guide.

### Do you need to upload your NFTs to marketplaces to show them up?

The answer is no. You will never need to upload your NFTs to marketplaces if you already deployed your smart contract on blockchain. It's because what marketplaces do is to watch the blockchain, find newly created contract and save the contract information in their database. And once they are able to find the smart contract, they can easily get all the information for each NFT as all the smart contract follows the same standard (ERC-721 or ERC-1155) and all they need to do is call the function defined in the standard to get information about each NFT.

### How do I create a collection in marketplaces?

As all the marketplaces already have the information of your contract, all you need to do is to login to marketplaces with the wallet you deployed the contract and find the collection. One thing you need to know is, **the collection won't show up until you mint at least one NFT** as marketplaces don't allow an empty collection. So you can either mint one or airdrop one to yourself and as soon as one NFT is created in the smart contract, you will be able to find your collection on marketplaces. The way to find it is to simply search your smart contract address in search box and your collection should show up.

#### [How to mint one NFT from Launchpad](/after-creating-a-collection/set-up-a-collection-in-marketplaces/minting-an-nft)

[**How to airdrop an NFT**](/after-creating-a-collection/set-up-a-collection-in-marketplaces/airdropping-gifting-an-nft)

<br>


# Minting an NFT

How to mint one (or more) NFT/s from Launchpad

{% hint style="info" %}
We are charging a fraction for fee for each token on mint:

* Ethereum mainnet: 0.0008 ETH/\~$1 per token
* Polygon mainnet: 0.2 MATIC/\~$0.13 per token

*If the project owner is a* [*Launchpad Lifetime Access Pass*](https://opensea.io/collection/heymint-launchpad-lifetime-access-pass) *owner,* [*Curious Addys*](https://opensea.io/collection/catc) *holder (either holding a Curious Addys NFT & a* [*Curious Addys SBT token*](https://opensea.io/collection/heymint-launchpad-catc-access-pass) *or just holding a Curious Addys NFT longer than 6 months) or* [*Zen Academy SBT*](https://opensea.io/collection/heymint-launchpad-za-access-pass) *holder, the fee will be waived.*\
\
*Please check* [How the HeyMint Fee works](/pricing/how-the-heymint-fee-works)*for more information about the fees.*&#x20;
{% endhint %}

### **Creators: How to mint**

Step 1: Click on 'Minting' in the side panel, then select 'Customize Page.'

<figure><img src="/files/45nNjNgJAsZrwaS8g9zp" alt=""><figcaption></figcaption></figure>

Step 2: After [creating your mint page](/creators/manage-smart-contract/after-deployment/set-up-mint-website/use-heymint-mint-page), click on View page

<figure><img src="/files/Oc47sCFqPdRSoYIpQSE0" alt=""><figcaption></figcaption></figure>

Step 3: You will be redirected to your collection’s mint page.

{% hint style="danger" %}
*Mint will remain closed until you start your presale/public sale. Once you're ready to start your sale and open the mint, you can do so by navigating to the "Sale" section and starting the presale or public sale (whichever you prefer) from there. Please keep in mind that in order to mint during the presale, addresses will need to be added to the allowlist.*&#x20;

*If you're not yet ready to start the sale, you also have the option to* [*airdrop yourself an NFT*](/after-creating-a-collection/set-up-a-collection-in-marketplaces/airdropping-gifting-an-nft)*.*&#x20;

![](/files/mPFvxv2wzCG2nrSH7zjC)
{% endhint %}

![](/files/0NjkEuT957MaYXrUTpRM)

Step 4: Click on Mint Now

![](/files/Sfe3Ls6ltEeTMFdZZvBu)

Step 5: You will see this message and have to confirm the transaction in your wallet

![](/files/1schpoMuONI2x4NI6Ugo)

Step 6: Once the mint has been confirmed in your wallet, you can view it on OpenSea by clicking the link "View on OpenSea"

{% hint style="danger" %}
It may take a few minutes for OpenSea to load and display your collection. So if you don't see it right away, please don't worry and just hang tight. It should show up soon.
{% endhint %}

![](/files/vH5mMdix4XQZg9eEiWNe)

\ <br>

### **Collectors: How to mint**

Step 1: Open the mint page in a browser with your wallet extension

![](/files/SmzTrP1ierC3Kjf5m1v9)

<br>

Step 2: Click on Connect your wallet

![](/files/lojfi0HQy2mTLk5Q9cRO)

<br>

Step 3: Select your wallet

![](/files/6vPyuxUfnt0GALtXIb8B)

<br>

Step 4: Click on Mint Now

![](/files/Sfe3Ls6ltEeTMFdZZvBu)

Step 5: Confirm the transaction using your wallet

​​![](/files/1schpoMuONI2x4NI6Ugo)

<br>

Step 6: Once you have successfully minted, you will be able to view it on OpenSea

![](/files/vH5mMdix4XQZg9eEiWNe)


# Airdropping/gifting an NFT

{% hint style="info" %}
We are charging 0.00007 ETH/\~$0.1 per token for airdrop/gift tokens (so if you want to airdrop 10 tokens, it will cost \~$1).
{% endhint %}

### **How to manually airdrop or gift NFTs**

1. Click on Airdrop

<figure><img src="/files/xvglO945uq1DN7iIlOlo" alt=""><figcaption><p>Click on Airdrop</p></figcaption></figure>

2. Paste the wallet address
3. Enter the quantity of NFTs you want to send

<figure><img src="/files/NDCCB5TbI2tjPW1luWda" alt=""><figcaption><p>Paste the wallet address and enter the quantity of NFTs you want to airdrop</p></figcaption></figure>

3. Click on Send

### **How to import gift addresses via CSV**

1. Click the + button and import your CSV file

<figure><img src="/files/5UGajZ6t2zsM6fmoAY28" alt=""><figcaption><p>Click the + button and import your CSV file</p></figcaption></figure>

{% hint style="info" %}
Please make sure that your csv is in this format:&#x20;

<img src="/files/6gGm6PXxFOCuNWv5f9yV" alt="" data-size="original">
{% endhint %}

2. Or you can [Download a sample CSV](https://launchpad.heymint.xyz/sample-allowlist.csv)
3. Click on Send

<figure><img src="/files/sr9VTU3PiwIlLQUn8JB0" alt=""><figcaption><p>Click on Send</p></figcaption></figure>

### How to check collection in OpenSea after airdrop/gifting

1. Once you've successfully sent the tokens, click on "Overview"

<figure><img src="/files/NBRBzhsMkBpmuqoi58CF" alt=""><figcaption><p>Click on "Overview"</p></figcaption></figure>

2. Copy the contract address

<figure><img src="/files/tGxLpQHIwmA0wgtytPuF" alt=""><figcaption><p>Copy the contract address</p></figcaption></figure>

3. Open [OpenSea](https://opensea.io/) in a new tab or [OpenSea Testnets](https://testnets.opensea.io/) (for testnets).
4. Search your collection by pasting the contract address in OpenSea's search bar.
{% hint style="danger" %}
It may take a few minutes for OpenSea to load and display your collection. So if you don't see it right away, please don't worry and just hang tight. It should show up soon.
{% endhint %}

<figure><img src="/files/j4Mf5rIXoDMeYnmrGmN3" alt=""><figcaption><p>Search your collection by pasting the contract address in OpenSea's search bar.</p></figcaption></figure>

5. Click on your collection's name to view your collection.


# HeyMint Buttons

Adding HeyMint links to your website just got easier! Download our buttons in PNG and SVG formats to use on your website. Happy linking! :)

<figure><img src="/files/BVStoYixOv7xQKsCGDpi" alt=""><figcaption><p>HeyMint Buttons</p></figcaption></figure>

{% file src="/files/cN4inWaaXRGdt4KgXXRt" %}
Download HeyMint Buttons in PNG format
{% endfile %}

{% file src="/files/GvMzMCxtzyep1U8ddrjj" %}
Download HeyMint Buttons in SVG format
{% endfile %}


# HeyMint Launchpad Closure Announcement, FAQs, and Migration Guide

A step-by-step migration guide to help you export your collection and metadata from HeyMint Launchpad to your preferred IPFS host before the platform shuts down.

## Important Announcement

After a lot of thought, the HeyMint team has made the tough decision to sunset the HeyMint platform, including Launchpad, Quests, and all related services as it’s no longer sustainable for us to continue operating in the current market environment. We’ll be officially signing off all services on May 31, 2025.

This means that hosting for collections and metadata pinned via our IPFS will also come to an end and eventually become unavailable. To help make this transition as smooth as possible, we’ve put together a migration guide to support you and avoid any disruptions to the collections you’ve trusted us with.

### Here are the key dates to keep in mind:

* **May 31, 2025** – Art and collection generation services will close, and new user sign-ups will be disabled.

## Frequently Asked Questions (FAQs):

<details>

<summary>Sorry to hear about the closure. May we ask why HeyMint is shutting down?</summary>

First off, thank you so much for being part of the journey and trusting us with your NFT collection. Unfortunately, due to the current market conditions and rising operational costs, continuing the platform is no longer sustainable. Rather than risk a drop in quality, we’ve made the hard call to sunset HeyMint and shift our focus and resources to new and exciting projects. We hope you’ll stay tuned for what’s next!

</details>

<details>

<summary>What will happen to my current collections and projects in HeyMint / Launchpad?</summary>

If you’ve already deployed your project, you can access and make modifications to your contract via explorers such as Etherscan, Basescan, etc. - please make sure your contract is verified (you can check this in your project dashboard under Smart Contract > Overview).

If you used our art generation/token flow tool, you can now download your artworks and images directly from your project dashboard for free - even if they were previously part of a Plus or Premium feature. We're doing this as a gesture of appreciation and to help with your migration to other platforms.

</details>

<details>

<summary>What happens if I don’t migrate my collection and assets before May 31, 2025?</summary>

After the shutdown, HeyMint’s services and website will no longer be available—including the user interface for managing your project and any assets uploaded through our platform (like art-gen layers or custom token images).

Additionally, any images and metadata hosted via HeyMint’s IPFS pinning will be **unpinned** and may become **inaccessible**. To avoid losing access, we strongly recommend migrating your assets and metadata to your own IPFS host, such as [Pinata](https://pinata.cloud/) or [Storacha](https://console.storacha.network/).

If your project has already been deployed to the blockchain, you’ll still retain full control of it. You can manage its settings through the **Write as Proxy** feature available on your respective blockchain explorer (like Etherscan or Basescan).

**Important:** Make sure your contract is **Verified** in your project dashboard under **Smart Contract > General**—this is required to use the Write as Proxy tools.

</details>

<details>

<summary>Can I still mint NFTs from my collection after the shutdown?</summary>

Yes! If your collection is already deployed to the blockchain, it will continue to exist and function. However, you’ll need to set up and manage your own user interface to allow minting and interaction with users, since HeyMint’s UI will no longer be available.

</details>

## Launchpad Migration Guide

<mark style="color:purple;">**For ERC-721A**</mark> – You can follow the full steps outlined below on this page.

[<mark style="color:purple;">**For ERC-1155**</mark>](/migrate/heymint-launchpad-closure-announcement-faqs-and-migration-guide/erc-1155-migration-guide) – Due to the structure of ERC-1155 collections, please continue to the [ERC-1155 Migration Guide](/migrate/heymint-launchpad-closure-announcement-faqs-and-migration-guide/erc-1155-migration-guide) for specific instructions.

Thank you for trusting us with your NFT collection and for being part of our journey in Web3. While it’s tough to say goodbye, we want to make sure you can continue managing and staying connected with your project even after HeyMint shuts down.

To start migrating your collection, please head over to launchpad.heymint.xyz and follow the steps to export your assets and move them to a new IPFS host.

Please note: depending on the size of your files and metadata, there may be additional costs when uploading to a different IPFS provider.

### Step 1. Choose the collection you wish to migrate

<figure><img src="/files/E3swCxPHU3w5fYMvryu1" alt=""><figcaption><p>Choose the collection you wish to migrate</p></figcaption></figure>

From your Launchpad dashboard, select the project or collection you'd like to begin migrating.

Keep in mind: migration only applies to projects that have been **deployed to the blockchain** (mainnet or testnet) **and** are currently using HeyMint’s IPFS hosting for their images and metadata.

If your project is already using your own IPFS host, there’s no need to take action - your assets won’t be affected by the shutdown.

### Step 2. Access the Export Collection feature

In your Launchpad dashboard, head to the left-hand sidebar and click on **Export Collection**. This option will only be visible if your project has been deployed to the blockchain.

When starting the export, please keep the browser tab open to avoid any interruptions while your files are downloading and updating.

### Step 3. Download your collection’s artwork / images.

<figure><img src="/files/jn6hvEk4HA2MJWKcxZDc" alt=""><figcaption><p>Download Collection Images</p></figcaption></figure>

Start by selecting the first action: **Download collection images.** Follow the on-screen prompt and choose a folder on your computer where the images will be saved. Once the download is complete, double-check your local folder to make sure everything came through.

{% hint style="info" %}
Note: For ERC-721A collections created using Token Flow, cloned images will only be downloaded once since they share the same filename. Don’t worry—this won’t affect your migration process in any way.
{% endhint %}

### Step 4. Upload your collection’s artwork / images to your chosen IPFS host

<figure><img src="/files/NqRJ1Wz2dioO3BipFWeT" alt=""><figcaption><p>Pinata Folder Upload</p></figcaption></figure>

After confirming that your images have been successfully downloaded, go ahead and upload them to the IPFS host of your choice - such as [Storacha](https://console.storacha.network/), [Pinata](https://pinata.cloud/), or [Web3.Storage](https://web3.storage/).

{% hint style="warning" %}
Just a quick note: depending on the size of your collection, your chosen IPFS provider may charge for additional storage (see below for more info).
{% endhint %}

<details>

<summary>Web3 IPFS Storage Recommendations and Pricing (As of April 10th, 2025)</summary>

[**Web3.Storage**](https://web3.storage/pricing/) *(also known as Storacha Cloud)*

* **Starter – Free (credit card required)**\
  • 5GB storage\
  • 5GB egress/month\
  • $0.15/GB for extra storage or egress
* **Lite – $10/month**\
  • 100GB storage\
  • 100GB egress/month\
  • $0.05/GB for extras
* **Business – $100/month**\
  • 2TB storage\
  • 2TB egress/month\
  • $0.03/GB for extras

***

[**Pinata.cloud**](https://pinata.cloud/)

* **Free** *(no card info needed, as of now)*\
  • 1GB total storage (up to 500 files)\
  • 10GB bandwidth/month\
  • 1 gateway, 1 workspace member
* **Picnic – $20/month**\
  • 1TB storage\
  • 500GB bandwidth\
  • Unlimited files\
  • 1 gateway + CDN (additional gateways: $5 each)\
  • 3 workspace members\
  • $0.07/GB for extra storage

***

[**NFT.Storage**](https://nft.storage/pricing)

* **$4.99/GB one-time fee**\
  • Pay once to store your data forever—great for long-term archiving

</details>

<details>

<summary>Storacha Upload Guide</summary>

Here’s how to proceed on Storacha:

1. After registering and creating your space, upload the folder that contains your downloaded assets.
   * For **721A projects using art-gen**, you'll be prompted to select the folder where the files were saved.
   * For **721A (Token Flow)** and **1155 projects**, your download will come as a ZIP file. Be sure to **unzip** it before uploading to your IPFS host.
2. Once the upload is complete, copy the **CID** provided.\
   The CID is a unique string (usually starting with `bafyxxxxxx`) that serves as a digital fingerprint for your uploaded content. It allows anyone to locate and access your files through IPFS gateways.

You can use gateways like [ipfs.io](http://ipfs.io) or [w3s.link](http://w3s.link) to view your uploaded assets using the CID, as shown in the examples below.

<figure><img src="/files/M168aBUIDn7TtCYls4E5" alt=""><figcaption></figcaption></figure>

<figure><img src="/files/y3ZLzBiufPD5sKkz7QiU" alt=""><figcaption></figcaption></figure>

Your chosen IPFS host will usually display the CID of your uploaded folder or repository in its dashboard—just like the example below from Storacha.

<figure><img src="/files/PUCxTM7tApBZrb1KqTXo" alt=""><figcaption></figcaption></figure>

To help guide you through this step, we've included a video below showing the process on a Windows setup using a sample 721A art-generated project.

In this [video](https://files.gitbook.com/v0/b/gitbook-x-prod.appspot.com/o/spaces%2FgUBEZKVtA2DMYGTVBbl6%2Fuploads%2FblkJjScjN5AHVw7mCYaV%2FAsset%20upload%20to%20new%20IPFS%20host-clipped.mp4?alt=media\&token=b0954ce1-1d17-4cd6-9552-7e25d4236b43), you'll see how to:

1. Download your images and assets
2. Upload them to a new IPFS host (e.g. Storacha)
3. Copy and save the newly generated CID

</details>

<details>

<summary>Pinata Upload Guide</summary>

### Logging into Pinata

1. Go to Pinata and create an account: <https://app.pinata.cloud/>

<figure><img src="/files/Drzhkd95hUEwJaEXrcU1" alt=""><figcaption></figcaption></figure>

### Uploading art or metadata files & getting CID

{% hint style="danger" %}
**Note**: Art & metadata files should be uploaded **separately** using these steps.
{% endhint %}

1. Click the '+ Add' button, then select 'Folder Upload'.<br>

   <figure><img src="/files/4RvNGpiuqqNOdW2w0koG" alt=""><figcaption></figcaption></figure>
2. Enter the name, then click 'Upload'.<br>

   <figure><img src="/files/9Zju72rz72S7Pl82JNNv" alt=""><figcaption></figcaption></figure>
3. Once it finishes the upload, a new CID will be displayed next to the name. Copy the CID for pasting into Launchpad:

<figure><img src="/files/ANFaHsOjYIjZKzBXGn6P" alt=""><figcaption></figcaption></figure>

</details>

### Step 5. Update your new image CID

<figure><img src="/files/hhiPqgYRSZBgLYDCznWU" alt=""><figcaption><p>Update your new image CID</p></figcaption></figure>

After uploading your images to your chosen IPFS host, copy the **CID** (Content Identifier) and paste it into the **“CID for image files”** input box in your Launchpad dashboard. It should look something like this: `bafyxxxxxxx` (with the "x" being random characters). Once entered, click **Save image CID**.

{% hint style="info" %}

* *Make sure to select the correct **Media format** for the files you uploaded before saving.*
* **If your project doesn’t include animations**, you can leave the animation CID field blank and continue with the rest of the process.
  {% endhint %}

### Step 6. Process and update your collection’s metadata with the new image CID

<figure><img src="/files/DVRFCBuaEFkCASjcPyJW" alt=""><figcaption><p>Step 1/3 Update Metadata</p></figcaption></figure>

Next, go to **“Process and download the updated metadata with new image URI”** and click **“Update Metadata.”**

This step may take a little time - it will gather your collection’s existing metadata and replace the old image links with the new CID you just saved. Once the process is complete, download the updated metadata as a ZIP file.

<figure><img src="/files/edMFfcuYnsVDZ1tWAnWg" alt=""><figcaption><p>Step 2/3 Download ZIP</p></figcaption></figure>

{% hint style="danger" %}
After downloading, please check that the ZIP file is not empty and contains all the updated metadata files (they’ll appear as numbered files without a file extension).
{% endhint %}

<figure><img src="/files/jxsycV1g1pHYR649Gug8" alt=""><figcaption></figcaption></figure>

<figure><img src="/files/VUJxwSRkKjDVRlFoQ02g" alt=""><figcaption></figcaption></figure>

If you'd like to double-check that the image and animation URLs in the metadata have been updated correctly, you can drag any of the metadata files into your browser to view its contents. See the example below for a comparison.

In the original metadata, you’ll see a different CID in the `image` field:\
`bafybeibxq6bezazq2iwdhk5p23fwsllbz6372kvulabouxmsuwv35k2gbm`

<figure><img src="/files/33YFh3RcfYdgK8QifvIK" alt=""><figcaption><p>Original metadata</p></figcaption></figure>

In the updated metadata generated by the migration tool, you'll see that it now uses the CID you saved earlier:\
`bafybeihwusrv4unp3mxdncfhg6rikbtasjprcy4kndhniwnldjofnkhyba`

<figure><img src="/files/5ojE8VbOsHPf7WbKscvu" alt=""><figcaption><p>Updated metadata</p></figcaption></figure>

### **Step 7. Upload the updated metadata files to your chosen IPFS host**

<figure><img src="/files/NqRJ1Wz2dioO3BipFWeT" alt=""><figcaption><p>Step 3/3 Upload your metadata files to IPFS using a pinning service</p></figcaption></figure>

Once you’ve confirmed the updated metadata files are complete, head over to your chosen IPFS provider and upload all the files **together in one folder**. This will generate a new **CID for your metadata**, which you'll copy and use in the final step.

We've included a video walkthrough below that covers this step (along with Step 6), shown using a Windows setup. The process is the same for both 721A and 1155 projects, so you can follow along regardless of your collection type.

{% embed url="<https://files.gitbook.com/v0/b/gitbook-x-prod.appspot.com/o/spaces%2FgUBEZKVtA2DMYGTVBbl6%2Fuploads%2FY1pc7PsbKotnmCUOyagQ%2FMetadata%20updater%20and%20IPFS%20upload%20-%20Made%20with%20Clipchamp.mp4?alt=media&token=440f3bae-d596-4380-8d10-0cf89928c8a2>" %}

{% file src="/files/Grno6MYX3Nrkw1wS8n6u" %}

In this example, the CID provided after uploading the updated metadata is:\
[**bafybeihzx37ul3oucta45yb2paxqesloa66lccs6liamydsi45hw5feqlm**](https://bafybeihzx37ul3oucta45yb2paxqesloa66lccs6liamydsi45hw5feqlm.ipfs.w3s.link/ipfs/bafybeihzx37ul3oucta45yb2paxqesloa66lccs6liamydsi45hw5feqlm)

You can view the contents of this CID here:\
<https://bafybeihzx37ul3oucta45yb2paxqesloa66lccs6liamydsi45hw5feqlm.ipfs.w3s.link/>

### Step 8. Update your collection’s metadata on-chain

Now that you have your new metadata CID, head back to your dashboard and input the updated IPFS URI. The format should be:

```
ipfs://<your CID here>/
```

For this example, it would be:

```
ipfs://ipfs:bafybeihzx37ul3oucta45yb2paxqesloa66lccs6liamydsi45hw5feqlm/
```

<figure><img src="/files/bddBKq0Hn7OmtZxYaDDu" alt=""><figcaption></figcaption></figure>

Click **Validate & Save**, and once everything checks out, you’ll be prompted to sign a transaction through MetaMask. This will update your collection’s metadata on the blockchain.

You can refer to the video below to see how the update process works and how to confirm that the metadata has been successfully changed.

Here are the details of the test collection used in the recording:

1. OpenSea (Testnet) collection link: <https://testnets.opensea.io/collection/yababoo>
2. Project contract on Sepolia: <https://sepolia.etherscan.io/address/0xb90938d30c0f450e9b35bfc66e1e2c8374767bbc>

{% embed url="<https://files.gitbook.com/v0/b/gitbook-x-prod.appspot.com/o/spaces%2FgUBEZKVtA2DMYGTVBbl6%2Fuploads%2FXDnHe0lkyb1EH36VktSF%2FUpdate%20metadata%20in%20blockchain%20-%20Made%20with%20Clipchamp.mp4?alt=media&token=e00c0597-aba2-43ed-922a-0a6f553f8742>" %}

{% file src="/files/S3uaCfGOyqIexzvkoS93" %}

You can also confirm if the update was successful by checking your project through a blockchain explorer.

In our example, the project is deployed on **Sepolia (Ethereum)**, so we'll use [sepolia.etherscan.io](https://sepolia.etherscan.io) as the explorer.

Here’s how to check:

1. In the sidebar, click **Smart Contract**
2. Under the **Overview** tab, click the **Contract Address.** Make sure your contract is marked as **Verified**

   If it’s not, you’ll need to click **Verify Now** and complete the verification before continuing<br>

   <figure><img src="/files/qApmtaZZyWyK6vBxQxVm" alt=""><figcaption></figcaption></figure>
3. In the blockchain explorer, click on the **Contract** tab, then select **Read as Proxy**.

   > Note: This option will only appear if your contract has been verified. If you don’t see it, please go back and complete the verification step first.

<figure><img src="/files/xltukaLtCxqLc7FDDMNV" alt=""><figcaption></figcaption></figure>

4. Scroll through the available methods and look for either:

   * **`tokenURI`** – for 721A projects
   * **`uri`** – for 1155 projects

   Click on the appropriate method, enter the token ID you want to check (e.g. `1`), and click **Query**. The current metadata URI for that token will appear below.\ <br>

<figure><img src="/files/k8cAn5BRmeYee1jZsyNO" alt=""><figcaption><p><strong>For 721A projects:</strong><br>Using the <code>tokenURI</code> method, the expected result should follow this format:<br><code>ipfs://&#x3C;cid>/&#x3C;token ID></code><br>For example:<br><code>ipfs://bafybeihzx37ul3oucta45yb2paxqesloa66lccs6liamydsi45hw5feqlm/1</code> <br>You can view a sample contract here:<br><a href="https://sepolia.etherscan.io/address/0xb90938d30C0F450e9b35BFc66e1e2c8374767bBC#readProxyContract">https://sepolia.etherscan.io/address/0xb90938d30C0F450e9b35BFc66e1e2c8374767bBC#readProxyContract</a></p></figcaption></figure>

You can also check out the video below, which walks through the steps above using a 721A project. The process is nearly the same for 1155 projects—the only difference is that you'll use the **`uri`** method instead of **`tokenURI`**.

{% embed url="<https://files.gitbook.com/v0/b/gitbook-x-prod.appspot.com/o/spaces%2FgUBEZKVtA2DMYGTVBbl6%2Fuploads%2FIw6mRKmAAG4JytUQl7wx%2FChecking%20change%20in%20URI%20through%20blockchain%20explorer%20-%20Made%20with%20Clipchamp.mp4?alt=media&token=f929c605-b840-4e09-971f-60de6acdf97b>" %}

{% file src="/files/X8tUIaJC3EpzkugyW0qh" %}

Once you've completed all the steps and confirmed that your metadata URI now points to your own IPFS host, your migration is officially complete. You've successfully exported your project's metadata and assets to a location you fully control.

### Step 9. Make sure your NFT appears correctly on marketplaces

After you changed the token URI, make sure to go to one of the marketplaces, refresh metadata of one of the NFTs, and make sure it still displays correctly.&#x20;

***

## You're All Set!

Once you've completed all 9 steps, your collection will be updated and ready to go with its new image and metadata CIDs. Your smart contract remains on-chain and fully functional - HeyMint was just the launchpad, and your project lives on.

If you run into any issues or have questions along the way, feel free to reach out to us at <hey@heymint.xyz>. We'll continue to support users until our closure, but please note that response times may be a bit slower than usual as we operate at limited capacity.

Thank you again for being part of HeyMint 💜


# ERC-1155 Migration Guide

### Step 1. Choose the collection you wish to migrate

From your Launchpad dashboard, select the project or collection you’d like to begin migrating.

<figure><img src="/files/hoRQYvrv8VTJQVj1MZEk" alt=""><figcaption></figcaption></figure>

Please note: migration is only applicable for projects that were **deployed to the blockchain** (mainnet or testnet) **and** are currently using **HeyMint’s IPFS hosting**.

*If your project uses your own IPFS for images and metadata, there’s no need to migrate—it won’t be affected by the shutdown.*

While this guide focuses on 1155 projects, some minor steps may differ depending on your collection type. But don’t worry—the overall process remains the same. Also, please make sure **not to close your browser tab** during any part of the migration to avoid interruptions when files are downloading or updating.

### Step 2. Access the Export Collection feature

In your Launchpad dashboard, click on **Export Collection** from the left-hand sidebar.

<figure><img src="/files/GXMIRbksuhpHsbiUMIa5" alt=""><figcaption></figcaption></figure>

*Note: This option will only appear if your project has been deployed to the blockchain (either on mainnet or testnet).*

### Step 3. Download your collection’s artwork / images

Start by clicking on **Download collection images**. Follow the prompt to choose the folder where the files will be saved. Once the download is complete, check your local directory to make sure all files are there.

<figure><img src="/files/f4QmC42DFwmaj6Yl4JbR" alt=""><figcaption></figcaption></figure>

#### Please keep the following in mind:

1. **ERC-1155 projects** may include a variety of file types based on what was uploaded—such as `.jpg`, `.png`, or `.gif`. The downloaded files will be named according to their Token IDs.
2. If your project doesn’t include any uploaded animations, the **“Download animations”** button will not be visible.

### Step 4. Upload your collection’s artwork, images, or animations to your chosen IPFS host

Once you’ve confirmed that your images have been successfully downloaded, the next step is to upload them to your preferred IPFS hosting provider—such as [Storacha](https://console.storacha.network/), [Pinata](https://pinata.cloud/), or [Web3.Storage](https://web3.storage/).

Please note: depending on the size of your collection, some providers may charge for additional storage.

For this guide, we’ll be using **Storacha** as the example IPFS host. While the upload process may look slightly different on other platforms, the important part—retrieving your **CID (Content Identifier)**—will be the same.

**Important:**\
If your project includes both **images and animations**, upload them separately. Each should be saved and handled using its own unique CID.

Here’s how to proceed on Storacha:

1. After registering and creating your space, upload the folder that contains your downloaded assets.
   * For **721A (Token Flow)** and **1155 projects**, your download will come as a ZIP file. Be sure to **unzip** it before uploading to your IPFS host.
2. Once the upload is complete, copy the **CID** provided.\
   The CID is a unique string (usually starting with `bafyxxxxxx`) that serves as a digital fingerprint for your uploaded content. It allows anyone to locate and access your files through IPFS gateways.

You can use gateways like [ipfs.io](http://ipfs.io) or [w3s.link](http://w3s.link) to view your uploaded assets using the CID, as shown in the examples below.

<figure><img src="/files/M168aBUIDn7TtCYls4E5" alt=""><figcaption></figcaption></figure>

<figure><img src="/files/y3ZLzBiufPD5sKkz7QiU" alt=""><figcaption></figcaption></figure>

Your chosen IPFS host will usually display the CID of your uploaded folder or repository in its dashboard—just like the example below from Storacha.

<figure><img src="/files/PUCxTM7tApBZrb1KqTXo" alt=""><figcaption></figcaption></figure>

To help guide you through this step, we've included a video below showing the process on a Windows setup using a sample 721A art-generated project.

In this video, you'll see how to:

1. Download your images and assets
2. Upload them to a new IPFS host (e.g. Storacha)
3. Copy and save the newly generated CID

{% embed url="<https://files.gitbook.com/v0/b/gitbook-x-prod.appspot.com/o/spaces%2FgUBEZKVtA2DMYGTVBbl6%2Fuploads%2FblkJjScjN5AHVw7mCYaV%2FAsset%20upload%20to%20new%20IPFS%20host-clipped.mp4?alt=media&token=b0954ce1-1d17-4cd6-9552-7e25d4236b43>" %}

{% file src="/files/6mfKedbeZkfiKmKV4cbT" %}

### Step 5. Update the new image CID

After uploading your images to your new IPFS host, copy the CID and paste it into the **“CID for image files”** field in your dashboard. Then click **Save image CID** (or **Save animation CID**, if applicable).

Make sure you select the correct **Media format** (such as PNG, JPG, MP4, etc.) based on the files you've uploaded.

A few things to keep in mind:

1. **If your project doesn't include animations**, you can leave the animation CID field blank and continue with the rest of the steps.

   <figure><img src="/files/j3HP1AztcdvcwJGLLZiU" alt=""><figcaption></figcaption></figure>

2. **For 1155 projects**, since the original media formats are used (and may include different file types), you don't need to manually select a media format. Just paste the CID and click **Save**.

<figure><img src="/files/ZuaSSvaerAgSvopfH8do" alt=""><figcaption></figcaption></figure>

### Step 6. Process and update your collection’s metadata with the new image CID

Once you've saved your new image CID, go to **“Process and download the updated metadata with new image URI”** and click **“Update Metadata.”**

This will generate a fresh set of metadata files, now pointing to your newly uploaded images on IPFS.

For example, if your saved CID is:\
`bafybeihwusrv4unp3mxdncfhg6rikbtasjprcy4kndhniwnldjofnkhyba`\
the updated metadata will reference this in each token’s image field.

<figure><img src="/files/MHvwJWDuvd7ZoZNP0FuB" alt=""><figcaption></figcaption></figure>

This process may take a few moments, as it will gather your collection’s existing metadata (based on the “Current Metadata URI”) and replace the image and animation URLs with the new ones you've just saved.

Once it's complete, you'll be able to **download a ZIP file** containing the updated metadata.

<figure><img src="/files/UCqxEWmQZySEW3NCp6EH" alt=""><figcaption></figcaption></figure>

After the download is complete, double-check that the ZIP file isn’t empty and contains your updated metadata files. These files will be numbered and won’t have file extensions—this is expected.

<figure><img src="/files/KTdjtgAE4khcY60RDaJh" alt=""><figcaption></figcaption></figure>

<figure><img src="/files/N75khBVZM3EG375RN04U" alt=""><figcaption></figcaption></figure>

If you'd like to double-check that the image and animation URLs in the metadata have been updated correctly, you can drag any of the metadata files into your browser to view its contents. See the example below for a comparison.

In the original metadata, you’ll see a different CID in the `image` field:\
`bafybeibxq6bezazq2iwdhk5p23fwsllbz6372kvulabouxmsuwv35k2gbm`

<figure><img src="/files/33YFh3RcfYdgK8QifvIK" alt=""><figcaption><p>Original metadata</p></figcaption></figure>

In the updated metadata generated by the migration tool, you'll see that it now uses the CID you saved earlier:\
`bafybeihwusrv4unp3mxdncfhg6rikbtasjprcy4kndhniwnldjofnkhyba`

<figure><img src="/files/5ojE8VbOsHPf7WbKscvu" alt=""><figcaption><p>Updated metadata</p></figcaption></figure>

### Step 7. Upload the updated metadata files to your chosen IPFS host

Once you've confirmed that the metadata files have been updated, go ahead and upload all of them—in one folder—to your preferred IPFS host.

We've included a video walkthrough below that covers this step (along with Step 6), shown using a Windows setup. The process is the same for both 721A and 1155 projects, so you can follow along regardless of your collection type.

{% embed url="<https://files.gitbook.com/v0/b/gitbook-x-prod.appspot.com/o/spaces%2FgUBEZKVtA2DMYGTVBbl6%2Fuploads%2FY1pc7PsbKotnmCUOyagQ%2FMetadata%20updater%20and%20IPFS%20upload%20-%20Made%20with%20Clipchamp.mp4?alt=media&token=440f3bae-d596-4380-8d10-0cf89928c8a2>" %}

{% file src="/files/Grno6MYX3Nrkw1wS8n6u" %}

In this example, the CID provided after uploading the updated metadata is:\
[**bafybeihzx37ul3oucta45yb2paxqesloa66lccs6liamydsi45hw5feqlm**](https://bafybeihzx37ul3oucta45yb2paxqesloa66lccs6liamydsi45hw5feqlm.ipfs.w3s.link/ipfs/bafybeihzx37ul3oucta45yb2paxqesloa66lccs6liamydsi45hw5feqlm)

You can view the contents of this CID here:\
<https://bafybeihzx37ul3oucta45yb2paxqesloa66lccs6liamydsi45hw5feqlm.ipfs.w3s.link/>

### Step 8. Update your collection’s metadata on-chain

Now that you have your new metadata CID, head back to your dashboard and input the updated IPFS URI. The format should be:

```
ipfs://<your CID here>/
```

For this example, it would be:

```
ipfs://ipfs:bafybeihzx37ul3oucta45yb2paxqesloa66lccs6liamydsi45hw5feqlm/
```

<figure><img src="/files/bddBKq0Hn7OmtZxYaDDu" alt=""><figcaption></figcaption></figure>

Click **Validate & Save**, and once everything checks out, you’ll be prompted to sign a transaction through MetaMask. This will update your collection’s metadata on the blockchain.

You can refer to the video below to see how the update process works and how to confirm that the metadata has been successfully changed.

Here are the details of the test collection used in the recording:

1. OpenSea (Testnet) collection link: <https://testnets.opensea.io/collection/yababoo>
2. Project contract on Sepolia: <https://sepolia.etherscan.io/address/0xb90938d30c0f450e9b35bfc66e1e2c8374767bbc>

{% embed url="<https://files.gitbook.com/v0/b/gitbook-x-prod.appspot.com/o/spaces%2FgUBEZKVtA2DMYGTVBbl6%2Fuploads%2FXDnHe0lkyb1EH36VktSF%2FUpdate%20metadata%20in%20blockchain%20-%20Made%20with%20Clipchamp.mp4?alt=media&token=e00c0597-aba2-43ed-922a-0a6f553f8742>" %}

{% file src="/files/S3uaCfGOyqIexzvkoS93" %}

You can also confirm if the update was successful by checking your project through a blockchain explorer.

In our example, the project is deployed on **Sepolia (Ethereum)**, so we'll use [sepolia.etherscan.io](https://sepolia.etherscan.io) as the explorer.

Here’s how to check:

1. In the sidebar, click **Smart Contract**
2. Under the **Overview** tab, click the **Contract Address.** Make sure your contract is marked as **Verified**

   If it’s not, you’ll need to click **Verify Now** and complete the verification before continuing<br>

   <figure><img src="/files/qApmtaZZyWyK6vBxQxVm" alt=""><figcaption></figcaption></figure>
3. In the blockchain explorer, click on the **Contract** tab, then select **Read as Proxy**.

   > Note: This option will only appear if your contract has been verified. If you don’t see it, please go back and complete the verification step first.

<figure><img src="/files/xltukaLtCxqLc7FDDMNV" alt=""><figcaption></figcaption></figure>

4. Scroll through the available methods and look for either:

   * **`tokenURI`** – for 721A projects
   * **`uri`** – for 1155 projects

   Click on the appropriate method, enter the token ID you want to check (e.g. `1`), and click **Query**. The current metadata URI for that token will appear below.

<figure><img src="/files/3hApDcV3ozzKbgnRotME" alt=""><figcaption><p><strong>For 1155 projects:</strong><br>Using the <code>uri</code> method, the expected result should follow this format:<br><code>ipfs://&#x3C;cid>/{id}</code> <br>No matter which token ID you input, the result will always display <code>{id}</code> as a placeholder.<br>For example:<br><code>ipfs://bafybeia2ac5urmqdxfs2jvld227za4sngntihhf7gnstzoa2rfqy3ixswu/{id}</code> <br>You can view a sample contract here:<br><a href="https://sepolia.etherscan.io/address/0x0a3f884502aECF6b088ECd248E340791b28EeF78#readProxyContract">https://sepolia.etherscan.io/address/0x0a3f884502aECF6b088ECd248E340791b28EeF78#readProxyContract</a></p></figcaption></figure>

You can also check out the video below, which walks through the steps above using a 721A project. The process is nearly the same for 1155 projects—the only difference is that you'll use the **`uri`** method instead of **`tokenURI`**.

{% embed url="<https://files.gitbook.com/v0/b/gitbook-x-prod.appspot.com/o/spaces%2FgUBEZKVtA2DMYGTVBbl6%2Fuploads%2FIw6mRKmAAG4JytUQl7wx%2FChecking%20change%20in%20URI%20through%20blockchain%20explorer%20-%20Made%20with%20Clipchamp.mp4?alt=media&token=f929c605-b840-4e09-971f-60de6acdf97b>" %}

{% file src="/files/X8tUIaJC3EpzkugyW0qh" %}

Once you've completed all the steps and confirmed that your metadata URI now points to your own IPFS host, your migration is officially complete. You've successfully exported your project's metadata and assets to a location you fully control.

### Step 9. Make sure your NFT appears correctly on marketplaces

After you changed the token URI, make sure to go to one of the marketplaces, refresh metadata of one of the NFTs, and make sure it still displays correctly.&#x20;

***

### **Need help or have questions?**

We’re here for you. If you need any assistance or have questions about the platform or migration process, feel free to reach out to us at <hey@heymint.xyz>.

We'll continue to support users until our closure, but please note that response times may be a bit slower than usual as we operate at limited capacity.